What is this product about?
What is this product about?
What is this product about?
VirtuFit enables users to virtually try on clothes and accessories, encouraging them to explore different combinations and discover new styles effortlessly.
VirtuFit enables users to virtually try on clothes and accessories, encouraging them to explore different combinations and discover new styles effortlessly.
VirtuFit enables users to virtually try on clothes and accessories, encouraging them to explore different combinations and discover new styles effortlessly.
What problem is VirtuFit solving?
What problem is VirtuFit solving?
What problem is VirtuFit solving?
Many users face challenges in building complete outfits and visualizing how those outfits will look on them when shopping online.
Many users face challenges in building complete outfits and visualizing how those outfits will look on them when shopping online.
Many users face challenges in building complete outfits and visualizing how those outfits will look on them when shopping online.
What is the impact on businesses and users?
Impact on businesses and users?
What is the impact on businesses and users?
VirtuFit enhances conversion rates, boosts user engagement, and nurtures customer loyalty by allowing users to virtually try on clothes and accessories before making a purchase.
VirtuFit enhances conversion rates, boosts user engagement, and nurtures customer loyalty by allowing users to virtually try on clothes and accessories before making a purchase.
VirtuFit enhances conversion rates, boosts user engagement, and nurtures customer loyalty by allowing users to virtually try on clothes and accessories before making a purchase.
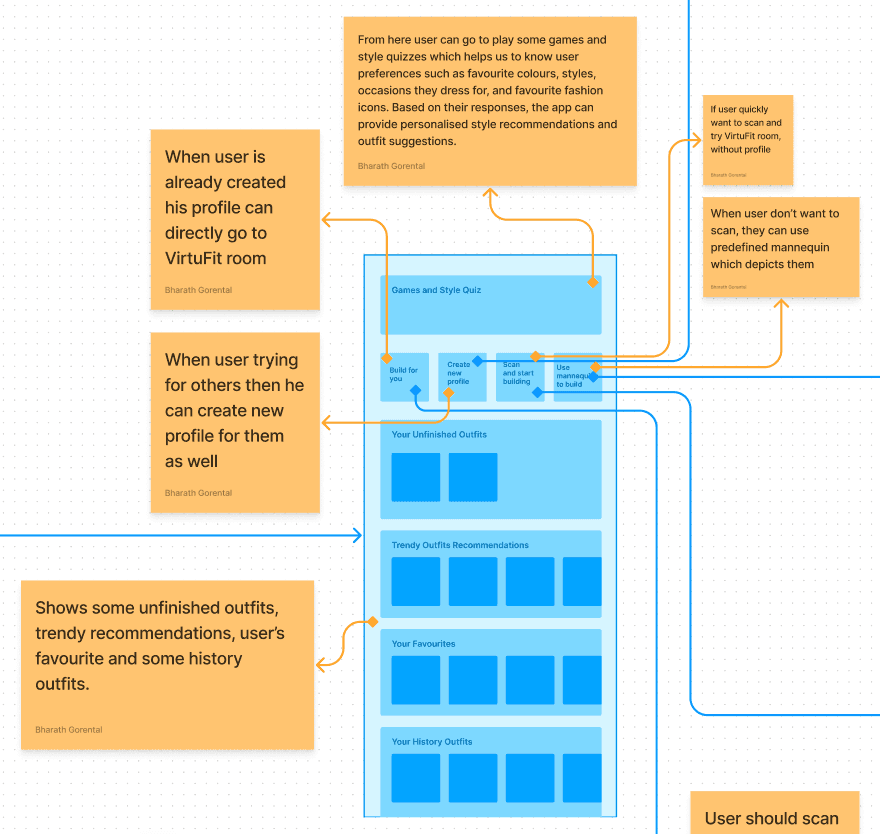
Let me walk you through a brief overview of the final screens to get you started
Let me walk you through a brief overview of the final screens to get you started
Let me walk you through a brief overview of the final screens to get you started
Let's explore multiple use cases for users to achieve their goals
Let's explore multiple use cases for users to achieve their goals
Let's explore multiple use cases for users to achieve their goals
How can users start building an outfit?
How can users start building an outfit?
How can users start building an outfit?

Users can pick from their previously saved outfits.
Users can pick from their previously saved outfits.
Users can pick from their previously saved outfits.
Users can prompt for specific outfit they are looking for.
VirtuFit recommends trendy outfits based on the user's past preferences.
VirtuFit recommends trendy outfits based on the user's past preferences.
VirtuFit recommends trendy outfits based on the user's past preferences.
Users can prompt for specific outfit they are looking for.
Users can prompt for specific outfit they are looking for.

So that users don't have to build an outfit from scratch every time.
So that users don't have to build an outfit from scratch every time.
So that users don't have to build an outfit from scratch every time.
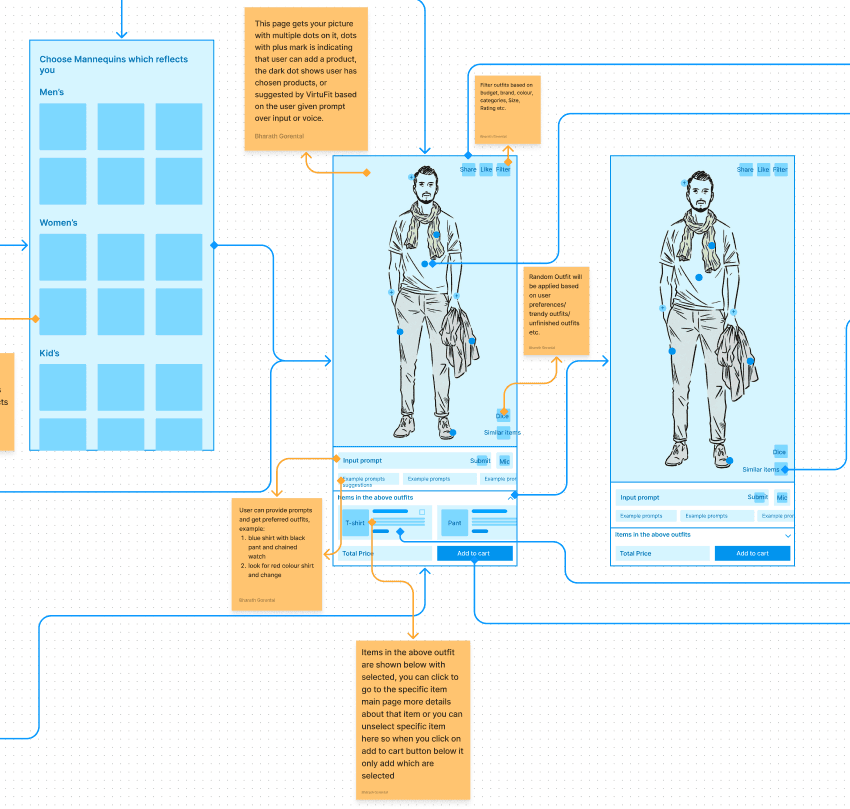
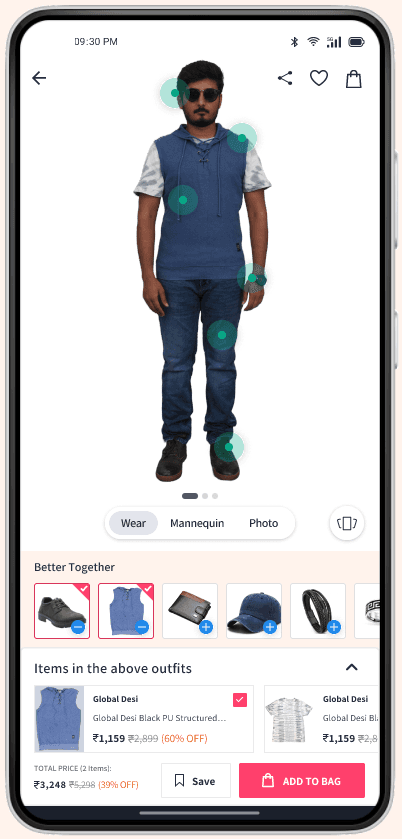
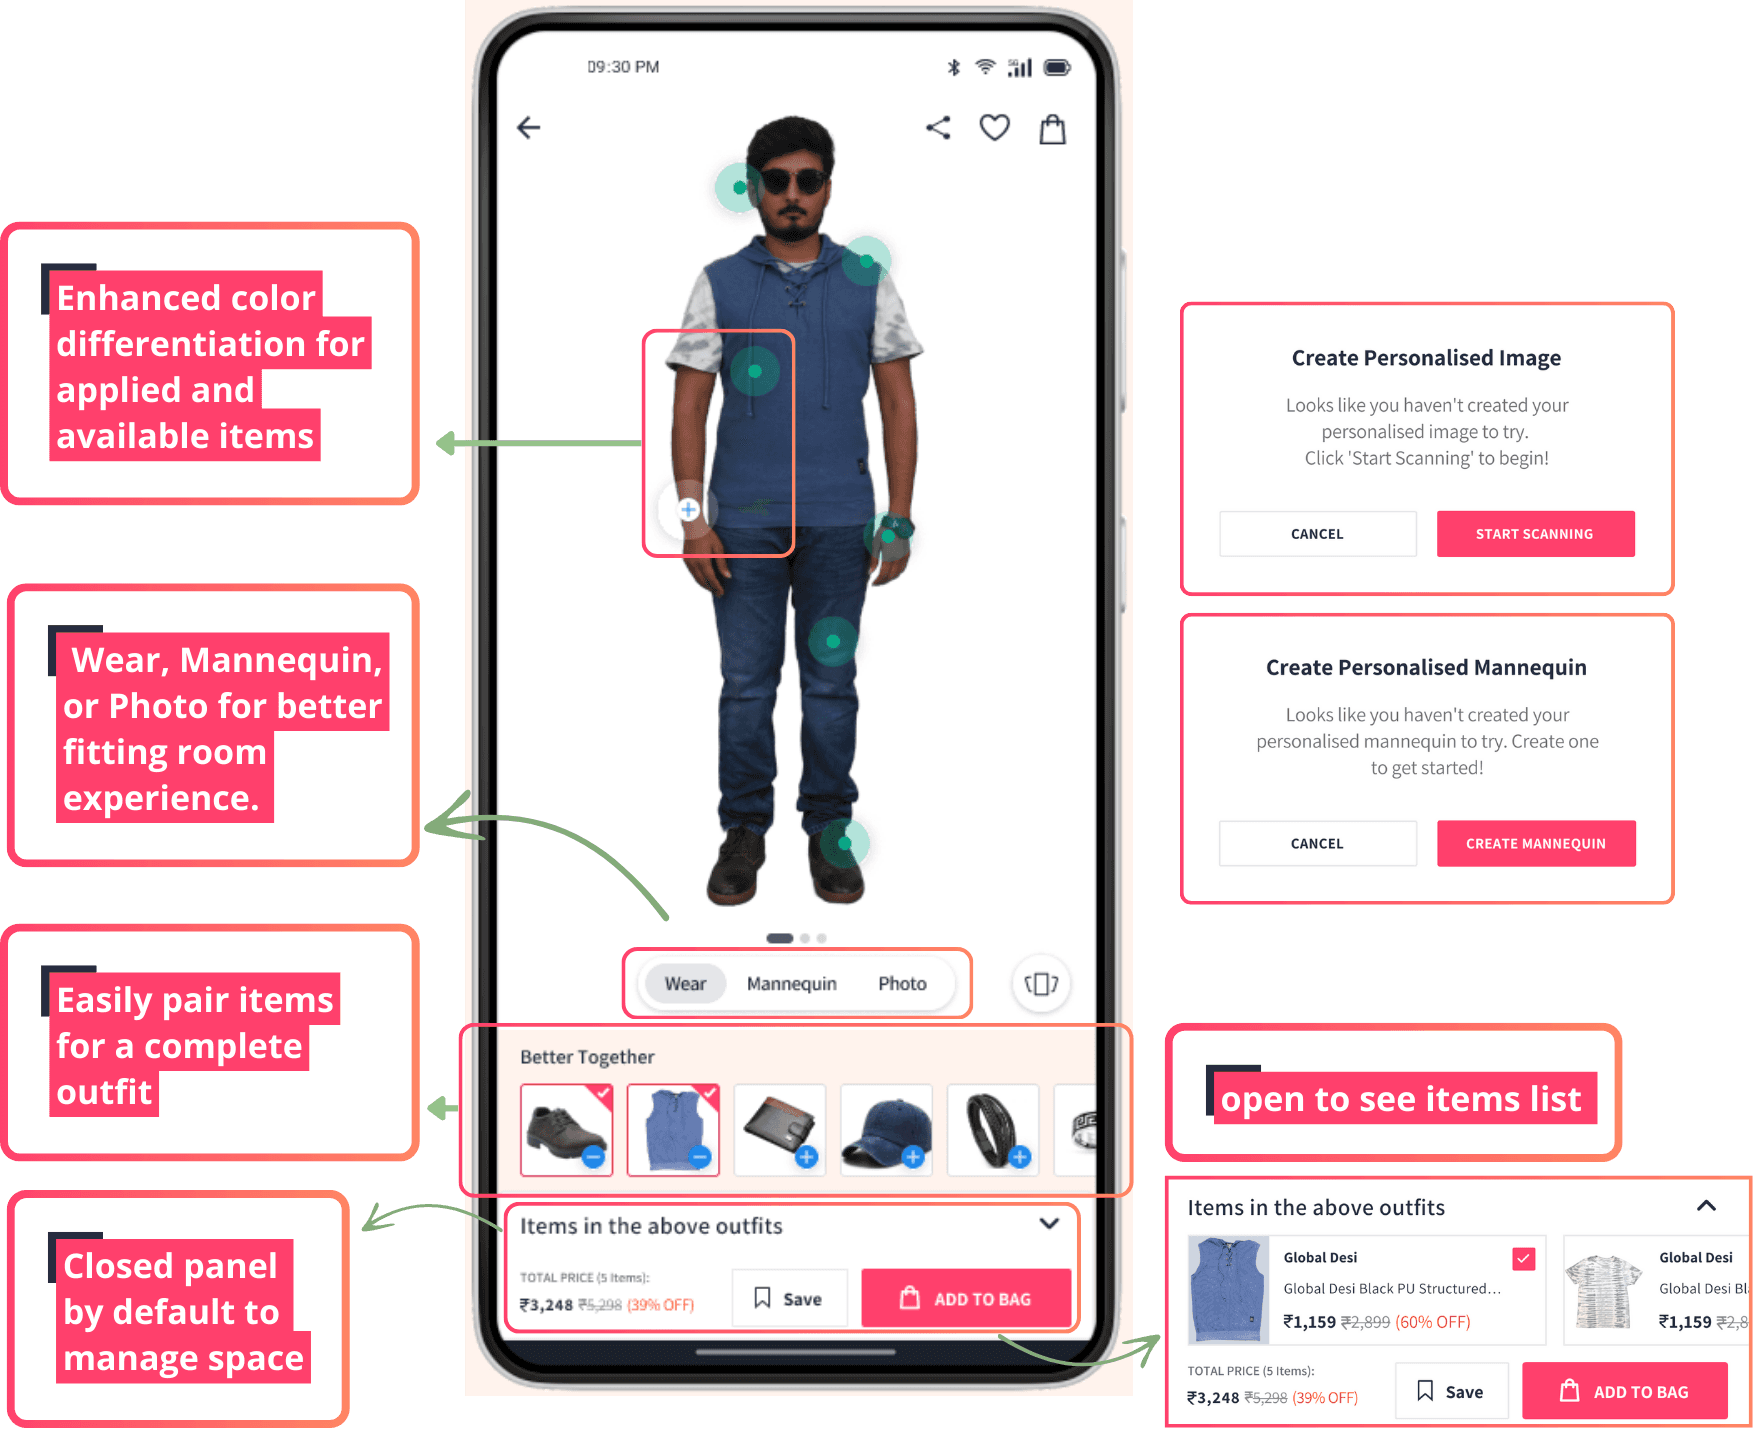
How can users try on outfits in different views?
How can users try on outfits in different views?
Photo: See the outfit in detail.
Photo: See the outfit in detail.
Photo: See the outfit in detail.
Mannequin: See how the outfit looks on a mannequin.
Mannequin: See how the outfit looks on a mannequin.
Mannequin: See how the outfit looks on a mannequin.
Wear: See how the outfit looks on them from different angles.
Wear: See how the outfit looks on them from different angles.
Wear: See how the outfit looks on them from different angles.
Users will have multiple options to view outfits based on their preferences.
Users will have multiple options to view outfits based on their preferences.
Users will have multiple options to view outfits based on their preferences.
How can users try on outfits in different views?
How can users try on outfits using the "Wear" view?
How can users try on outfits using the "Wear" view?
How can users try on outfits using the "Wear" view?
Using the phone's camera, users can scan themselves and virtually try on outfits.
Using the phone's camera, users can scan themselves and virtually try on outfits.
Using the phone's camera, users can scan themselves and virtually try on outfits.
How can users trust that their scan is secure and accurate?
How can users trust that their scan is secure and accurate?
How can users trust that their scan is secure and accurate?
I provided clear privacy details before the scan, assuring them that their scans remain confidential.
I provided clear privacy details before the scan, assuring them that their scans remain confidential.
I provided clear privacy details before the scan, assuring them that their scans remain confidential.
Enhanced usability by providing helpful tips on lighting, positioning, and movement to improve the accuracy of the scan.
Enhanced usability by providing helpful tips on lighting, positioning, and movement to improve the accuracy of the scan.
Enhanced usability by providing helpful tips on lighting, positioning, and movement to improve the accuracy of the scan.
How can users visualize outfits quickly without a full body scan?
How can users visualize outfits quickly without a full body scan?
Users with limited time or privacy concerns can visualise outfits quickly by using the Mannequin option by choosing a mannequin that reflects them
Users with limited time or privacy concerns can visualise outfits quickly by using the Mannequin option by choosing a mannequin that reflects them
Users with limited time or privacy concerns can visualise outfits quickly by using the Mannequin option by choosing a mannequin that reflects them
How can users visualize outfits quickly without a full body scan?
How can users have full control over their data?
How can users have full control over their data?
How can users have full control over their data?
Users can easily retake or delete their scanned results and mannequin information.
Users can easily retake or delete their scanned results and mannequin information.
Users can easily retake or delete their scanned results and mannequin information.
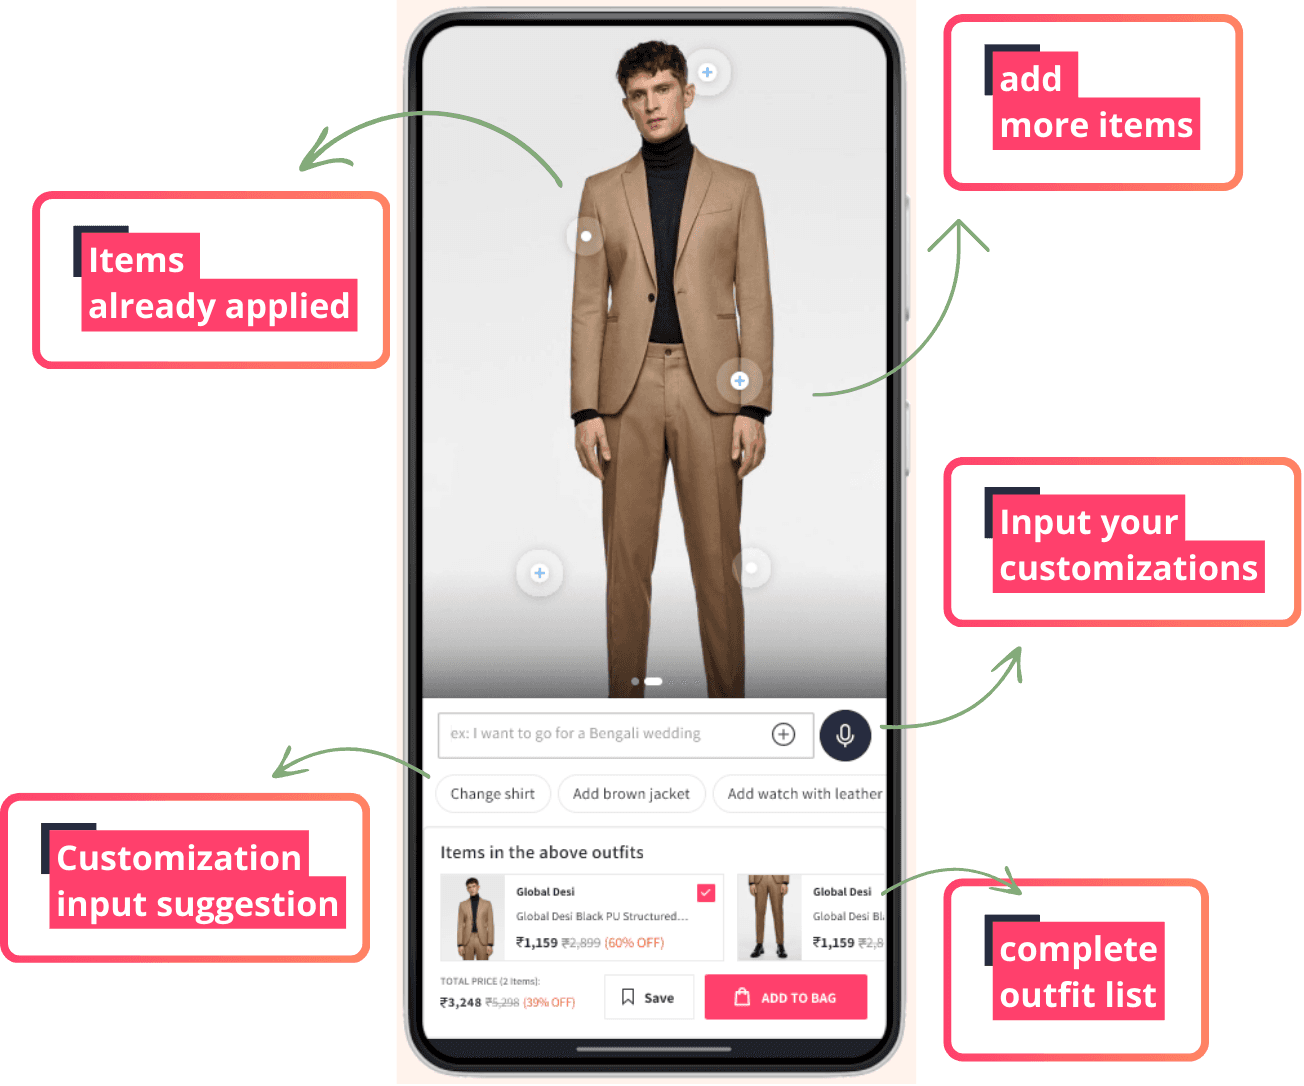
How can users find the right accessories for their outfits?
How can users find the right accessories for their outfits?
VirtuFit suggests complementary accessories with the "Better Together" option.
VirtuFit suggests complementary accessories with the "Better Together" option.
VirtuFit suggests complementary accessories with the "Better Together" option.
VirtuFit suggests combinations that go well together when users try similar items or make outfit changes.
VirtuFit suggests combinations that go well together when users try similar items or make outfit changes.
VirtuFit suggests combinations that go well together when users try similar items or make outfit changes.
Plus icons on specific body parts show users different accessories they can add.
Plus icons on specific body parts show users different accessories they can add.
Plus icons on specific body parts show users different accessories they can add.
How can users find the right accessories for their outfits?
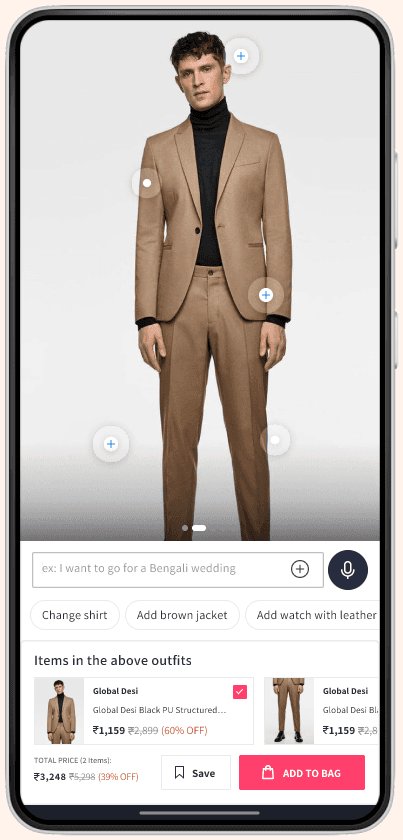
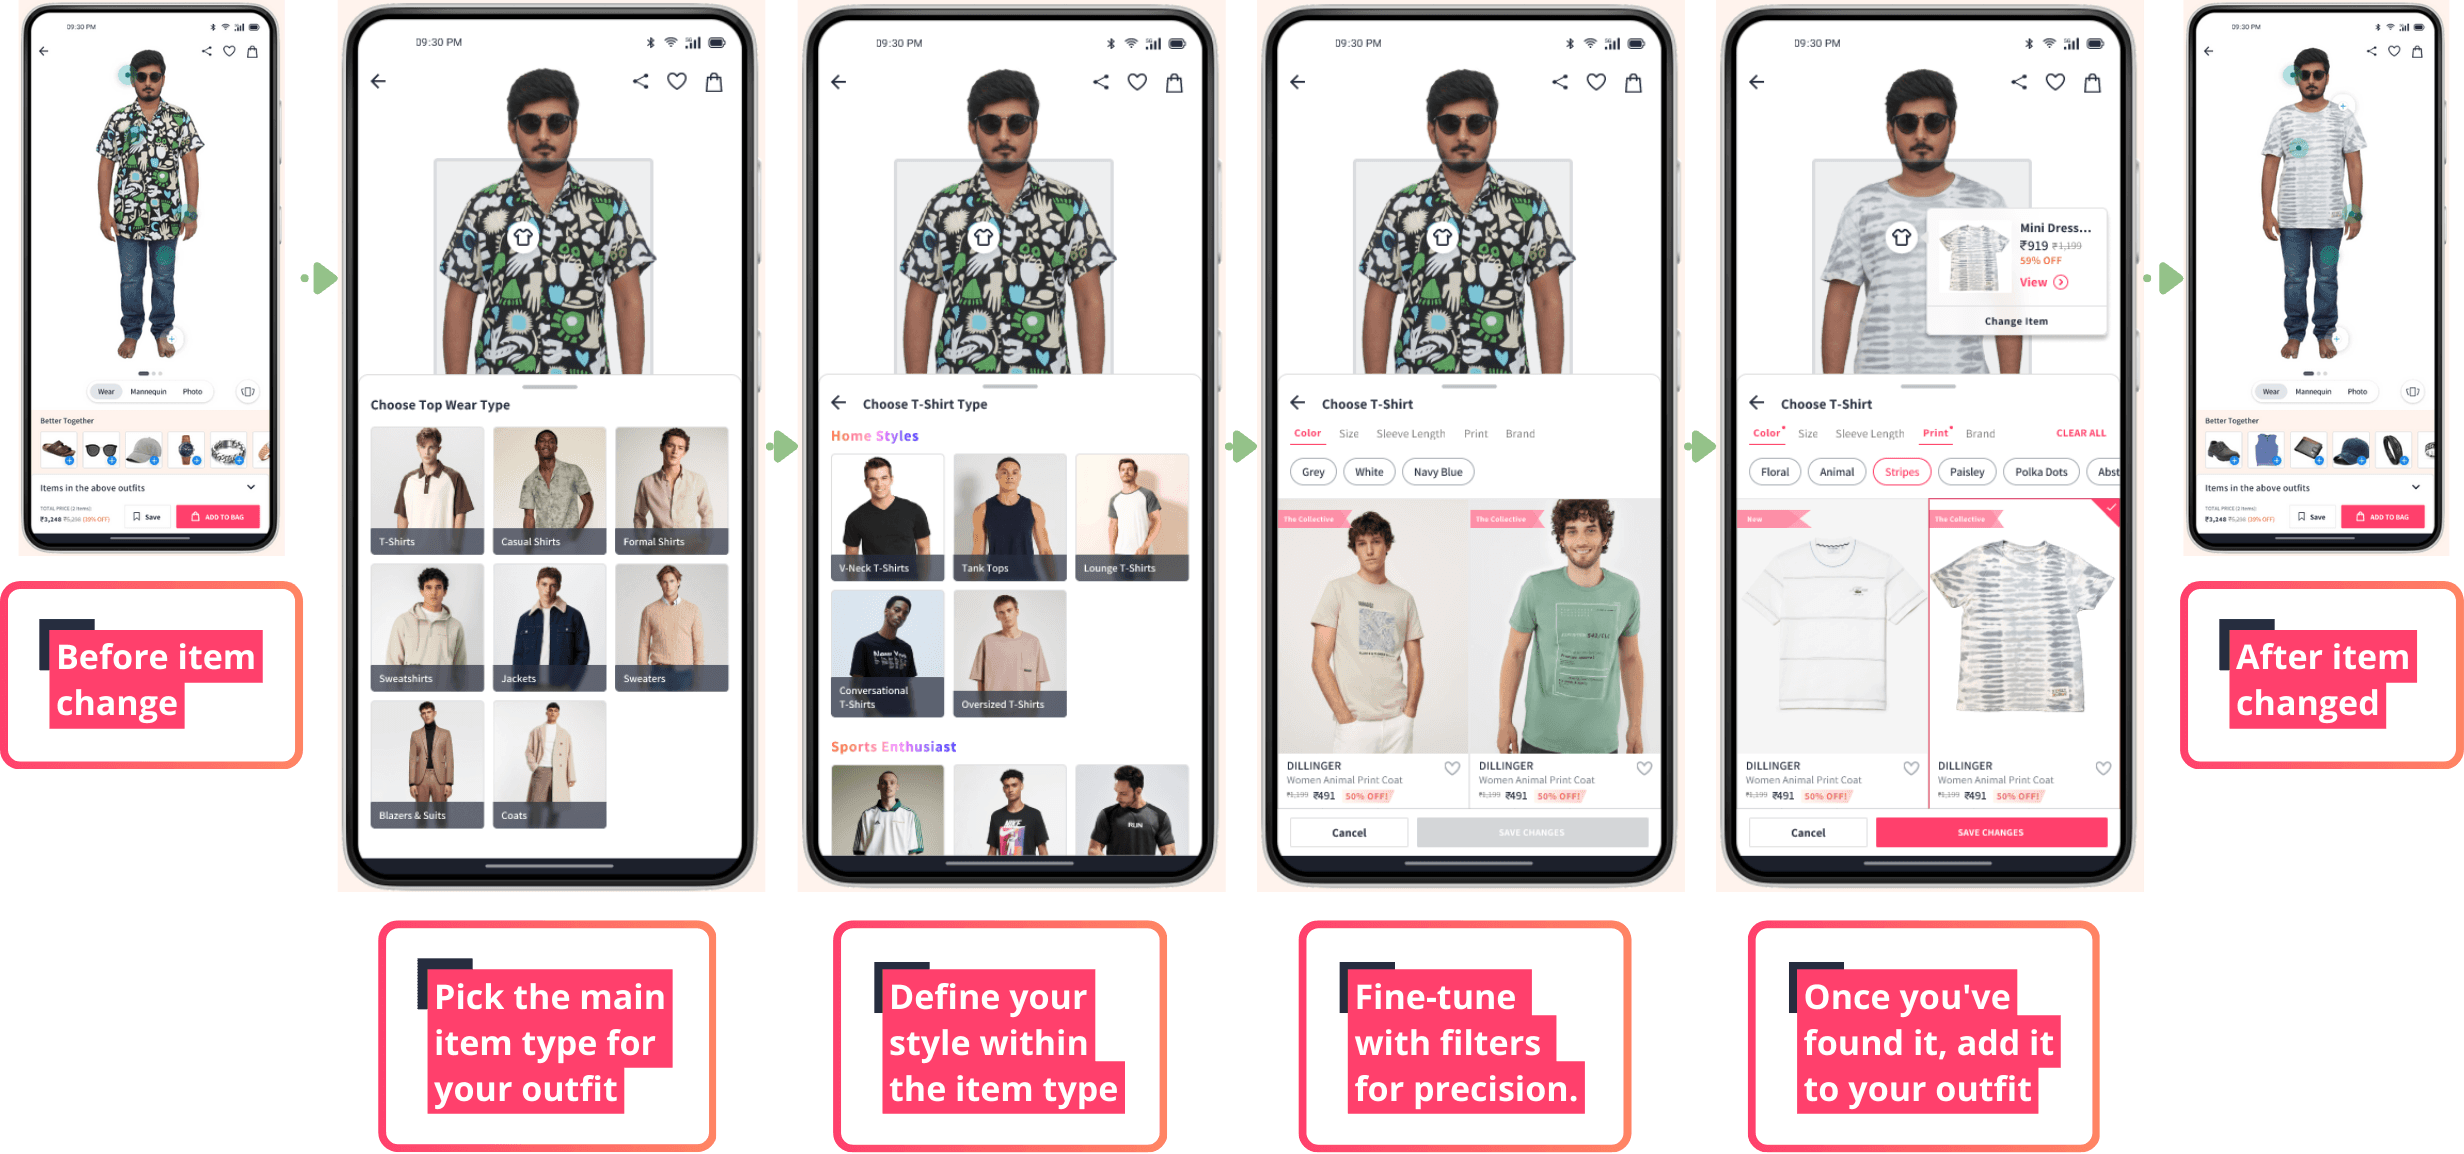
How can users customize their outfits?
How can users customize their outfits?
How can users customize their outfits?
Customise step-by-step: Users can choose the main item, then refine their choice by type and style.
Customise step-by-step: Users can choose the main item, then refine their choice by type and style.
Customise step-by-step: Users can choose the main item, then refine their choice by type and style.
Filter choices: Users can narrow down their choices by color, print, and sleeve length.
Filter choices: Users can narrow down their choices by color, print, and sleeve length.
Filter choices: Users can narrow down their choices by color, print, and sleeve length.
How can users customize their outfits?
How can users customize their outfits?
How can users customize their outfits?
User can explore outfit from all angles with carousel
User can explore outfit from all angles with carousel
User can explore outfit from all angles with carousel
VirtuFit highlights outfit details and suitability to help users feel confident
VirtuFit highlights outfit details and suitability to help users feel confident
VirtuFit highlights outfit details and suitability to help users feel confident
User can see details, reviews, and suggestions for each item on its own page.
User can see details, reviews, and suggestions for each item on its own page.
User can see details, reviews, and suggestions for each item on its own page.
This feature might solve users' problems with virtual fitting rooms, such as inaccurate sizing and unrealistic images.
This feature might solve users' problems with virtual fitting rooms, such as inaccurate sizing and unrealistic images.
This feature might solve users' problems with virtual fitting rooms, such as inaccurate sizing and unrealistic images.
How can users save and organize their outfit inspirations?
How can users save and organize their outfit inspirations?
User can save outfits to wishlist by default on click 'Save' button.
User can save outfits to wishlist by default on click 'Save' button.
User can save outfits to wishlist by default on click 'Save' button.
Also user can Add outfits to specific collections created in the past or on the go.
Also user can Add outfits to specific collections created in the past or on the go.
Also user can Add outfits to specific collections created in the past or on the go.
It helps user to save and organise their favourite looks
It helps user to save and organise their favourite looks
It helps user to save and organise their favourite looks
How can users save and organize their outfit inspirations?
How can users track outfit cost as they shop?
How can users track outfit cost as they shop?
How can users track outfit cost as they shop?
User can see all items in the outfit, with concise details and pricing of each item, at the bottom of the screen
User can see all items in the outfit, with concise details and pricing of each item, at the bottom of the screen
User can see all items in the outfit, with concise details and pricing of each item, at the bottom of the screen
Also they can track the total cost of outfit as they add or remove items.
Also they can track the total cost of outfit as they add or remove items.
Also they can track the total cost of outfit as they add or remove items.

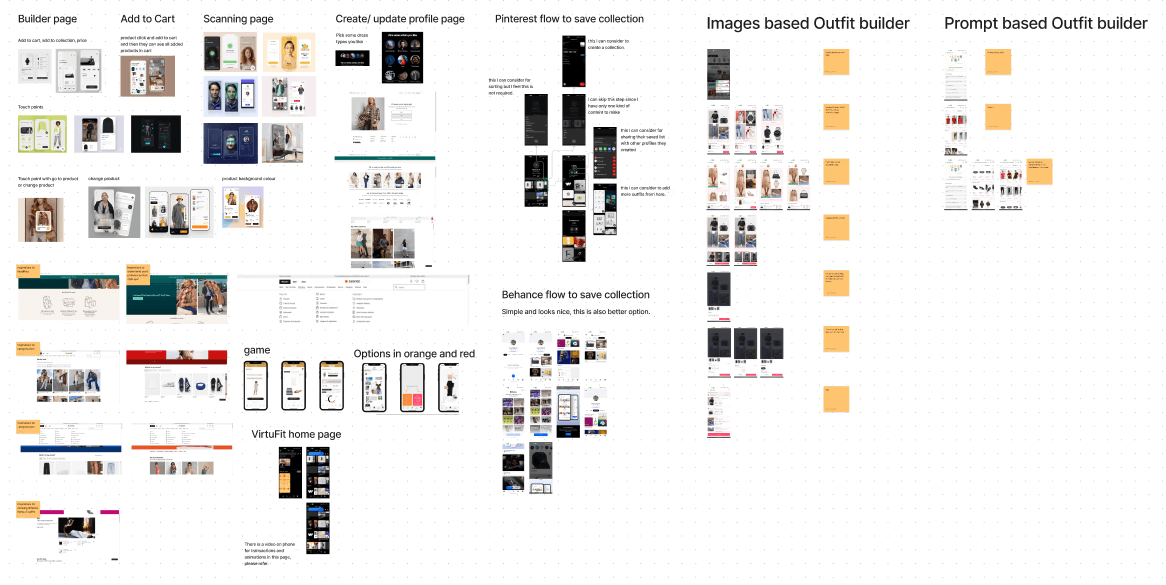
Curious how I crafted VirtuFit?
how I crafted VirtuFit?
Curious how I crafted VirtuFit?

1
1
Exploring mobile app fitting room
Exploring mobile app fitting room
Exploring mobile app fitting room
At the start of the project, I addressed the challenge of introducing users to a mobile app virtual fitting room by researching existing apps. I integrated their successful approaches with my own ideas, due to limited user data available.
At the start of the project, I addressed the challenge of introducing users to a mobile app virtual fitting room by researching existing apps. I integrated their successful approaches with my own ideas, due to limited user data available.
At the start of the project, I addressed the challenge of introducing users to a mobile app virtual fitting room by researching existing apps. I integrated their successful approaches with my own ideas, due to limited user data available.
Gathering creative inspirations
Gathering creative inspirations
Gathering creative inspirations

2
2
Bringing the real world into my creative journey
Bringing the real world into my creative journey
Bringing the real world into my creative journey
While I was working on this creative project, I decided to make it practical by choosing the Myntra app as my canvas. This helped me get a real sense of how things should work. I spent time exploring the app's layout and even built some components and elements like buttons and cards. So When it was time to create my feature, I did it in a way that saved me time and let me focus on the details.
While I was working on this creative project, I decided to make it practical by choosing the Myntra app as my canvas. This helped me get a real sense of how things should work. I spent time exploring the app's layout and even built some components and elements like buttons and cards. So When it was time to create my feature, I did it in a way that saved me time and let me focus on the details.
While I was working on this creative project, I decided to make it practical by choosing the Myntra app as my canvas. This helped me get a real sense of how things should work. I spent time exploring the app's layout and even built some components and elements like buttons and cards. So When it was time to create my feature, I did it in a way that saved me time and let me focus on the details.
Understanding Myntra's design
Understanding Myntra's design
Understanding Myntra's design

3
3
Generating creative ideas
Generating creative ideas
Generating creative ideas
I began with doodles on paper to encourage diverse thinking, seeking numerous concepts to spark innovative solutions.
I began with doodles on paper to encourage diverse thinking, seeking numerous concepts to spark innovative solutions.
I began with doodles on paper to encourage diverse thinking, seeking numerous concepts to spark innovative solutions.
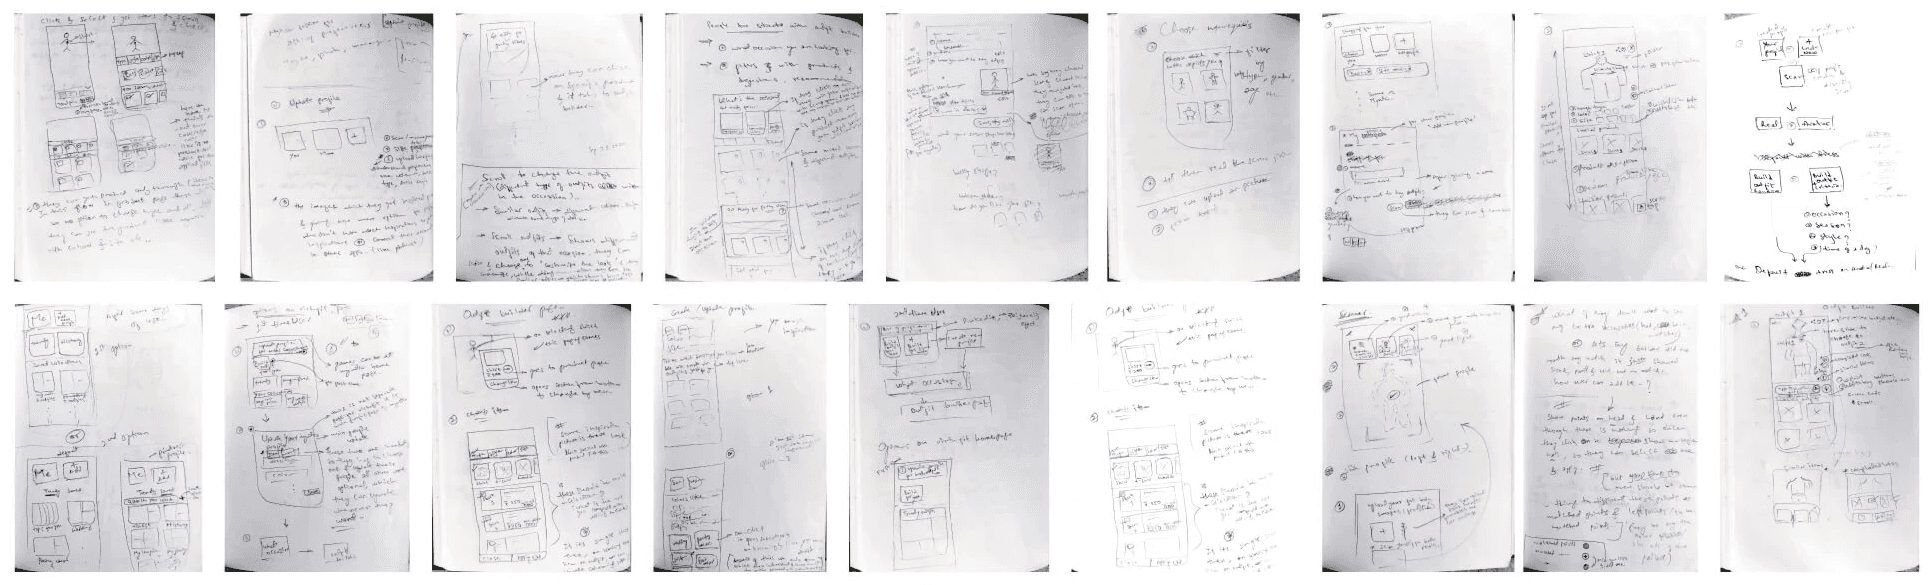
Sample paper wireframes
Sample paper wireframes
Sample paper wireframes
Glimpse at all paper wireframes
Glimpse at all paper wireframes
Glimpse at all paper wireframes
4
4
From doodles to digital
From doodles to digital
From doodles to digital
With my approach of drawing inspiration from diverse sources, I planned for ongoing validation. Initially, I needed to test the early concepts and user flows, which proved challenging with unfamiliar users and rough paper sketches. To overcome this, I tested with peers using clear digital wireframes for better comprehension.
With my approach of drawing inspiration from diverse sources, I planned for ongoing validation. Initially, I needed to test the early concepts and user flows, which proved challenging with unfamiliar users and rough paper sketches. To overcome this, I tested with peers using clear digital wireframes for better comprehension.
With my approach of drawing inspiration from diverse sources, I planned for ongoing validation. Initially, I needed to test the early concepts and user flows, which proved challenging with unfamiliar users and rough paper sketches. To overcome this, I tested with peers using clear digital wireframes for better comprehension.

Sample digital wireframes
Sample digital wireframes
Sample digital wireframes
Glimpse at complete digital wireframes
Glimpse at complete digital wireframes
Glimpse at complete digital wireframes

5
5
Transforming user testing from flop to fantastic
Transforming user testing from flop to fantastic
Transforming user testing from flop to fantastic
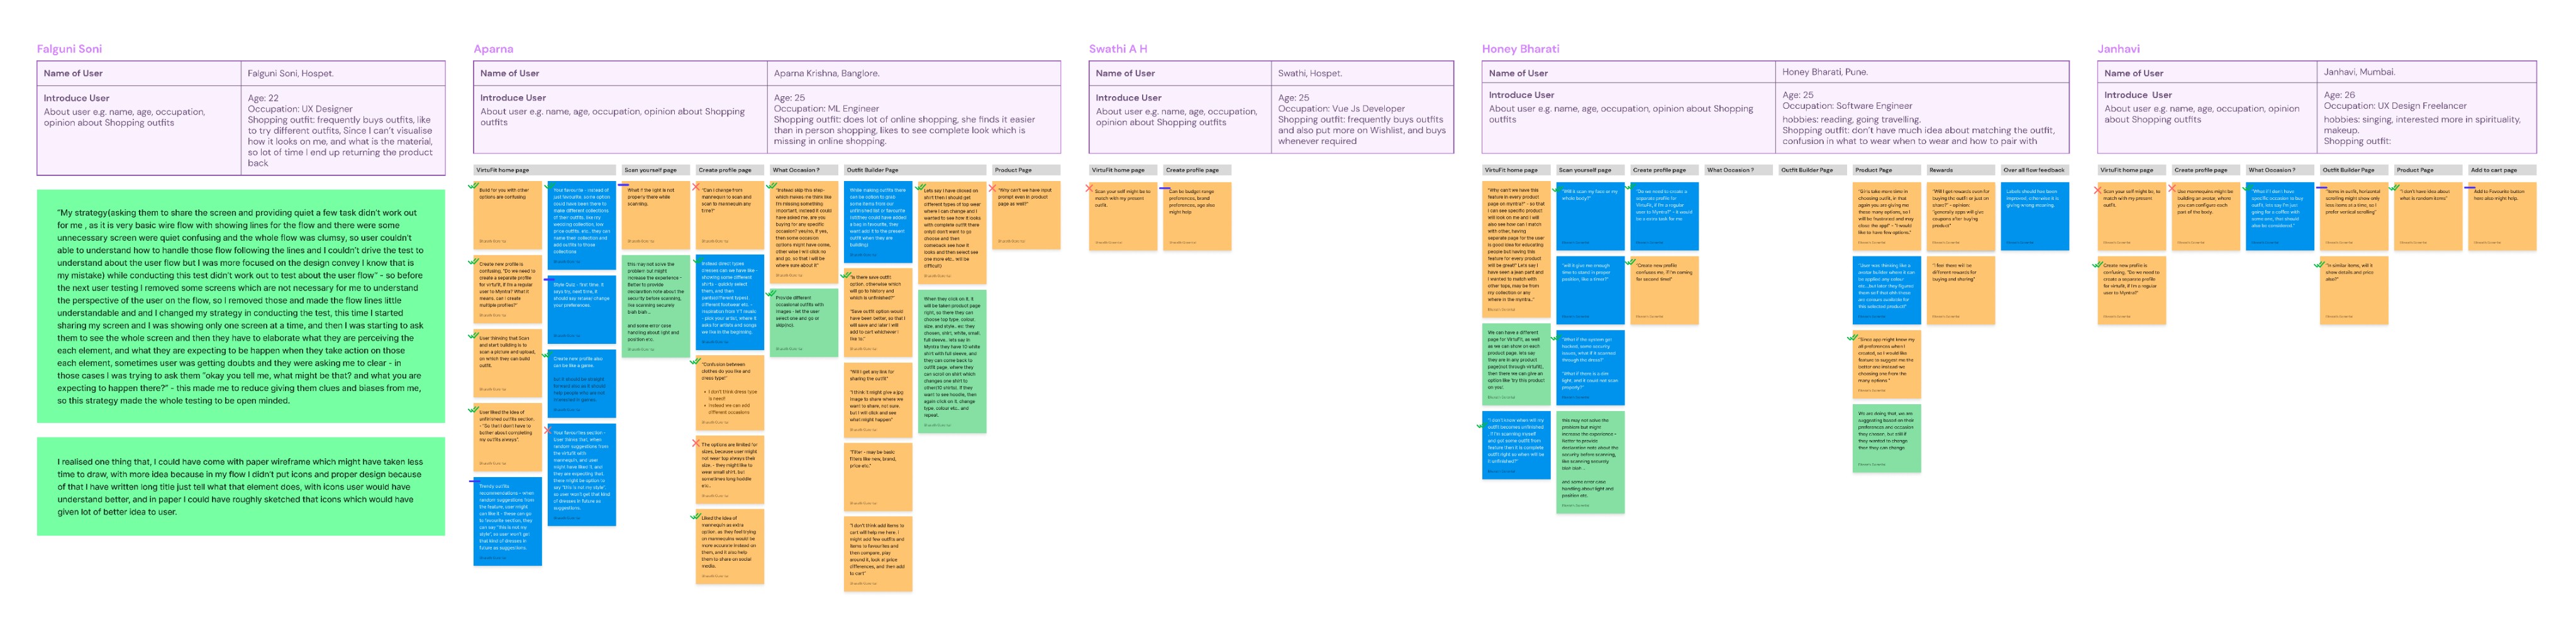
My first user test didn't go as planned. The flow was confusing, and those extra screens? Not a good idea. So, I switched it up. I began sharing one screen at a time, asking users to describe what they see and what they expect. It turned things around, making testing more insightful and enjoyable!
My first user test didn't go as planned. The flow was confusing, and those extra screens? Not a good idea. So, I switched it up. I began sharing one screen at a time, asking users to describe what they see and what they expect. It turned things around, making testing more insightful and enjoyable!
My first user test didn't go as planned. The flow was confusing, and those extra screens? Not a good idea. So, I switched it up. I began sharing one screen at a time, asking users to describe what they see and what they expect. It turned things around, making testing more insightful and enjoyable!
Sample updated wireframes
Sample updated wireframes
Sample updated wireframes

Glimpse at complete updated wireframes
Glimpse at complete updated wireframes
Glimpse at complete updated wireframes
Paper vs. pixels
Paper vs. pixels
Paper vs. pixels
Reflecting on this journey, I realised that in subsequent tests, paper wireframes with icons and rough sketches of UI elements might have saved time and offered clearer insights. While my digital wireframes lacked icons, UI elements and intricate designs, paper sketches with roughly drawn icons could have provided users with a better understanding of the concepts. This was a valuable lesson for future iterations.
Reflecting on this journey, I realised that in subsequent tests, paper wireframes with icons and rough sketches of UI elements might have saved time and offered clearer insights. While my digital wireframes lacked icons, UI elements and intricate designs, paper sketches with roughly drawn icons could have provided users with a better understanding of the concepts. This was a valuable lesson for future iterations.
Reflecting on this journey, I realised that in subsequent tests, paper wireframes with icons and rough sketches of UI elements might have saved time and offered clearer insights. While my digital wireframes lacked icons, UI elements and intricate designs, paper sketches with roughly drawn icons could have provided users with a better understanding of the concepts. This was a valuable lesson for future iterations.

Sample user feedback on wireframes
Sample user feedback on wireframes
Sample user feedback on wireframes
User feedback on wireframes
User feedback on wireframes
User feedback on wireframes
6
6
Unveiling the secrets of fashion choices
Unveiling the secrets of fashion choices
Unveiling the secrets of fashion choices
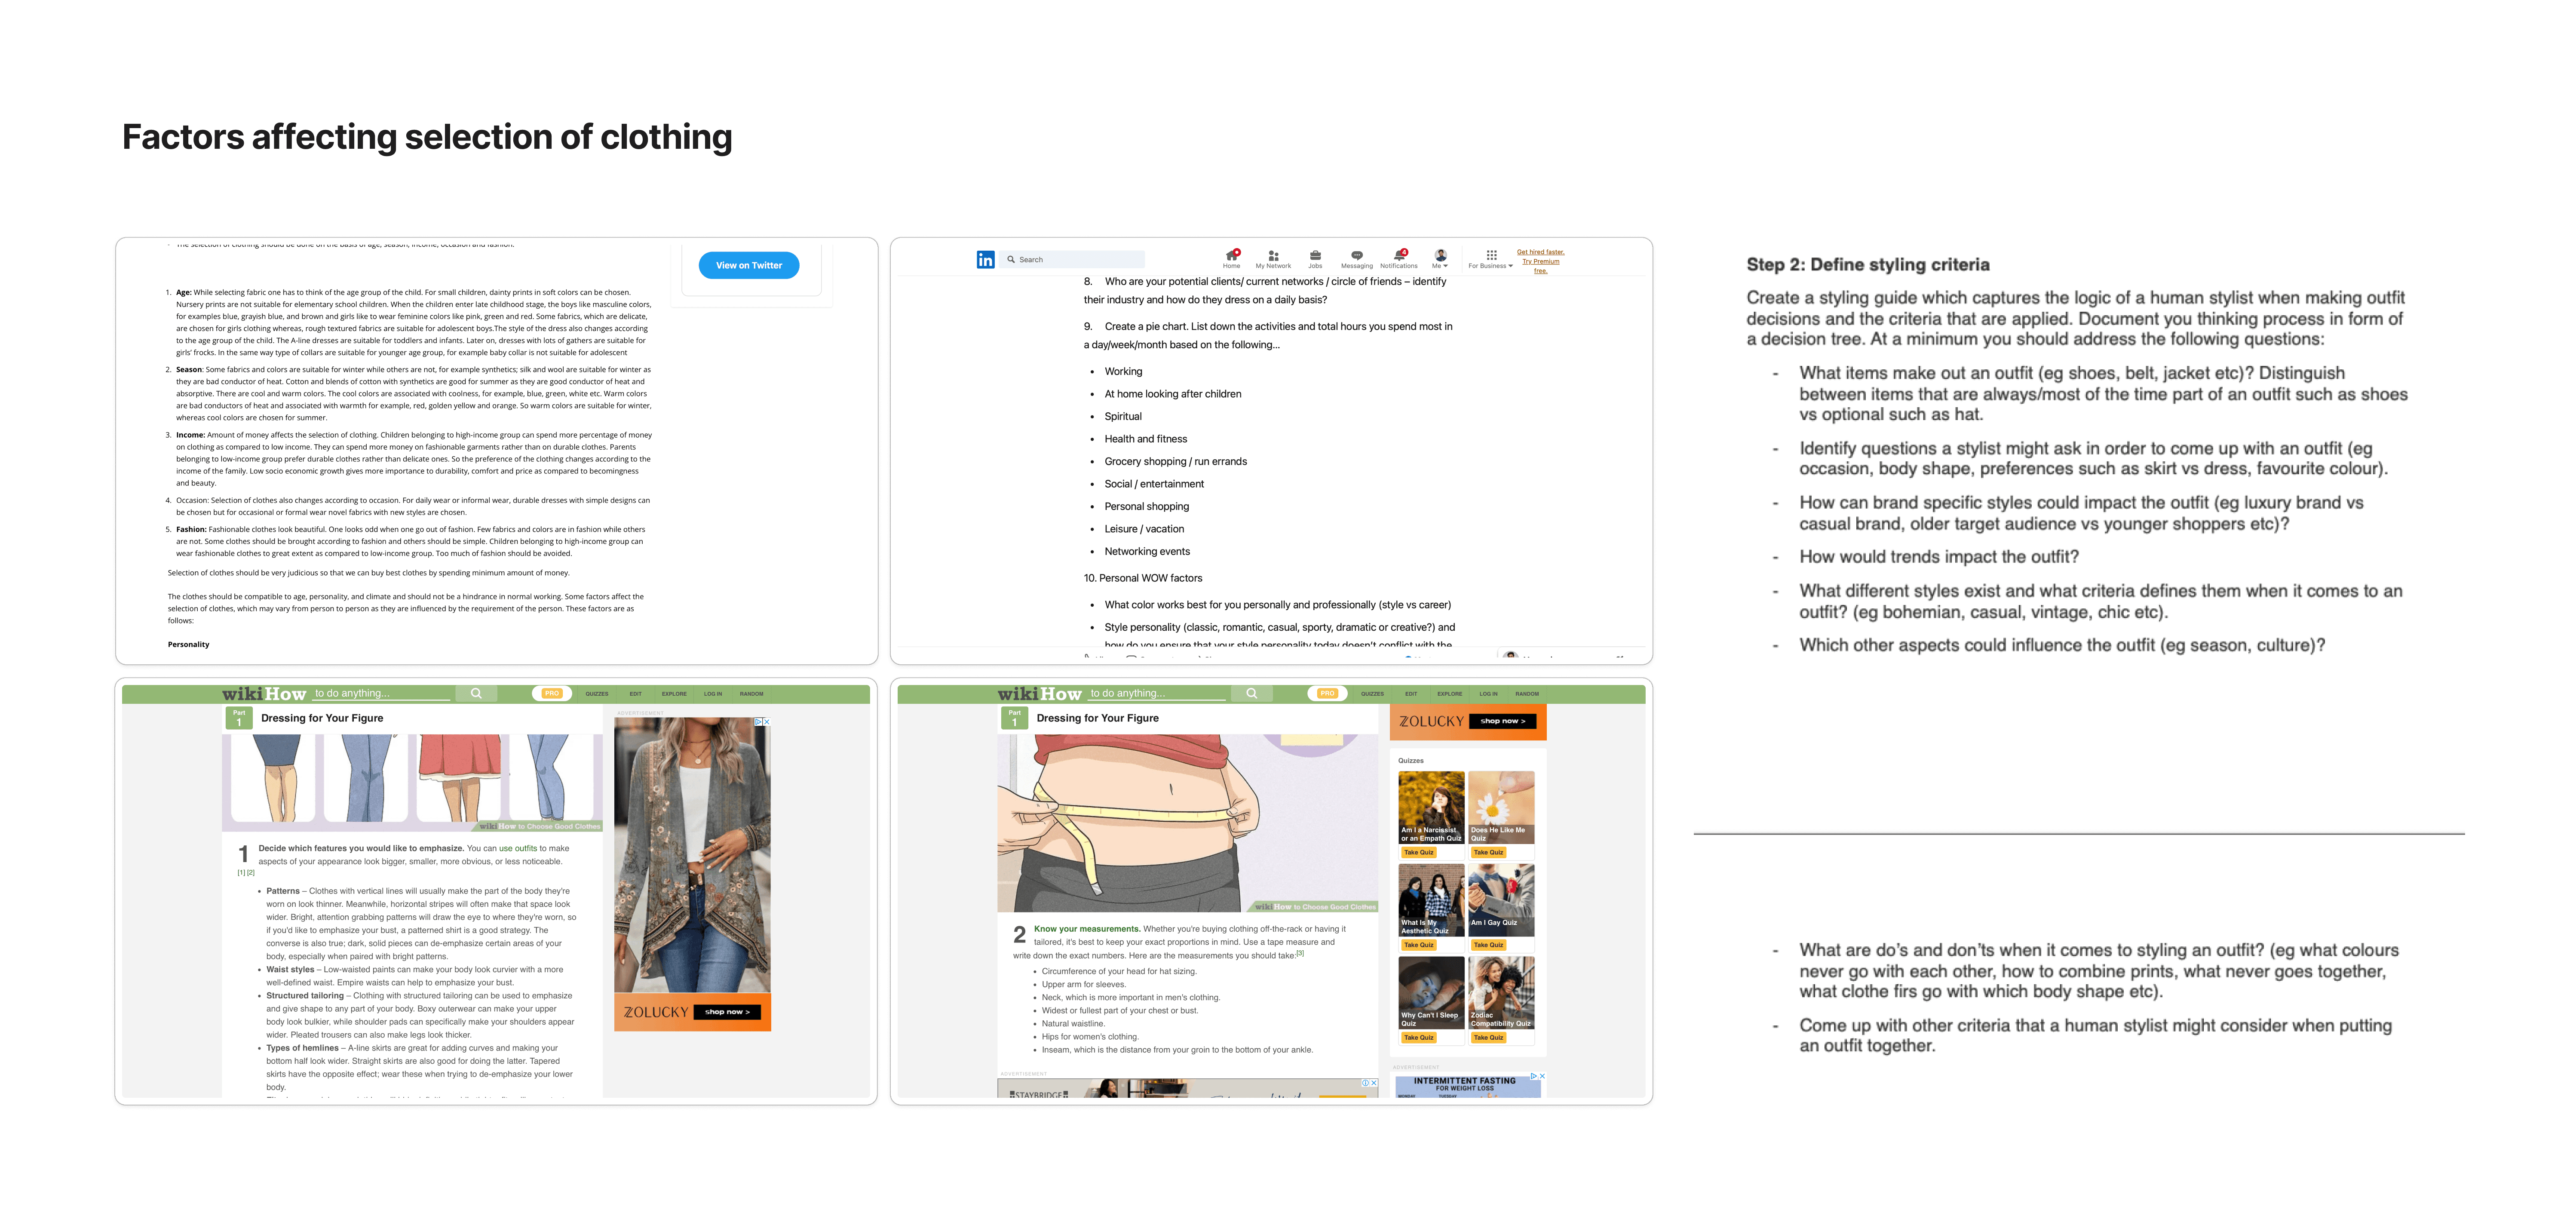
You know, after checking out the feedback from the first wireframe testing, things got a bit confusing. I realized I needed to dig deeper into how people shop for clothes and mix and match them. I wanted to know what really matters to them when they're buying stuff.
So, I turned that feedback into some ideas (hypothesis) to guide my research. I also did some extra reading(Secondary research) to get a wider view, you know? because the ideas I had were based on the feedback I got, but I didn't want to push my own solution on people. I just wanted to see how they go about putting together outfits

User feedback sparks hypothesis
User feedback sparks hypothesis
User feedback sparks hypothesis
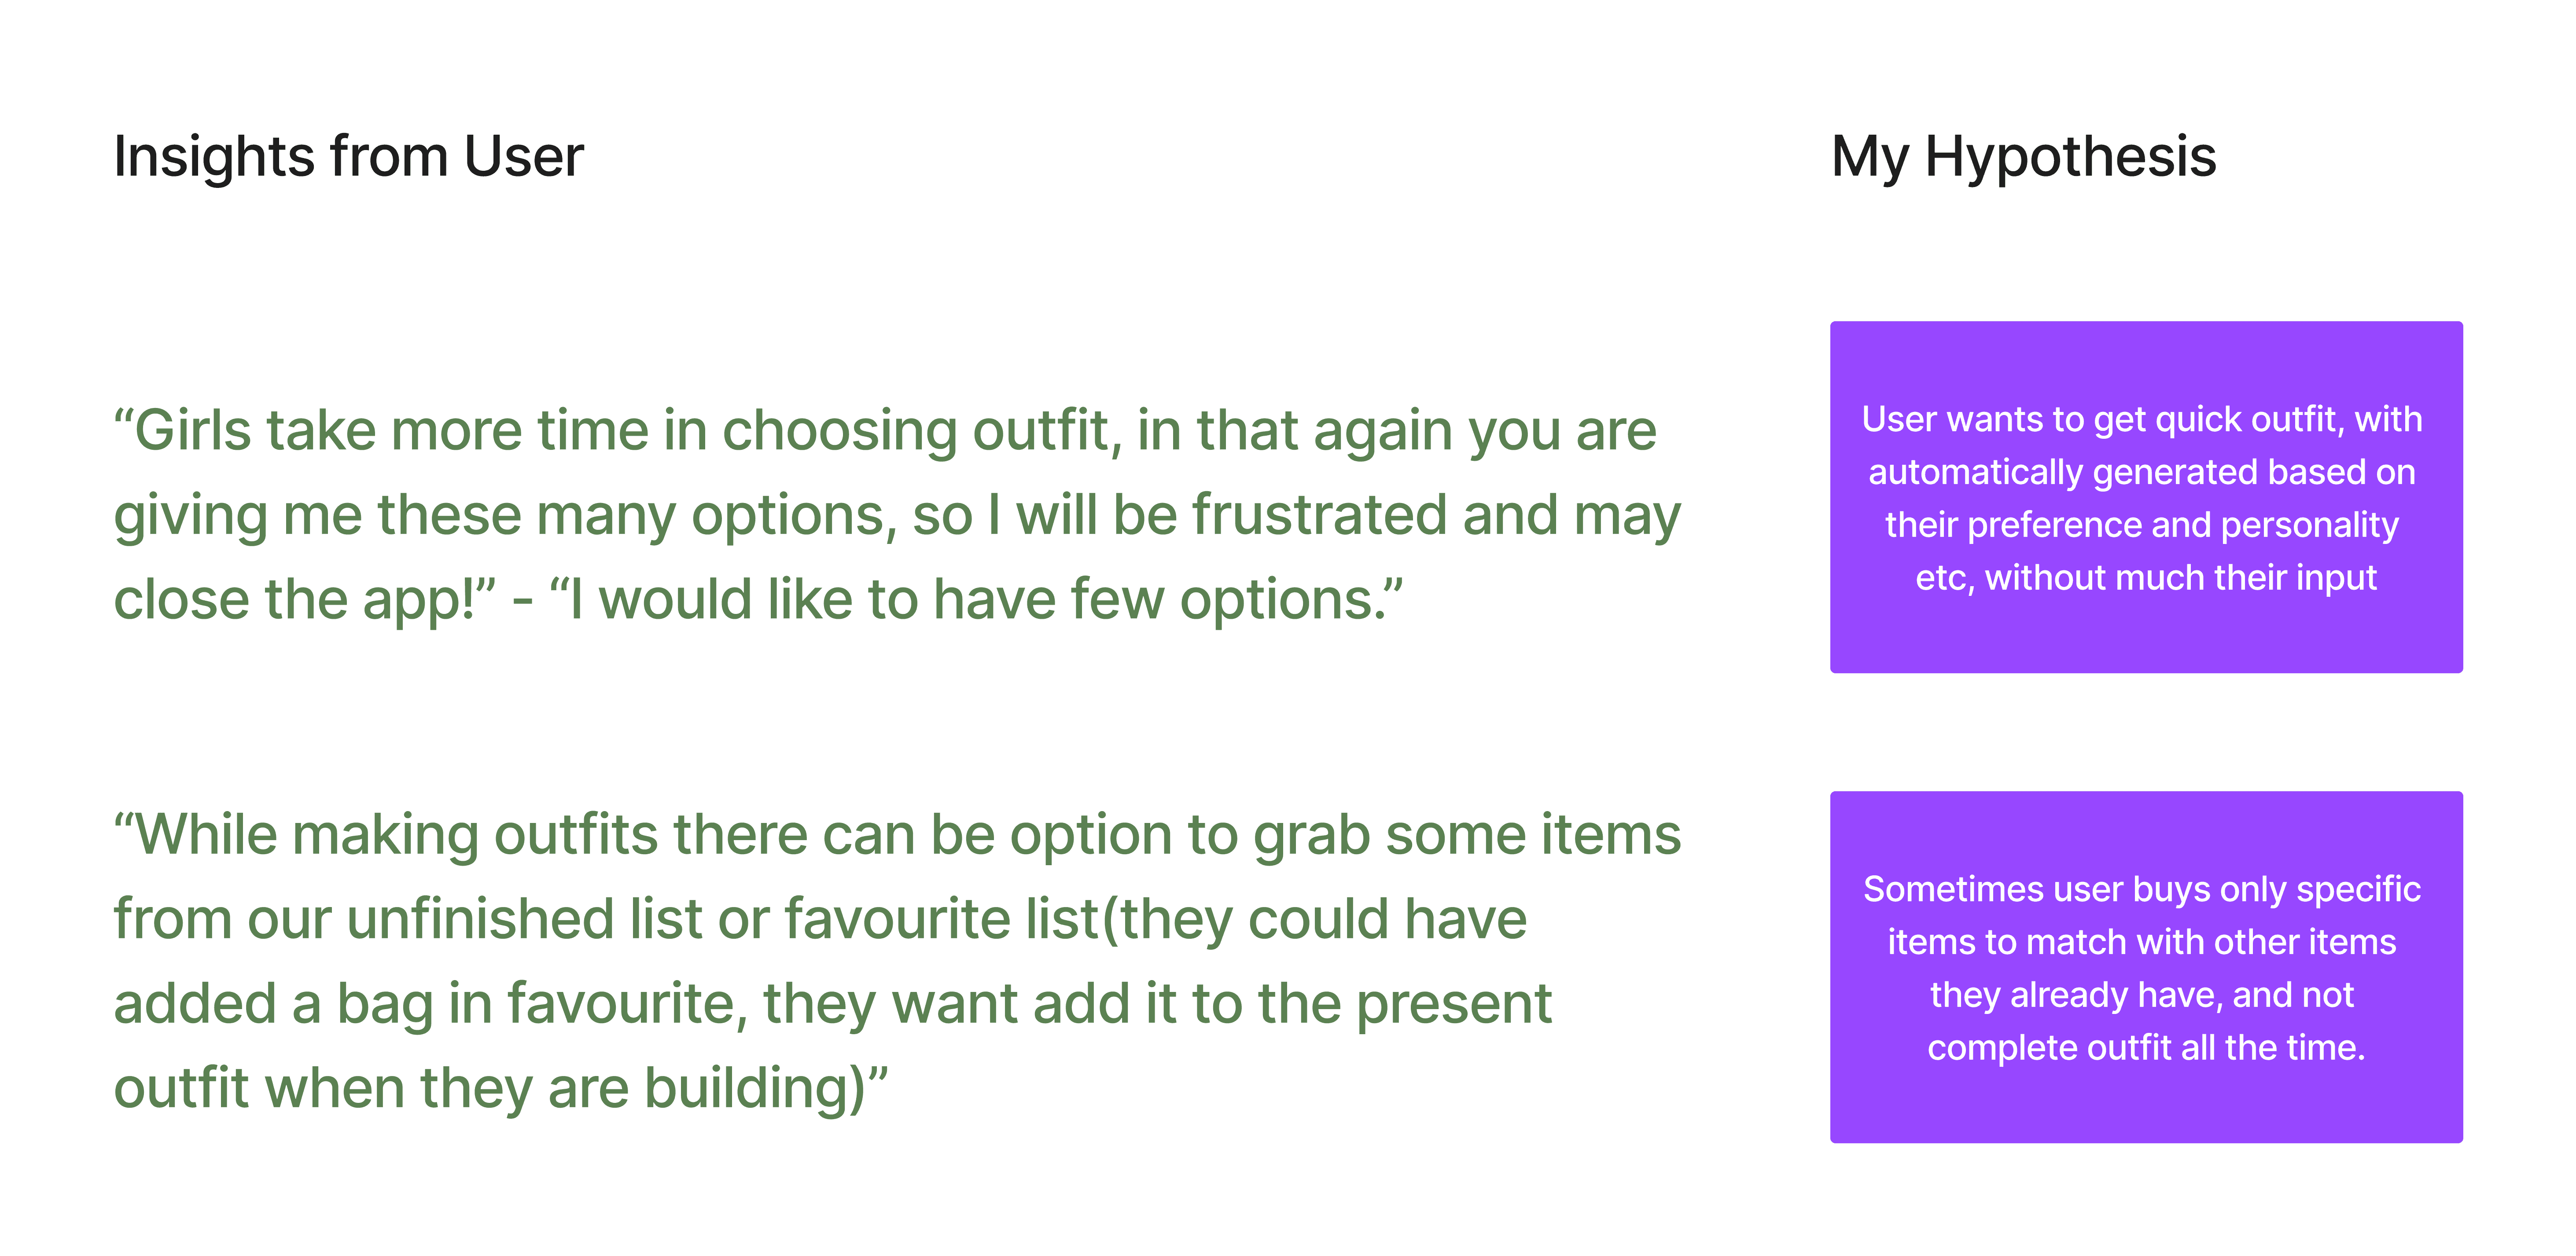
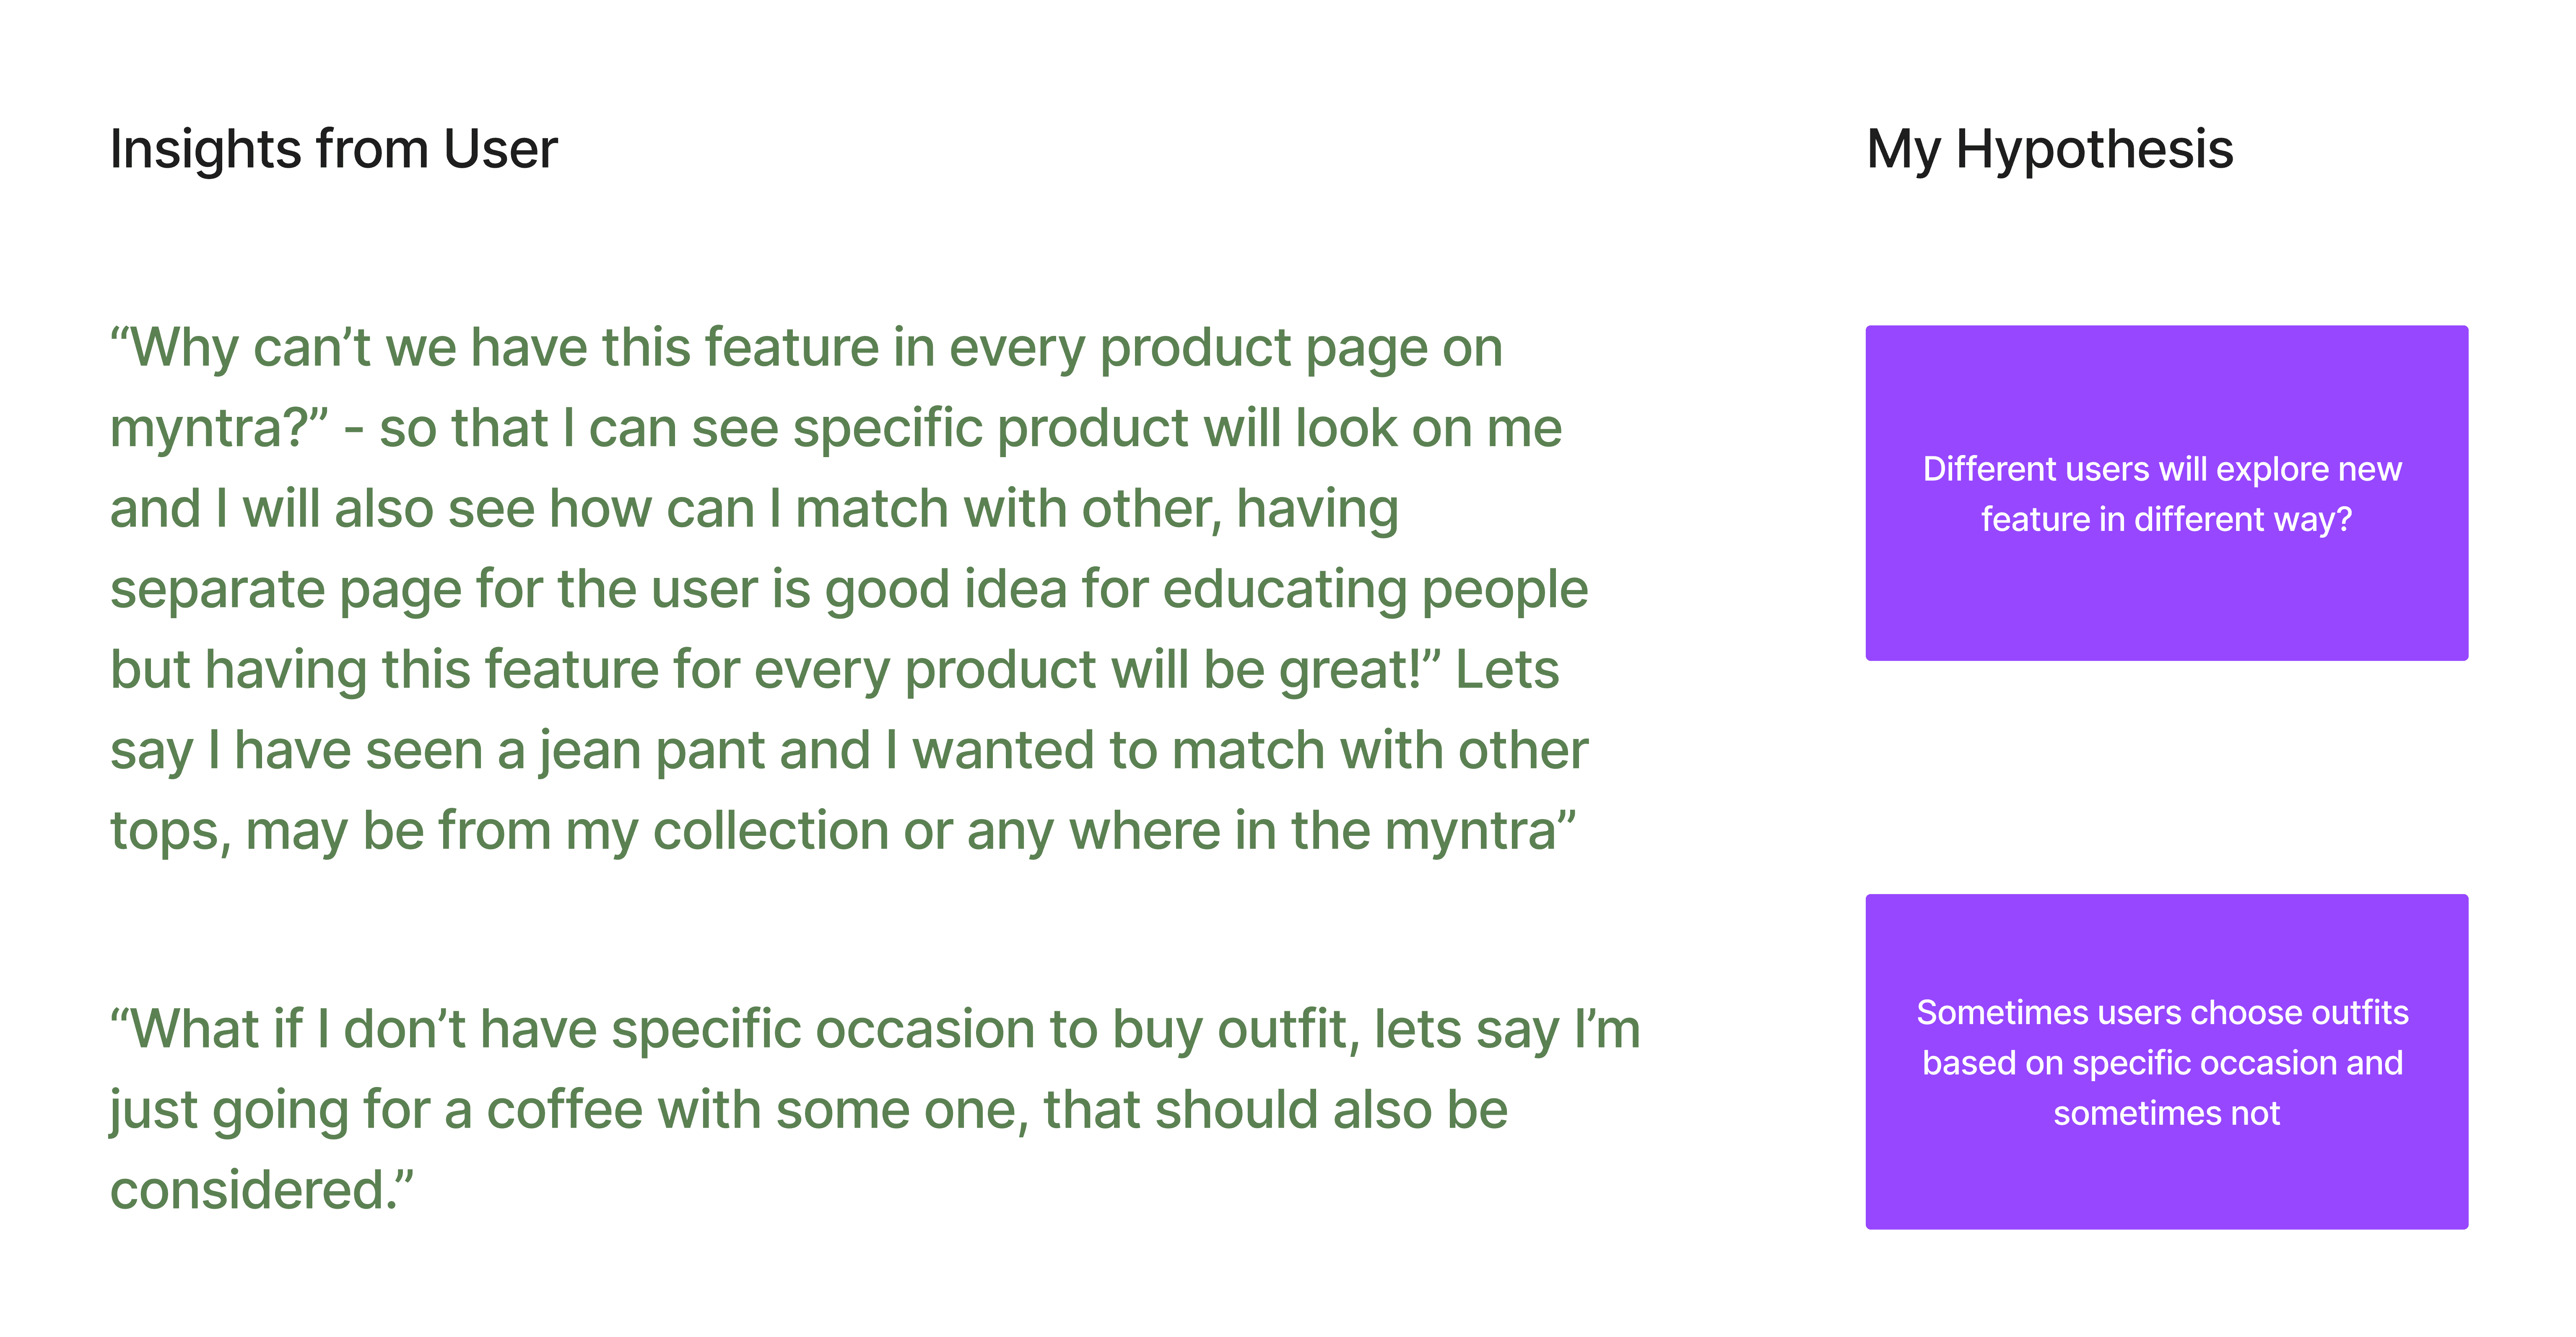
Exploring beyond the feedback: Hypothesis with secondary research
Exploring beyond the feedback: Hypothesis with secondary research
Exploring beyond the feedback: Hypothesis with secondary research
7
7
Friends of friends, new insights: My research adventure
Friends of friends, new insights: My research adventure
Friends of friends, new insights: My research adventure
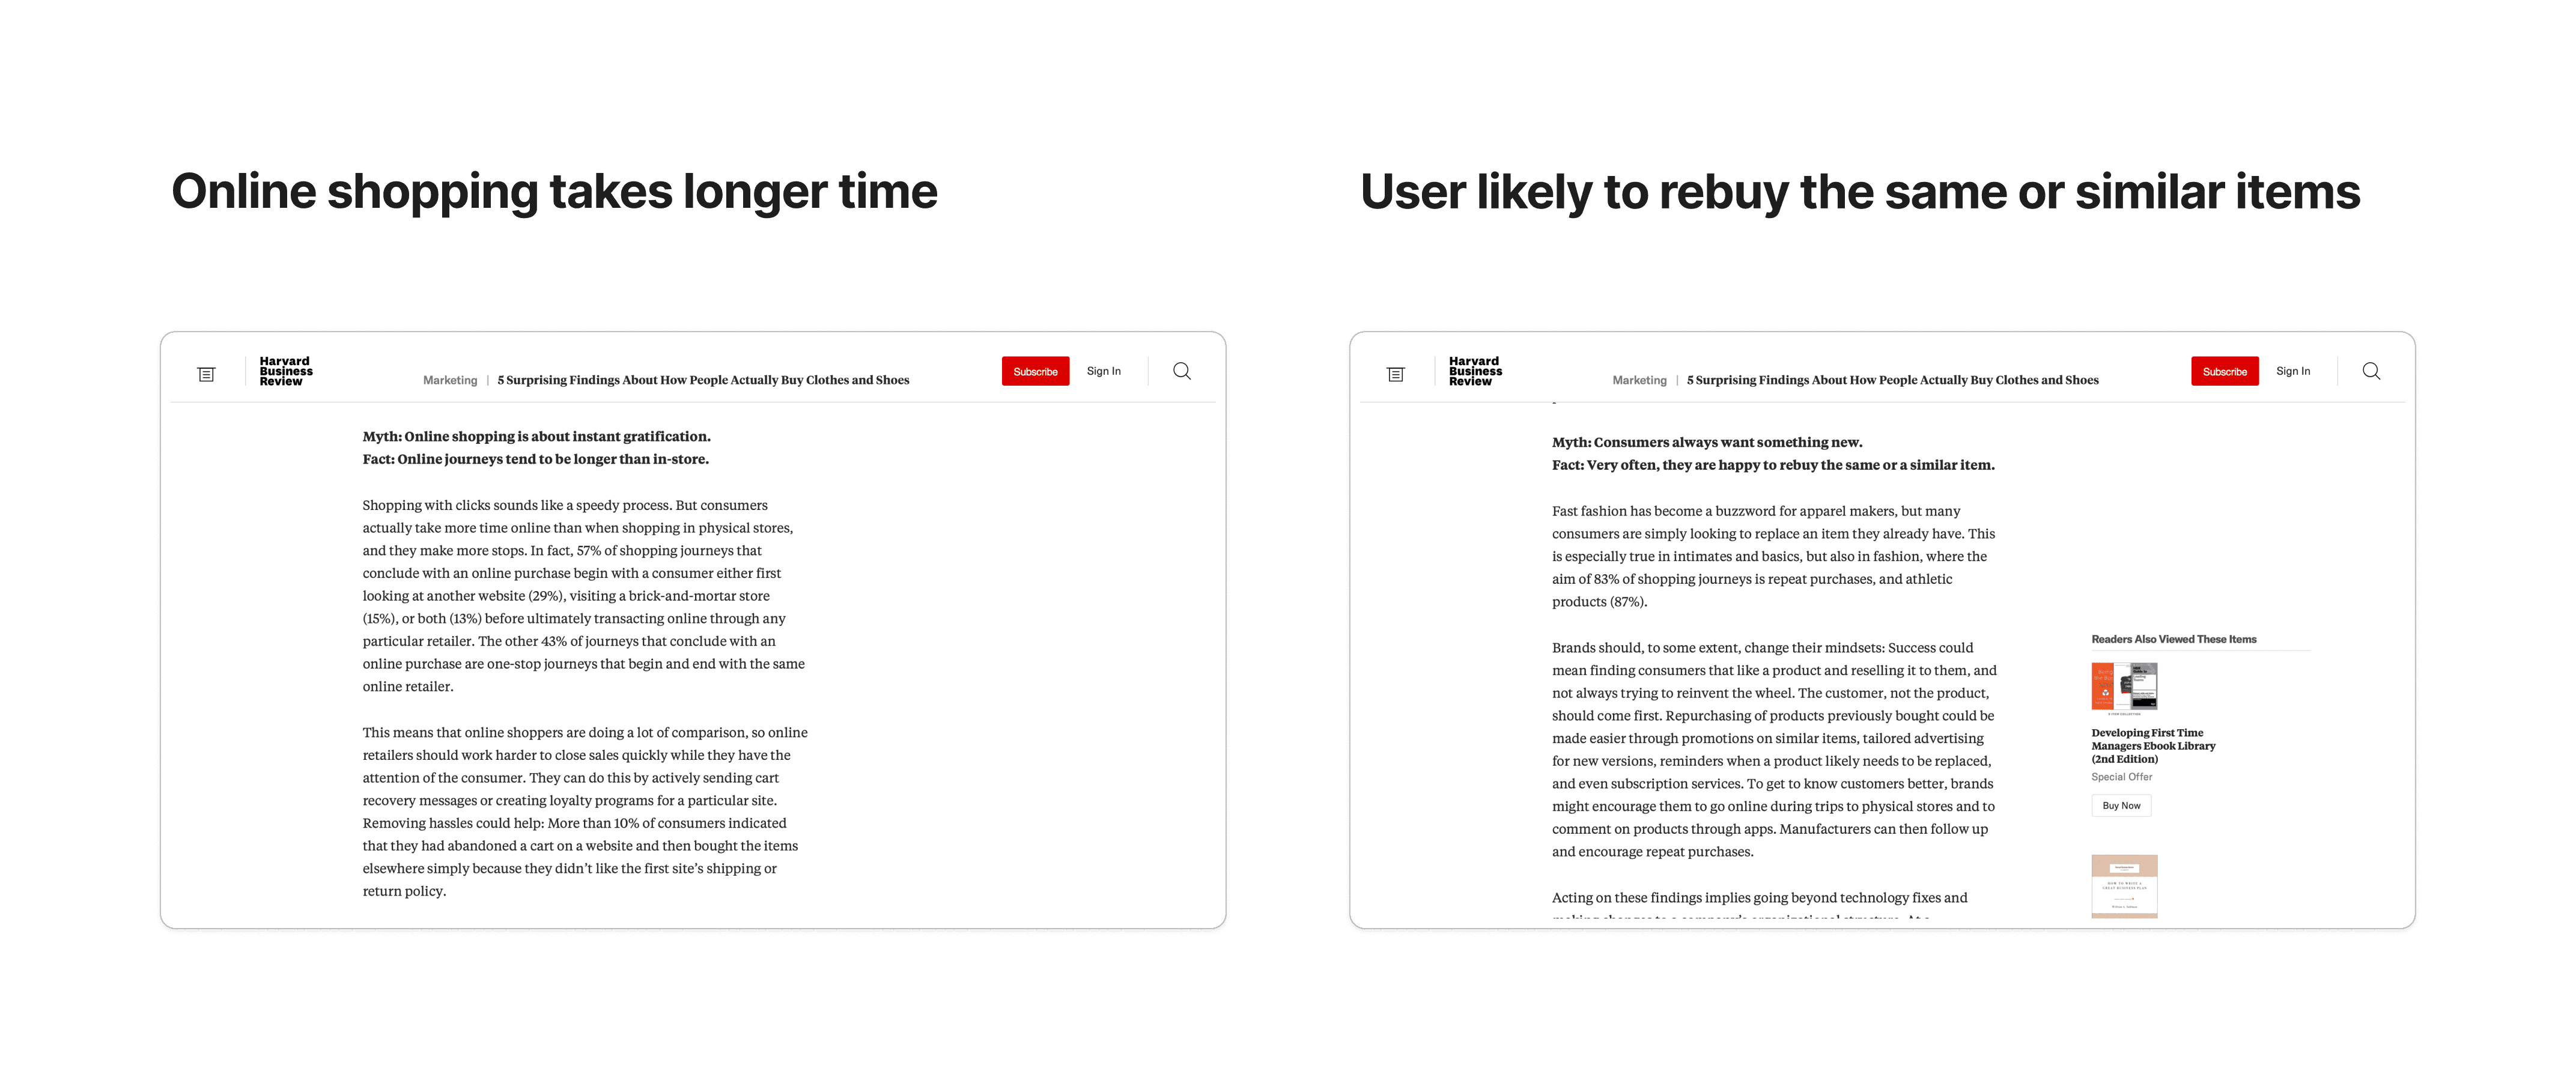
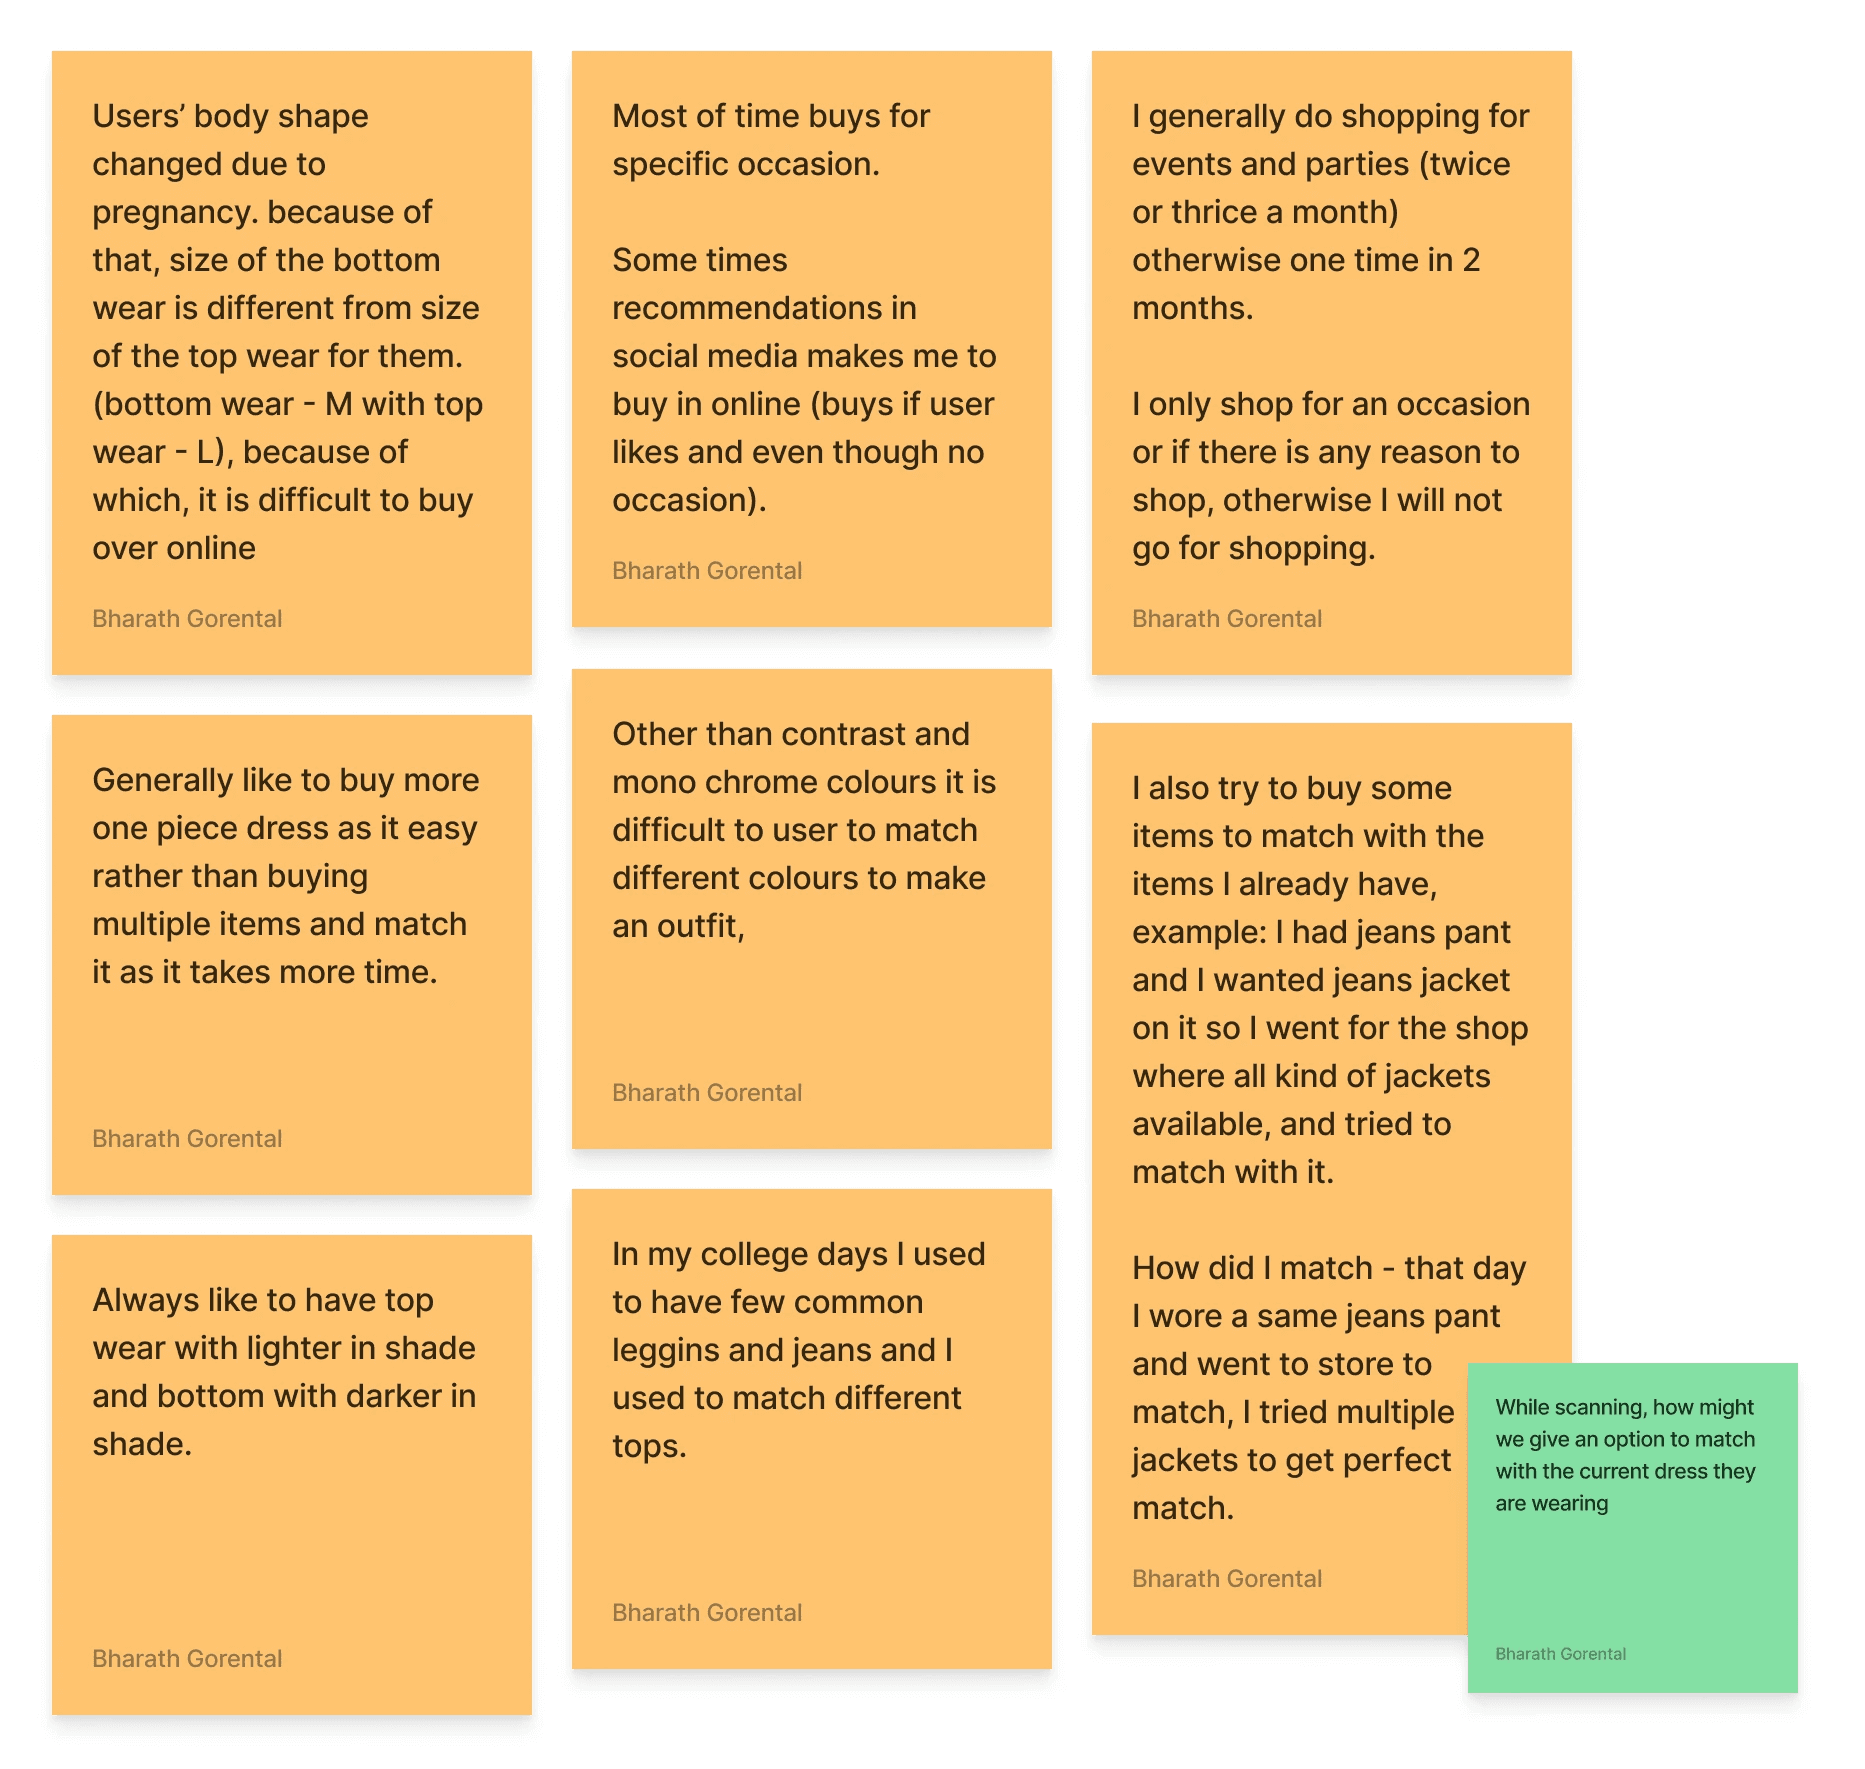
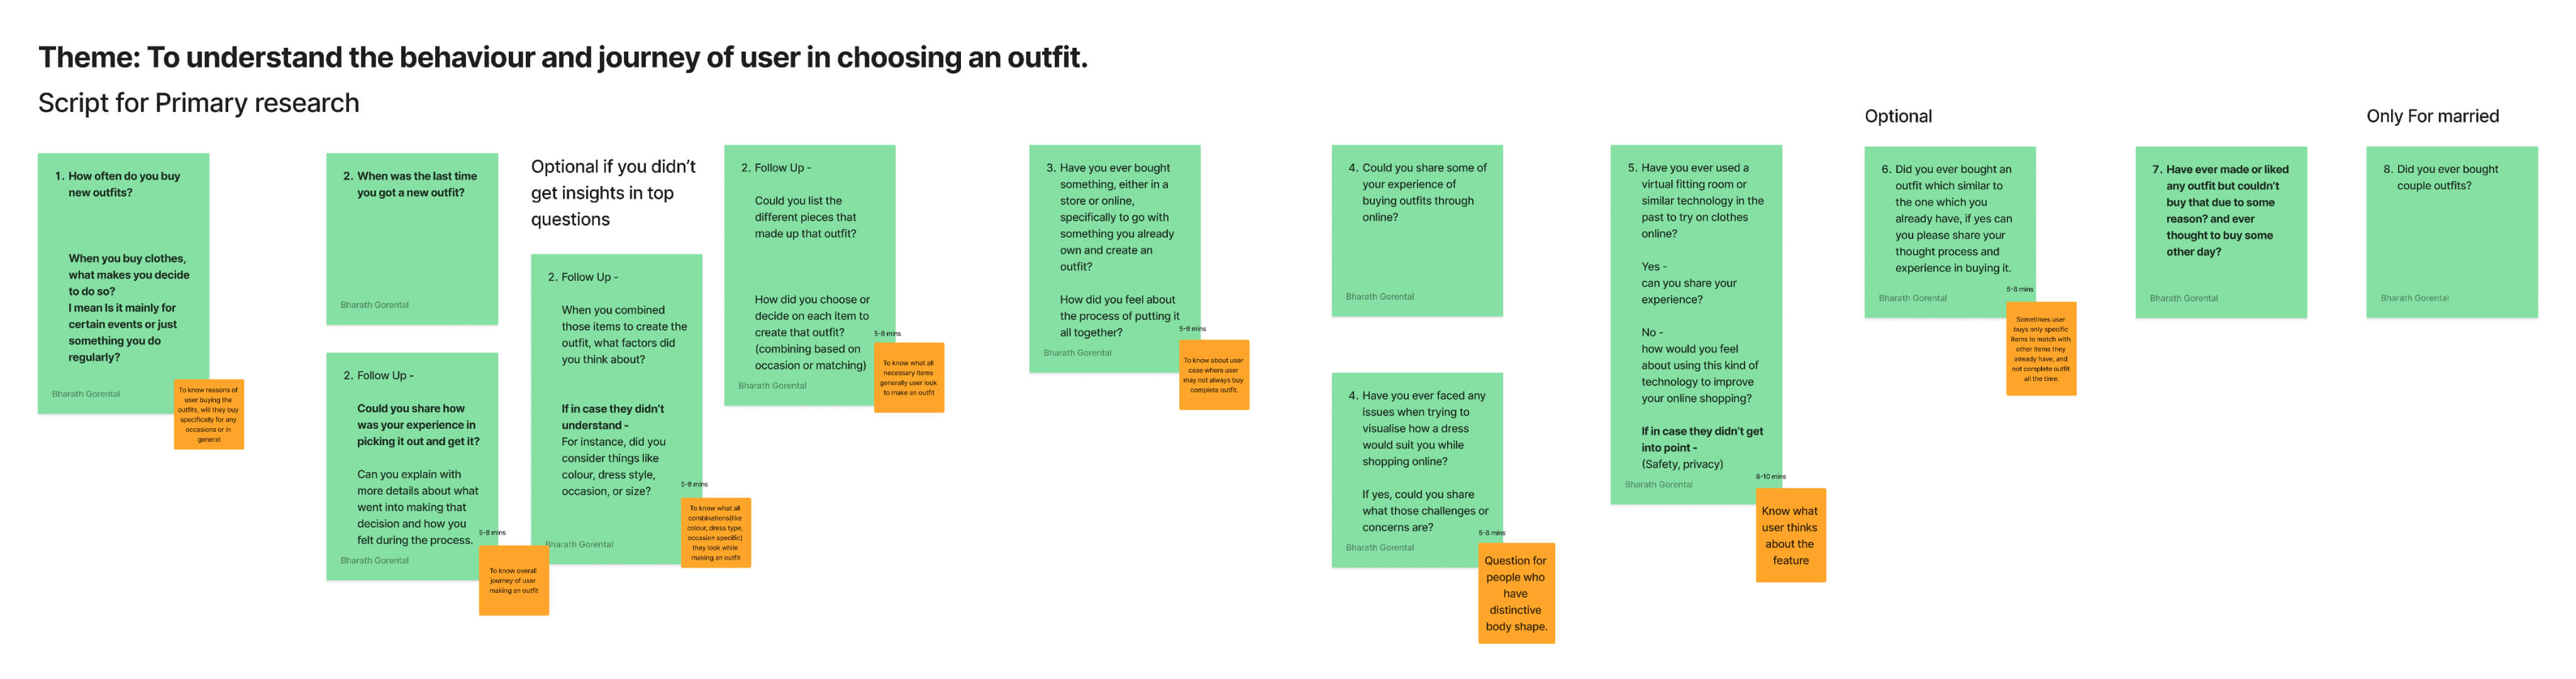
I wanted to hear from different folks on LinkedIn, but I only got two responses from strangers. So, I thought, why not ask people in my community and friends of friends? It worked! I got more responses and carried on with my research. After each chat, I made sure to jot down all the cool stuff they told me
I wanted to hear from different folks on LinkedIn, but I only got two responses from strangers. So, I thought, why not ask people in my community and friends of friends? It worked! I got more responses and carried on with my research. After each chat, I made sure to jot down all the cool stuff they told me
I wanted to hear from different folks on LinkedIn, but I only got two responses from strangers. So, I thought, why not ask people in my community and friends of friends? It worked! I got more responses and carried on with my research. After each chat, I made sure to jot down all the cool stuff they told me
Sample findings from users
Sample findings from users
Sample findings from users
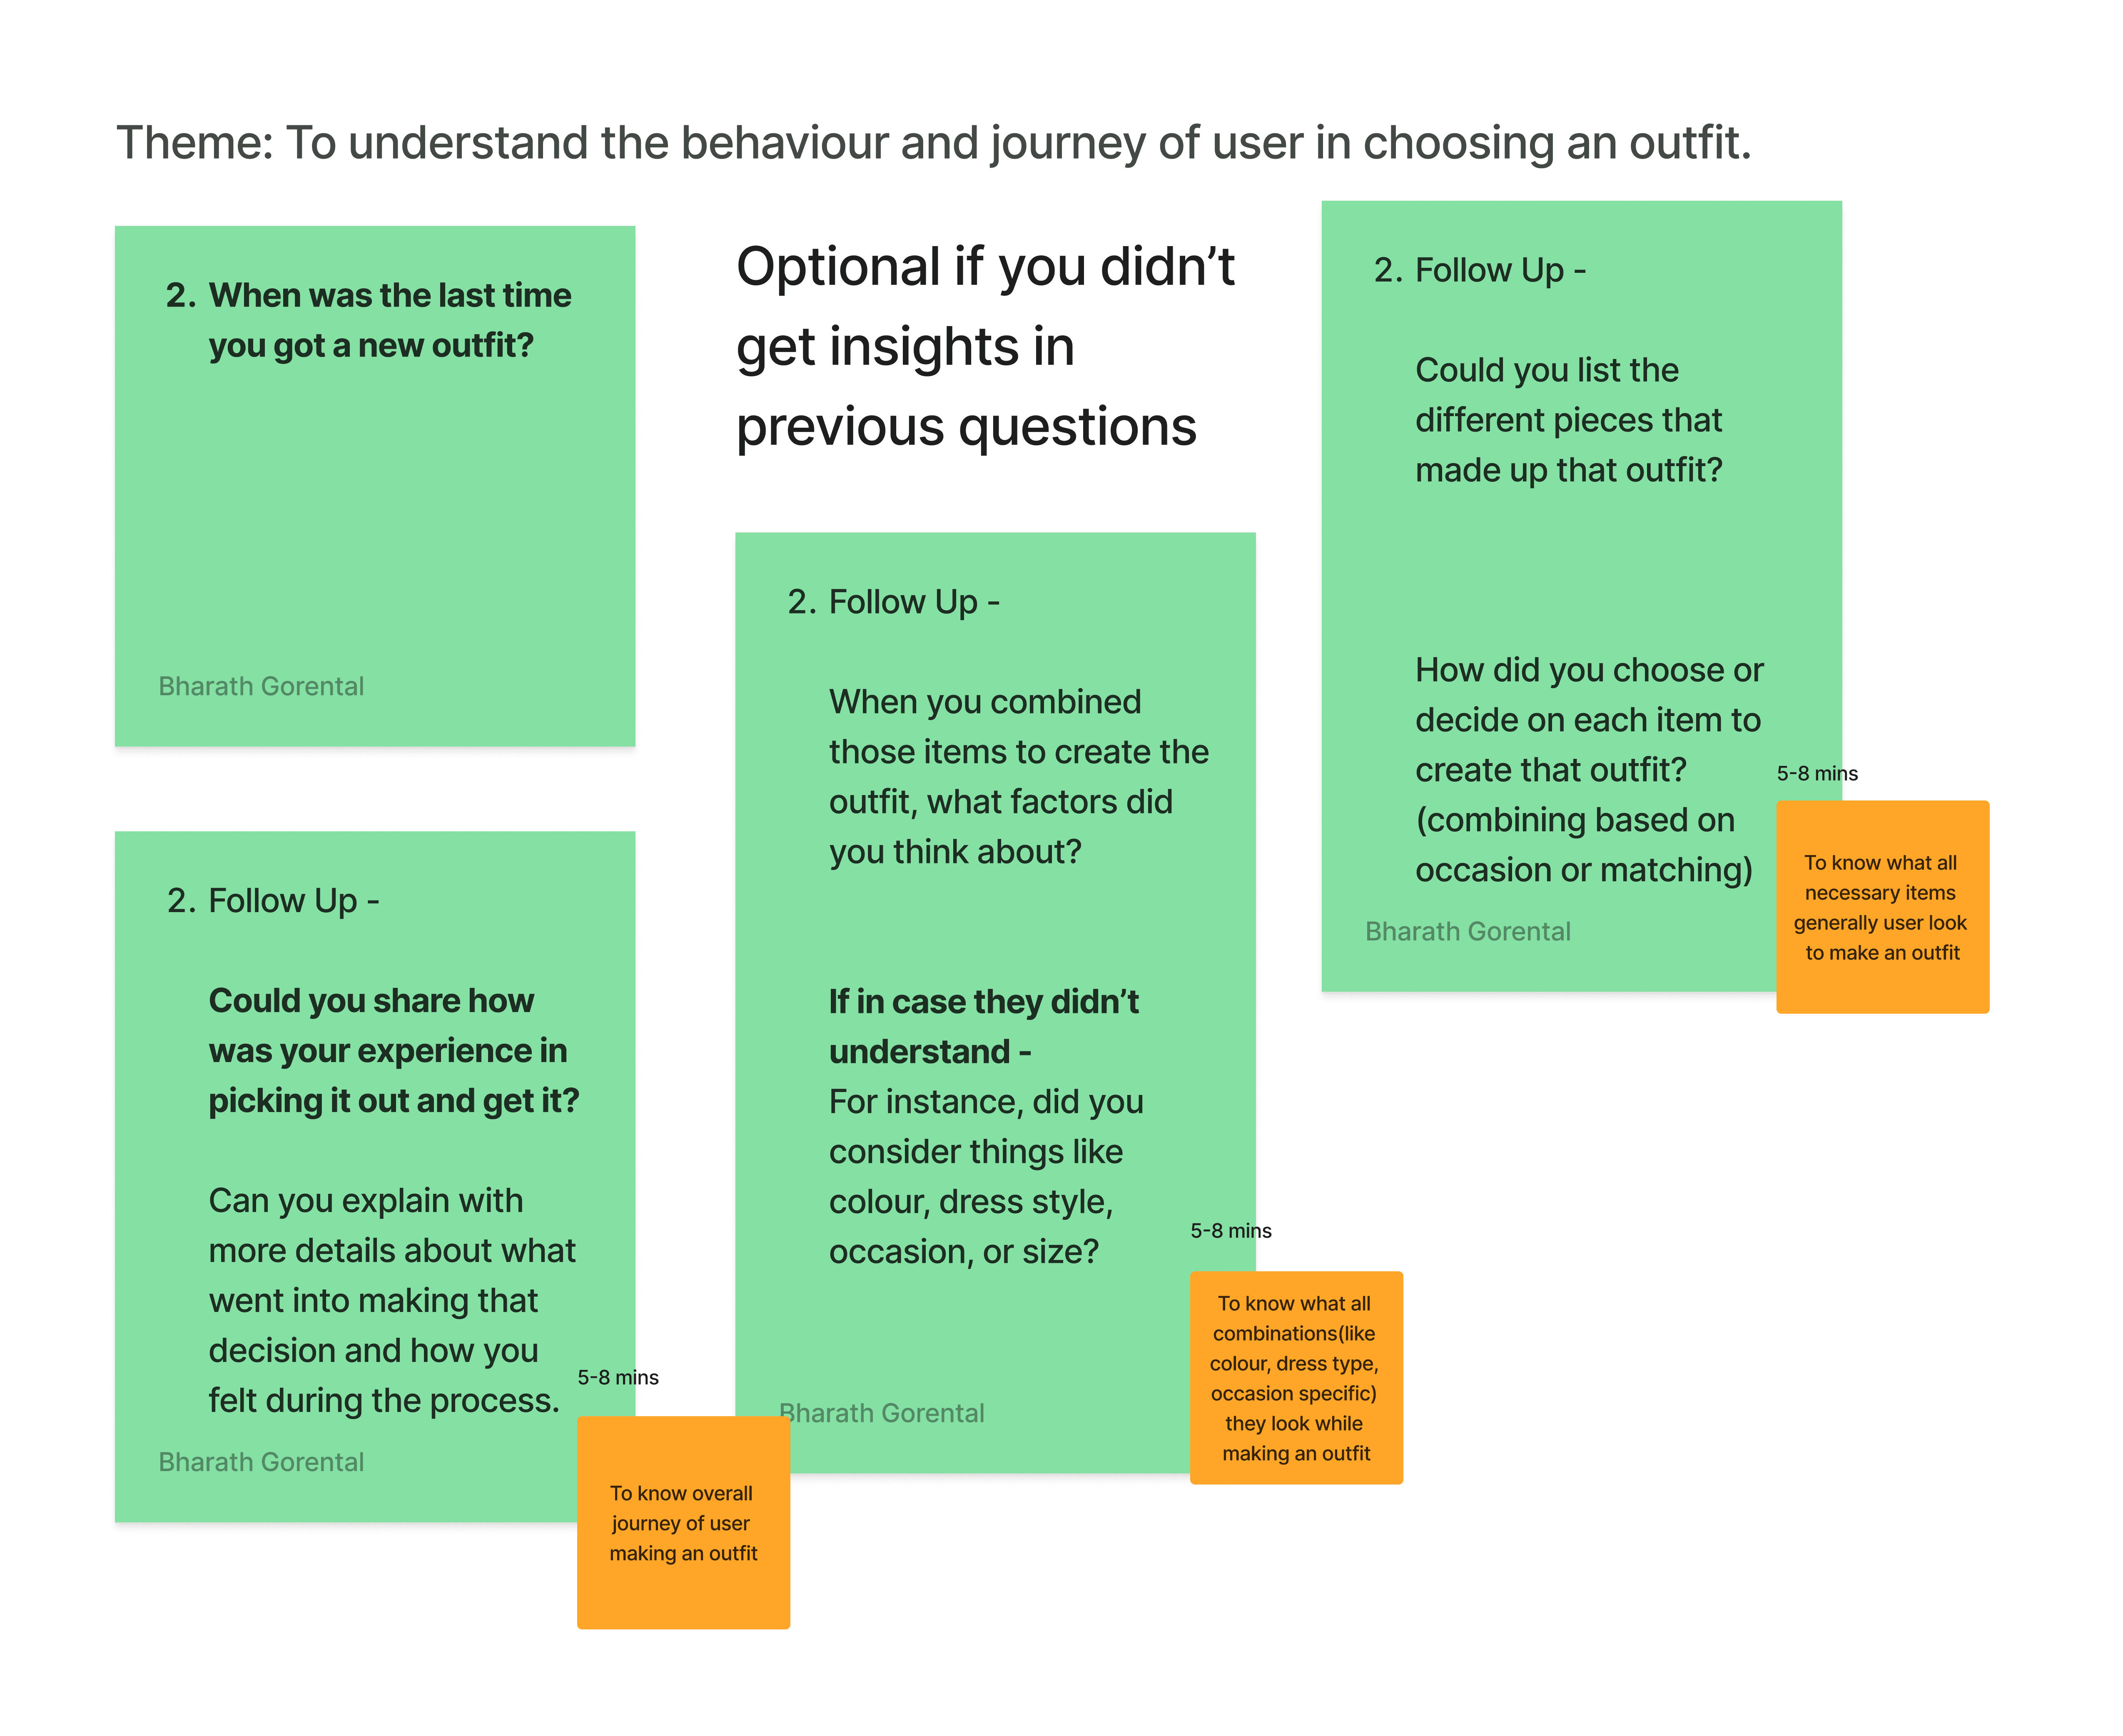
Glimpse into my research guide
Glimpse into my research guide
Glimpse into my research guide
User perspectives and findings
User perspectives and findings
User perspectives and findings

8
8
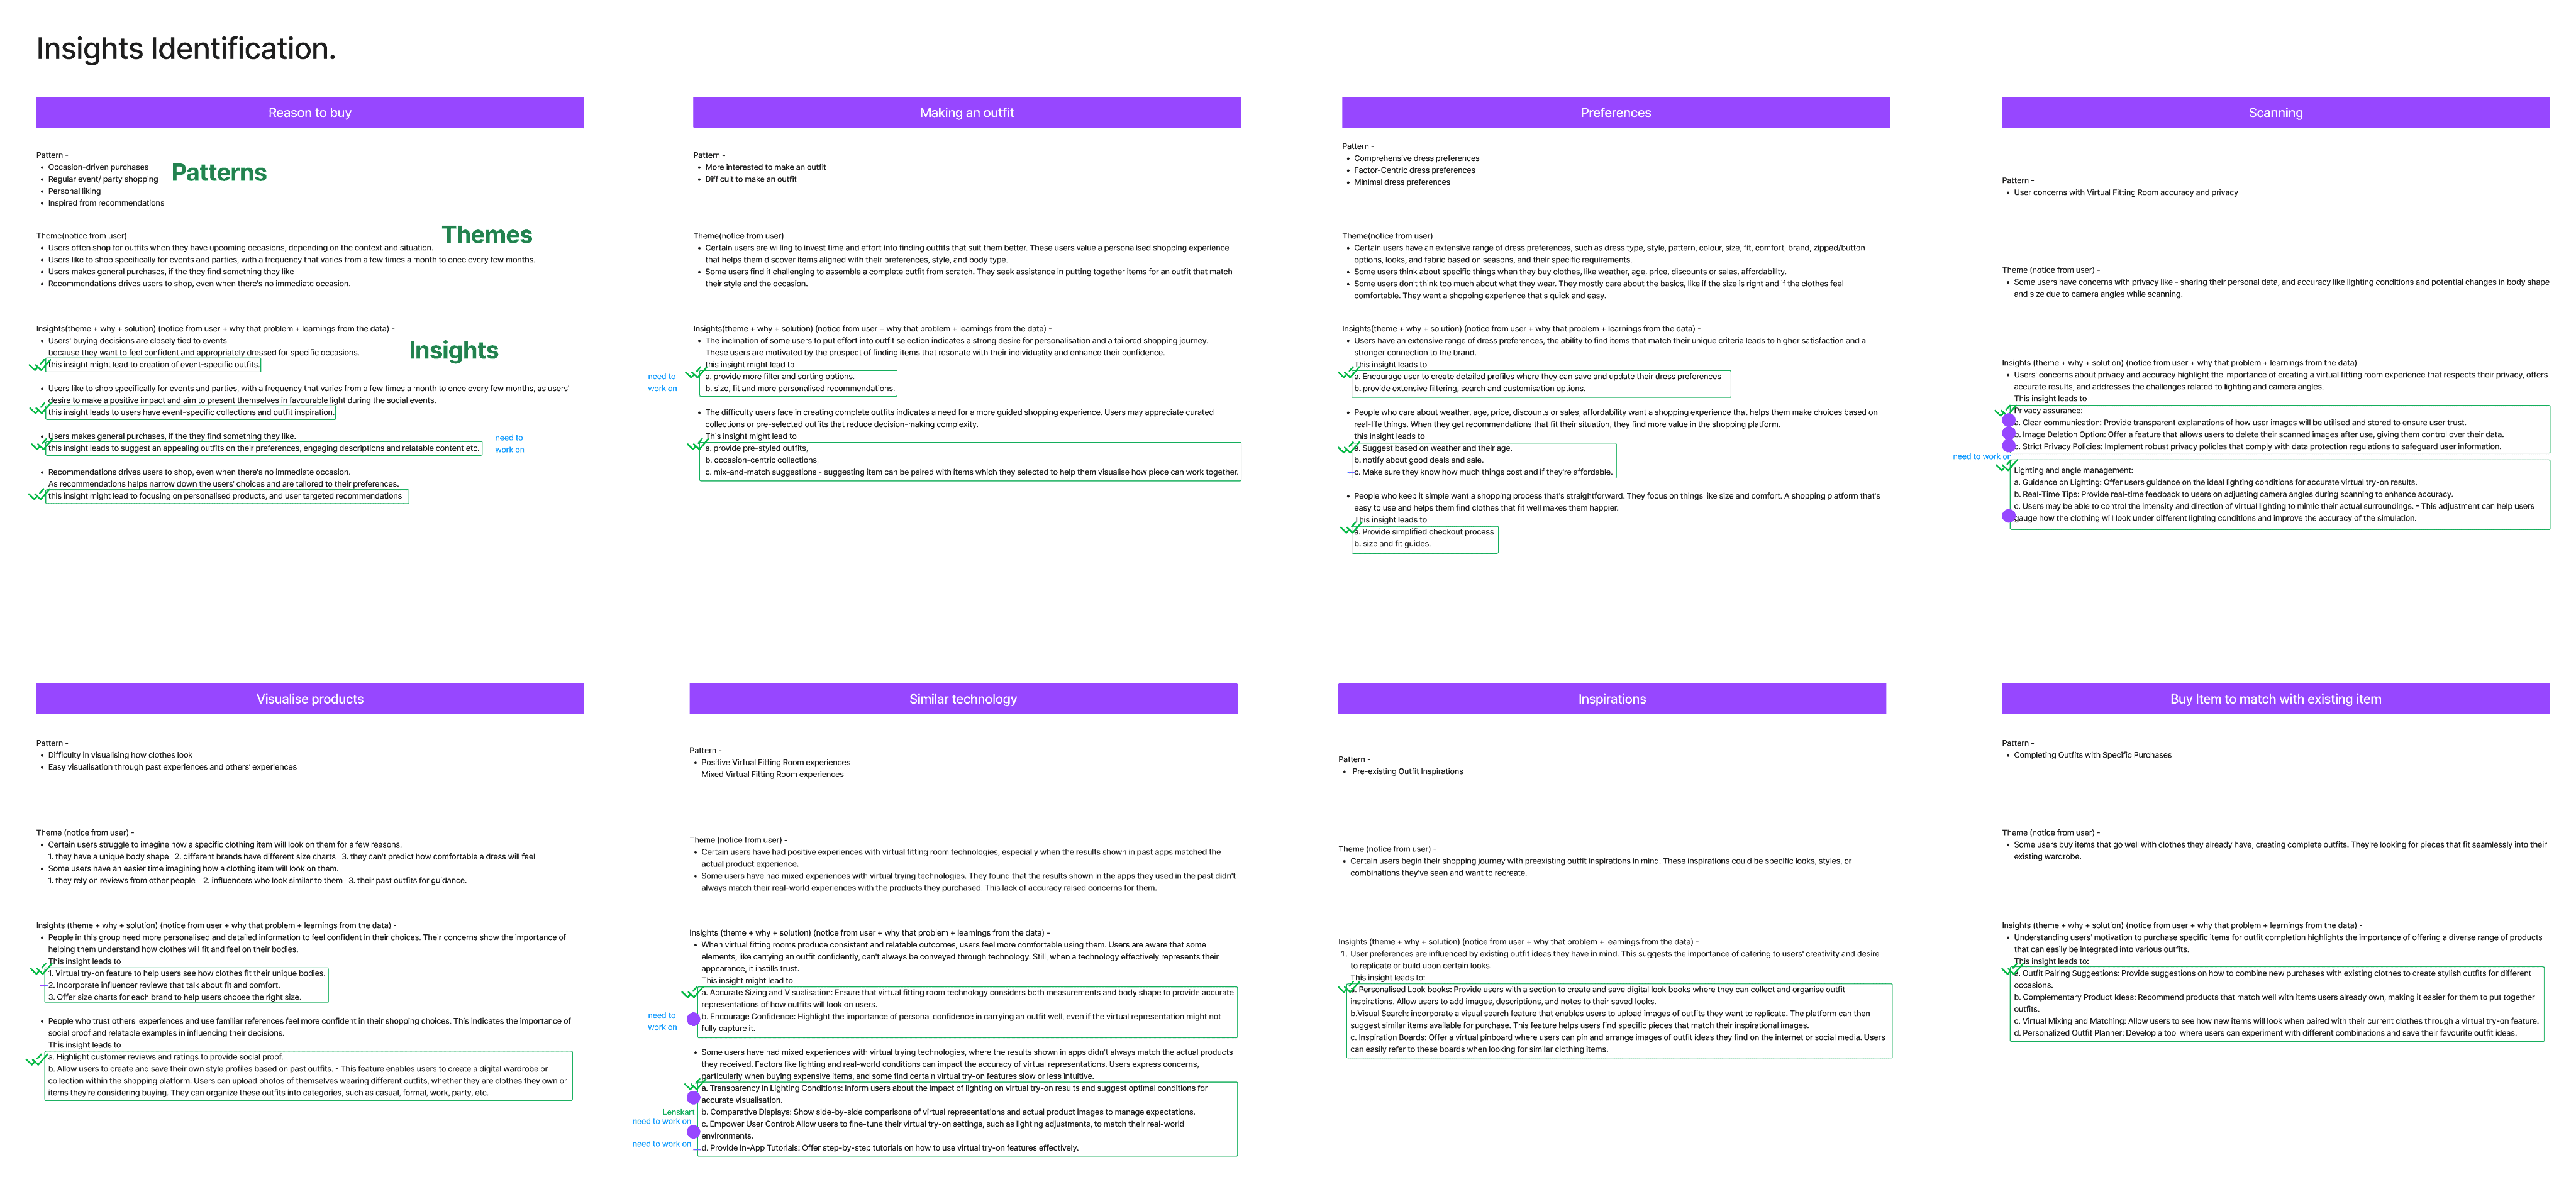
Finding patterns and themes: Affinity Mapping for analysing insights
Finding patterns and themes: Affinity Mapping for analysing insights
Finding patterns and themes: Affinity Mapping for analysing insights
I got loads of insights, but some were all over the place, didn't really add up. I needed to make sense of it all, you know? So, I started organising the data, putting similar stuff together and finding the connections. It's like solving a puzzle. And to do that, I used something called “Affinity Mapping”
I got loads of insights, but some were all over the place, didn't really add up. I needed to make sense of it all, you know? So, I started organising the data, putting similar stuff together and finding the connections. It's like solving a puzzle. And to do that, I used something called “Affinity Mapping”
I got loads of insights, but some were all over the place, didn't really add up. I needed to make sense of it all, you know? So, I started organising the data, putting similar stuff together and finding the connections. It's like solving a puzzle. And to do that, I used something called “Affinity Mapping”
Sample patterns, themes, and designable insights
Sample patterns, themes, and designable insights
Sample patterns, themes, and designable insights
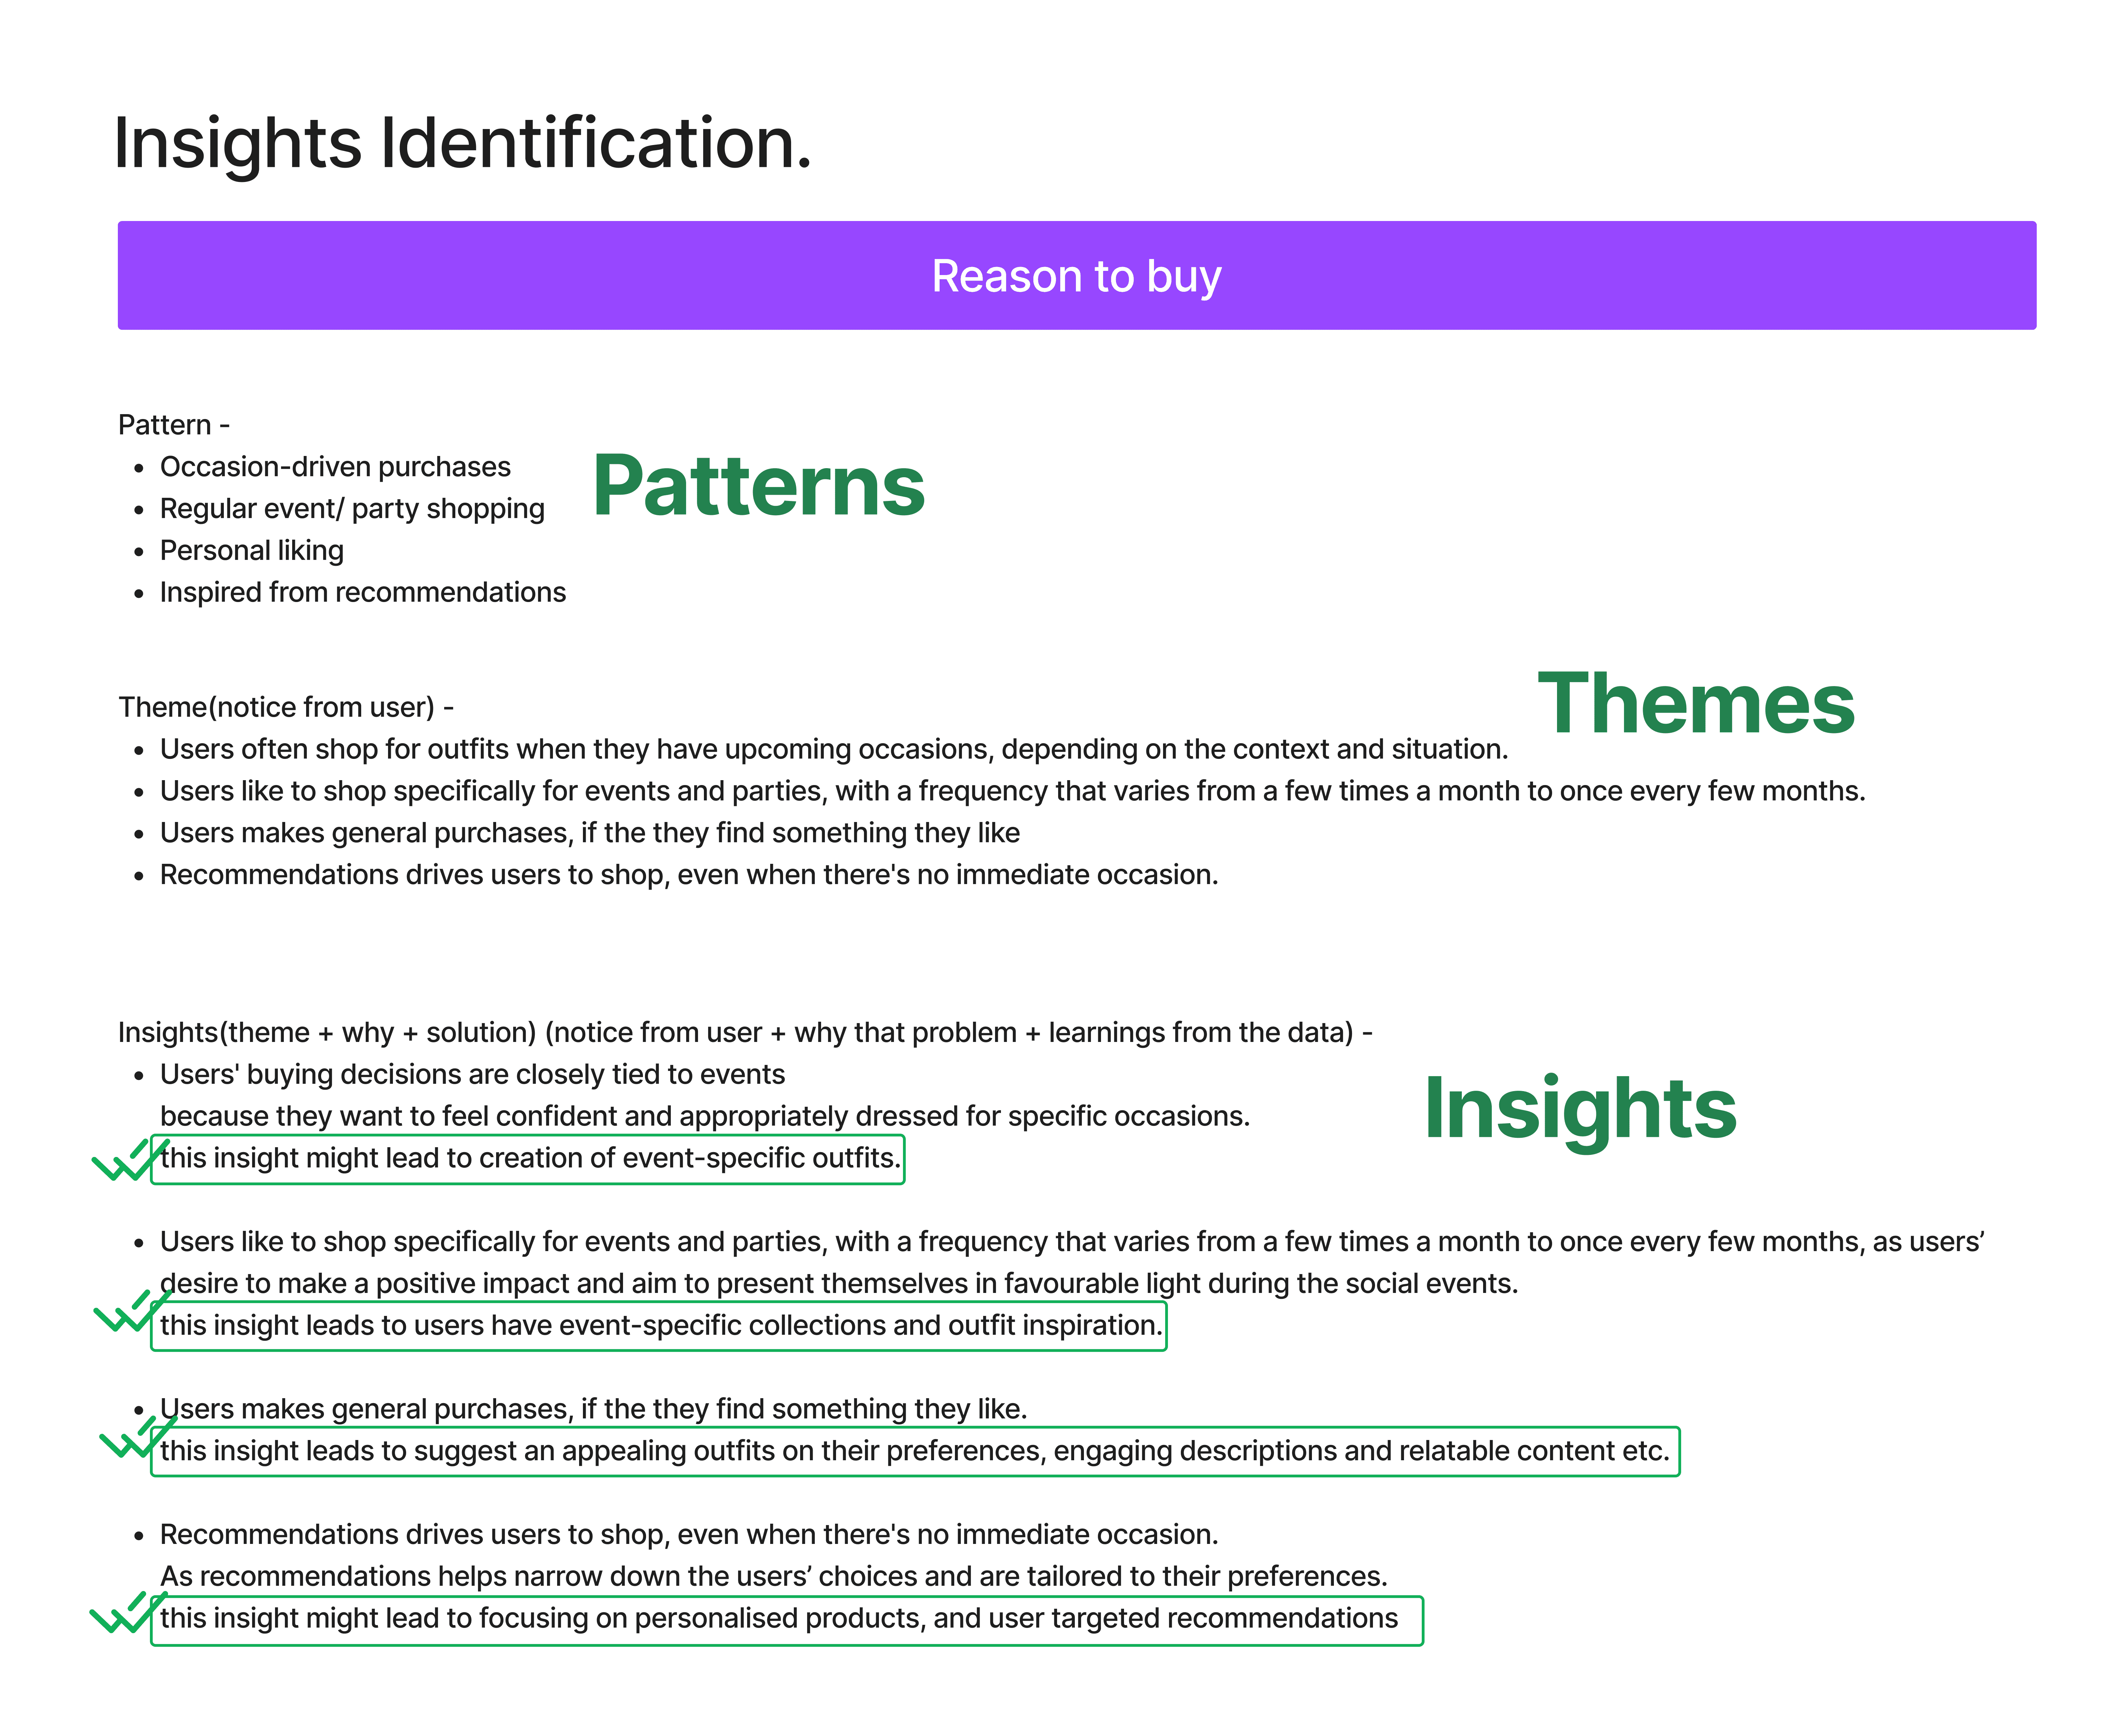
From raw findings to valuable patterns, themes, and insights
From raw findings to valuable patterns, themes, and insights
From raw findings to valuable patterns, themes, and insights
9
9
Choosing the path: How confusing insights altered my project journey
Choosing the path: How confusing insights altered my project journey
Choosing the path: How confusing insights altered my project journey
As I mentioned, the confusing insights from the wireframe testing phase pushed me to include primary research, even though it wasn't part of my initial plan. This unexpected addition led to time constraints , and I had originally intended to refine Wireframe 1 post-testing. However, due to limited time and the realization that many valuable insights from the primary research had already been integrated into Wireframe-1 , I made the decision to skip Wireframe-2 and proceed directly to creating the high-fidelity UI screens.
As I mentioned, the confusing insights from the wireframe testing phase pushed me to include primary research, even though it wasn't part of my initial plan. This unexpected addition led to time constraints , and I had originally intended to refine Wireframe 1 post-testing. However, due to limited time and the realization that many valuable insights from the primary research had already been integrated into Wireframe-1 , I made the decision to skip Wireframe-2 and proceed directly to creating the high-fidelity UI screens.
As I mentioned, the confusing insights from the wireframe testing phase pushed me to include primary research, even though it wasn't part of my initial plan. This unexpected addition led to time constraints , and I had originally intended to refine Wireframe 1 post-testing. However, due to limited time and the realization that many valuable insights from the primary research had already been integrated into Wireframe-1 , I made the decision to skip Wireframe-2 and proceed directly to creating the high-fidelity UI screens.


10
10
Bridging imagination and reality: The virtual fitting room creation
Bridging imagination and reality: The virtual fitting room creation
Bridging imagination and reality: The virtual fitting room creation
When I started the UI design High-fidelity, it was like entering a creative journey. I took my initial ideas and blended them with feedback received during the wire-framing stage. Additionally, insights from my primary research and some design inspirations played a crucial role in shaping the screens. It felt like I was assembling a puzzle to craft a smooth and captivating virtual fitting room experience.
When I started the UI design High-fidelity, it was like entering a creative journey. I took my initial ideas and blended them with feedback received during the wire-framing stage. Additionally, insights from my primary research and some design inspirations played a crucial role in shaping the screens. It felt like I was assembling a puzzle to craft a smooth and captivating virtual fitting room experience.
When I started the UI design High-fidelity, it was like entering a creative journey. I took my initial ideas and blended them with feedback received during the wire-framing stage. Additionally, insights from my primary research and some design inspirations played a crucial role in shaping the screens. It felt like I was assembling a puzzle to craft a smooth and captivating virtual fitting room experience.
11
11
Connecting the dots: Overcoming user screen challenges
Connecting the dots: Overcoming user screen challenges
Connecting the dots: Overcoming user screen challenges
When I moved on to creating individual UI screens, I felt confident with all the feedback, research insights, and inspiration in my toolkit. But when it came to connecting these screens to get an overview of the user flow, that's when things got a bit tricky. I discovered that some flows didn't make sense, and certain logic was missing. Let me walk you through an example of one screen's design and the changes I made to address these issues.
When I moved on to creating individual UI screens, I felt confident with all the feedback, research insights, and inspiration in my toolkit. But when it came to connecting these screens to get an overview of the user flow, that's when things got a bit tricky. I discovered that some flows didn't make sense, and certain logic was missing. Let me walk you through an example of one screen's design and the changes I made to address these issues.
When I moved on to creating individual UI screens, I felt confident with all the feedback, research insights, and inspiration in my toolkit. But when it came to connecting these screens to get an overview of the user flow, that's when things got a bit tricky. I discovered that some flows didn't make sense, and certain logic was missing. Let me walk you through an example of one screen's design and the changes I made to address these issues.


How did I address these issues?
How did I address these issues?
How did I address these issues?
Let's explore the challenges and how I tackled them in designing outfit builder user flows.
Let's explore the challenges and how I tackled them in designing outfit builder user flows.
Let's explore the challenges and how I tackled them in designing outfit builder user flows.
I'll use the 'outfit building' screen as an example to demonstrate the transformation. But first, let's take a closer look at this screen.
I'll use the 'outfit building' screen as an example to demonstrate the transformation. But first, let's take a closer look at this screen.
I'll use the 'outfit building' screen as an example to demonstrate the transformation. But first, let's take a closer look at this screen.
Style choices selection screen
Style choices selection screen
Style choices selection screen
Outfit builder screen
Outfit builder screen
Outfit builder screen
Let's explore the transformation
Let's explore the transformation
Let's explore the transformation
Outfit builder screen
Outfit builder screen
Outfit builder screen

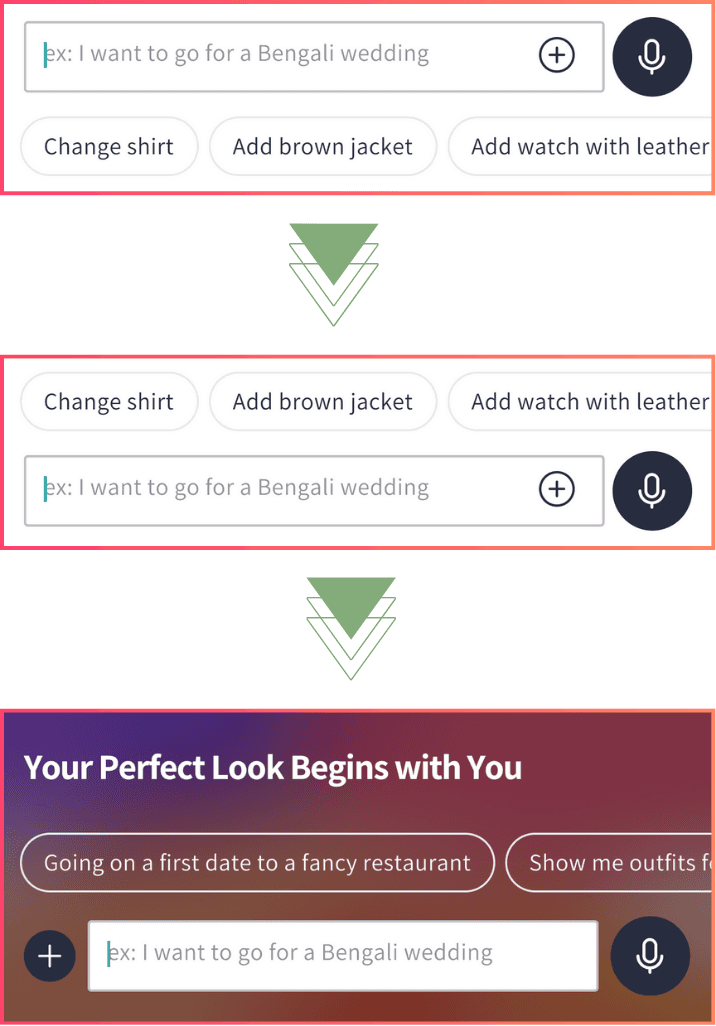
During usability testing, I noticed something interesting. People seemed to skip right over the suggestions and jumped into typing.
During usability testing, I noticed something interesting. People seemed to skip right over the suggestions and jumped into typing.
During usability testing, I noticed something interesting. People seemed to skip right over the suggestions and jumped into typing.
So, I started brainstorming how to make these suggestions more noticeable and useful. Then, I stumbled upon the Linkedin comment design, and it got me thinking - why did they set it up this way? Eventually, it clicked.
So, I started brainstorming how to make these suggestions more noticeable and useful. Then, I stumbled upon the Linkedin comment design, and it got me thinking - why did they set it up this way? Eventually, it clicked.
So, I started brainstorming how to make these suggestions more noticeable and useful. Then, I stumbled upon the Linkedin comment design, and it got me thinking - why did they set it up this way? Eventually, it clicked.
Placing those suggestions above the input box is kind of like how we chat in real life. We often think about what to say before we start typing, right?
Placing those suggestions above the input box is kind of like how we chat in real life. We often think about what to say before we start typing, right?
Placing those suggestions above the input box is kind of like how we chat in real life. We often think about what to say before we start typing, right?
Plus, having those suggestions up top nudges people to check them out before they begin typing. It makes the conversation more engaging and encourages more folks to use the chat feature.
Plus, having those suggestions up top nudges people to check them out before they begin typing. It makes the conversation more engaging and encourages more folks to use the chat feature.
Plus, having those suggestions up top nudges people to check them out before they begin typing. It makes the conversation more engaging and encourages more folks to use the chat feature.
While I was going through the reiteration process, I began to reevaluate the use cases I had initially considered for the input prompt.
While I was going through the reiteration process, I began to reevaluate the use cases I had initially considered for the input prompt.
While I was going through the reiteration process, I began to reevaluate the use cases I had initially considered for the input prompt.
I realised that these use cases didn't align with the user flow.
I realised that these use cases didn't align with the user flow.
I realised that these use cases didn't align with the user flow.
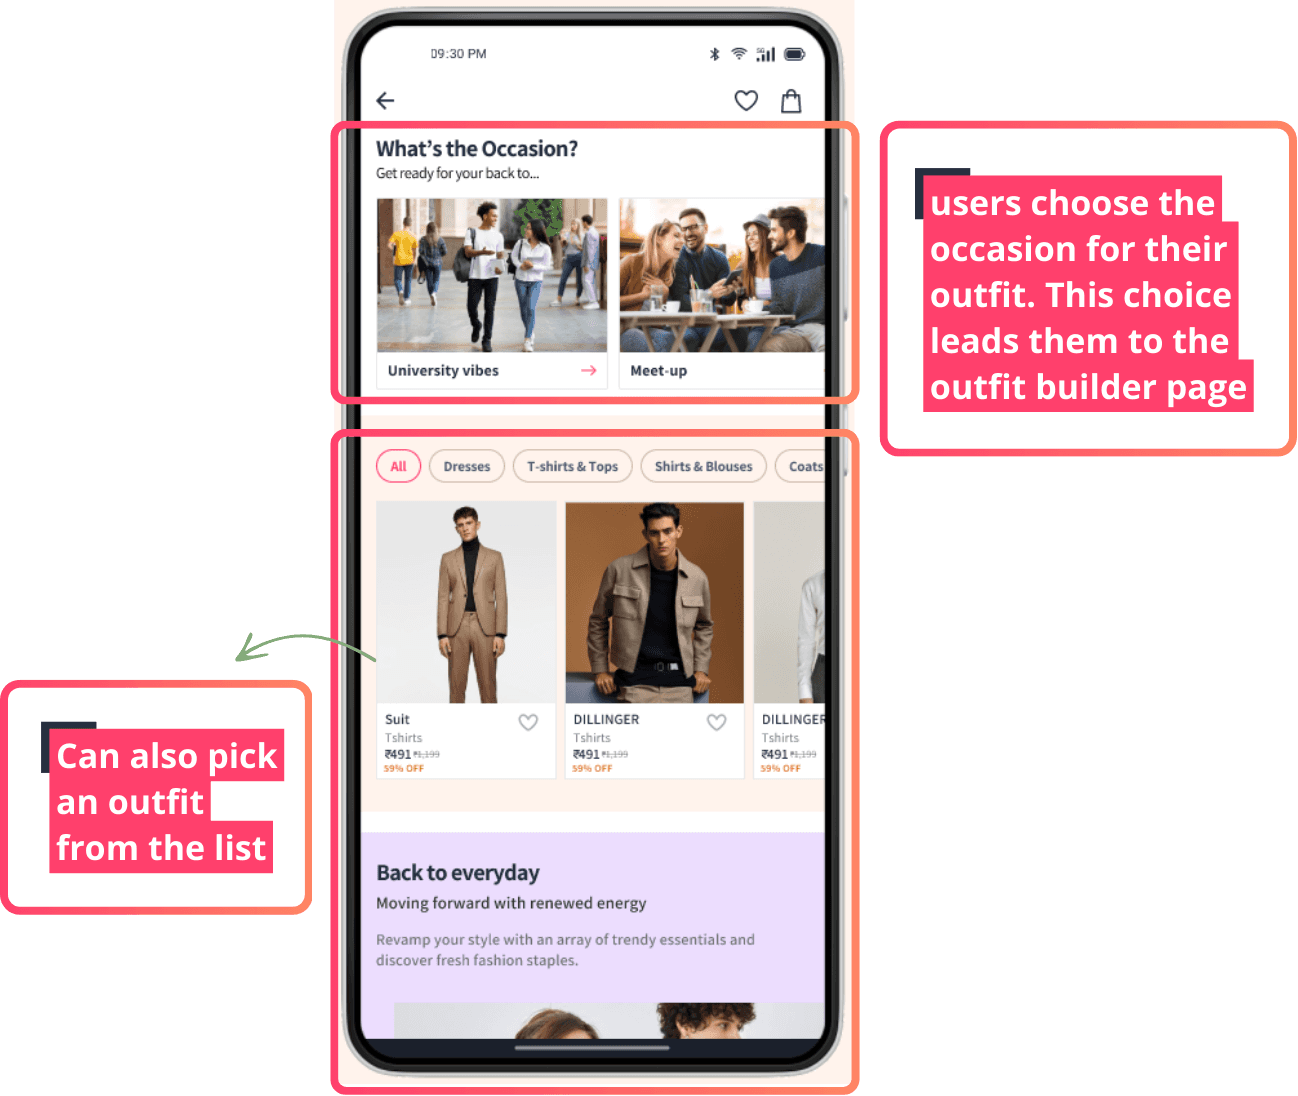
At the beginning, I had a vision that Users can then either choose an outfit from an occasion or select one from a below list of outfits, to start with, without confusing them. Once users have their initial outfit, they can move to the outfit builder page for customisation. This is where they can add accessories, change colours, and make other adjustments.
At the beginning, I had a vision that Users can then either choose an outfit from an occasion or select one from a below list of outfits, to start with, without confusing them. Once users have their initial outfit, they can move to the outfit builder page for customisation. This is where they can add accessories, change colours, and make other adjustments.
At the beginning, I had a vision that Users can then either choose an outfit from an occasion or select one from a below list of outfits, to start with, without confusing them. Once users have their initial outfit, they can move to the outfit builder page for customisation. This is where they can add accessories, change colours, and make other adjustments.
However, during testing, Users appeared confused about the extent of changes they could make. They weren't sure if they could simply adjust details or entirely change the occasion or outfit.
However, during testing, Users appeared confused about the extent of changes they could make. They weren't sure if they could simply adjust details or entirely change the occasion or outfit.
However, during testing, Users appeared confused about the extent of changes they could make. They weren't sure if they could simply adjust details or entirely change the occasion or outfit.
This confusion led to a time-consuming process of selecting an outfit since users weren't choosing from a list of outfits but rather relying on AI to suggest one. The suggested outfit might not align with the user's preferences, resulting in a prolonged selection process.
This confusion led to a time-consuming process of selecting an outfit since users weren't choosing from a list of outfits but rather relying on AI to suggest one. The suggested outfit might not align with the user's preferences, resulting in a prolonged selection process.
This confusion led to a time-consuming process of selecting an outfit since users weren't choosing from a list of outfits but rather relying on AI to suggest one. The suggested outfit might not align with the user's preferences, resulting in a prolonged selection process.
This situation made me reconsider the use of input prompts at this stage. I also identified limitations in the prompts' functionality. For instance, if a user requested to "change shirt type to a t-shirt," the change would occur, but the user couldn't see or select the specific t-shirt's colour, size, or style before applying it. Consequently, if the user wasn't satisfied, they'd have to provide another prompt, leading to a potentially endless cycle. Moreover, the exact item the user desired might not even be available in Myntra's product catalogue.
This situation made me reconsider the use of input prompts at this stage. I also identified limitations in the prompts' functionality. For instance, if a user requested to "change shirt type to a t-shirt," the change would occur, but the user couldn't see or select the specific t-shirt's colour, size, or style before applying it. Consequently, if the user wasn't satisfied, they'd have to provide another prompt, leading to a potentially endless cycle. Moreover, the exact item the user desired might not even be available in Myntra's product catalogue.
This situation made me reconsider the use of input prompts at this stage. I also identified limitations in the prompts' functionality. For instance, if a user requested to "change shirt type to a t-shirt," the change would occur, but the user couldn't see or select the specific t-shirt's colour, size, or style before applying it. Consequently, if the user wasn't satisfied, they'd have to provide another prompt, leading to a potentially endless cycle. Moreover, the exact item the user desired might not even be available in Myntra's product catalogue.
To improve the user experience, making it more practical, user-controlled, and efficient, I decided to make changes to this part of the feature.
To improve the user experience, making it more practical, user-controlled, and efficient, I decided to make changes to this part of the feature.
To improve the user experience, making it more practical, user-controlled, and efficient, I decided to make changes to this part of the feature.

Outfit builder screen
Outfit builder screen
Outfit builder screen
And while working on the detailed UI screens, I noticed something important during a peer review. One of the users was more interested in entering their own reason for buying an outfit rather than picking from the provided choices.
And while working on the detailed UI screens, I noticed something important during a peer review. One of the users was more interested in entering their own reason for buying an outfit rather than picking from the provided choices.
And while working on the detailed UI screens, I noticed something important during a peer review. One of the users was more interested in entering their own reason for buying an outfit rather than picking from the provided choices.
This made me rethink the user experience, especially because we were already having some concerns about using text prompts in the outfit builder. It was time to find a solution that could make both types of users happy – those who liked the predefined reasons and those who wanted to customise.
This made me rethink the user experience, especially because we were already having some concerns about using text prompts in the outfit builder. It was time to find a solution that could make both types of users happy – those who liked the predefined reasons and those who wanted to customise.
This made me rethink the user experience, especially because we were already having some concerns about using text prompts in the outfit builder. It was time to find a solution that could make both types of users happy – those who liked the predefined reasons and those who wanted to customise.
As I was refining the feature,
I also focused on making it more accessible. One key change I made was repositioning the icon for adding images to the left side. This move aimed to prevent accidental touches when users accessed the microphone icon to provide prompts via voice.
As I was refining the feature,
I also focused on making it more accessible. One key change I made was repositioning the icon for adding images to the left side. This move aimed to prevent accidental touches when users accessed the microphone icon to provide prompts via voice.
As I was refining the feature,
I also focused on making it more accessible. One key change I made was repositioning the icon for adding images to the left side. This move aimed to prevent accidental touches when users accessed the microphone icon to provide prompts via voice.
Style choices selection screen
Style choices selection screen
Style choices selection screen
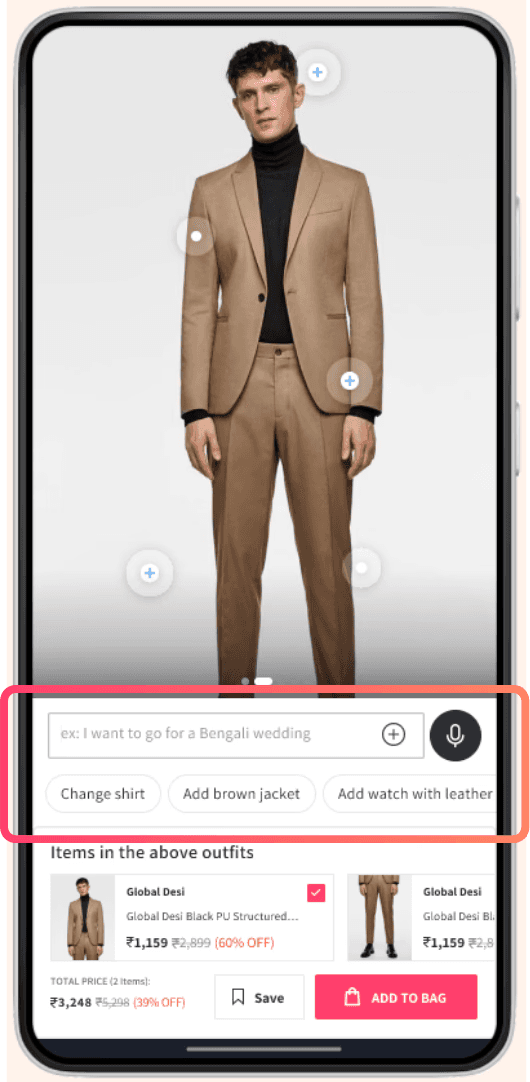
One prompt input Box, Multiple Ways to Perfect Your Look:
One prompt input Box, Multiple Ways to Perfect Your Look:
One prompt input Box, Multiple Ways to Perfect Your Look:
Manually input your outfit customisations
Manually input your outfit customisations
Manually input your outfit customisations
Speak your preferences directly into the input box for hands-free outfit creation.
Speak your preferences directly into the input box for hands-free outfit creation.
Speak your preferences directly into the input box for hands-free outfit creation.
Speed up the process by selecting from intuitive suggestions for your perfect look.
Speed up the process by selecting from intuitive suggestions for your perfect look.
Speed up the process by selecting from intuitive suggestions for your perfect look.
Alright, so let's dive into how I designed the interface to accommodate these three different ways of providing prompts.
Alright, so let's dive into how I designed the interface to accommodate these three different ways of providing prompts.
Utilising variant properties for prompt input animation
Utilising variant properties for prompt input animation
Utilising variant properties for prompt input animation
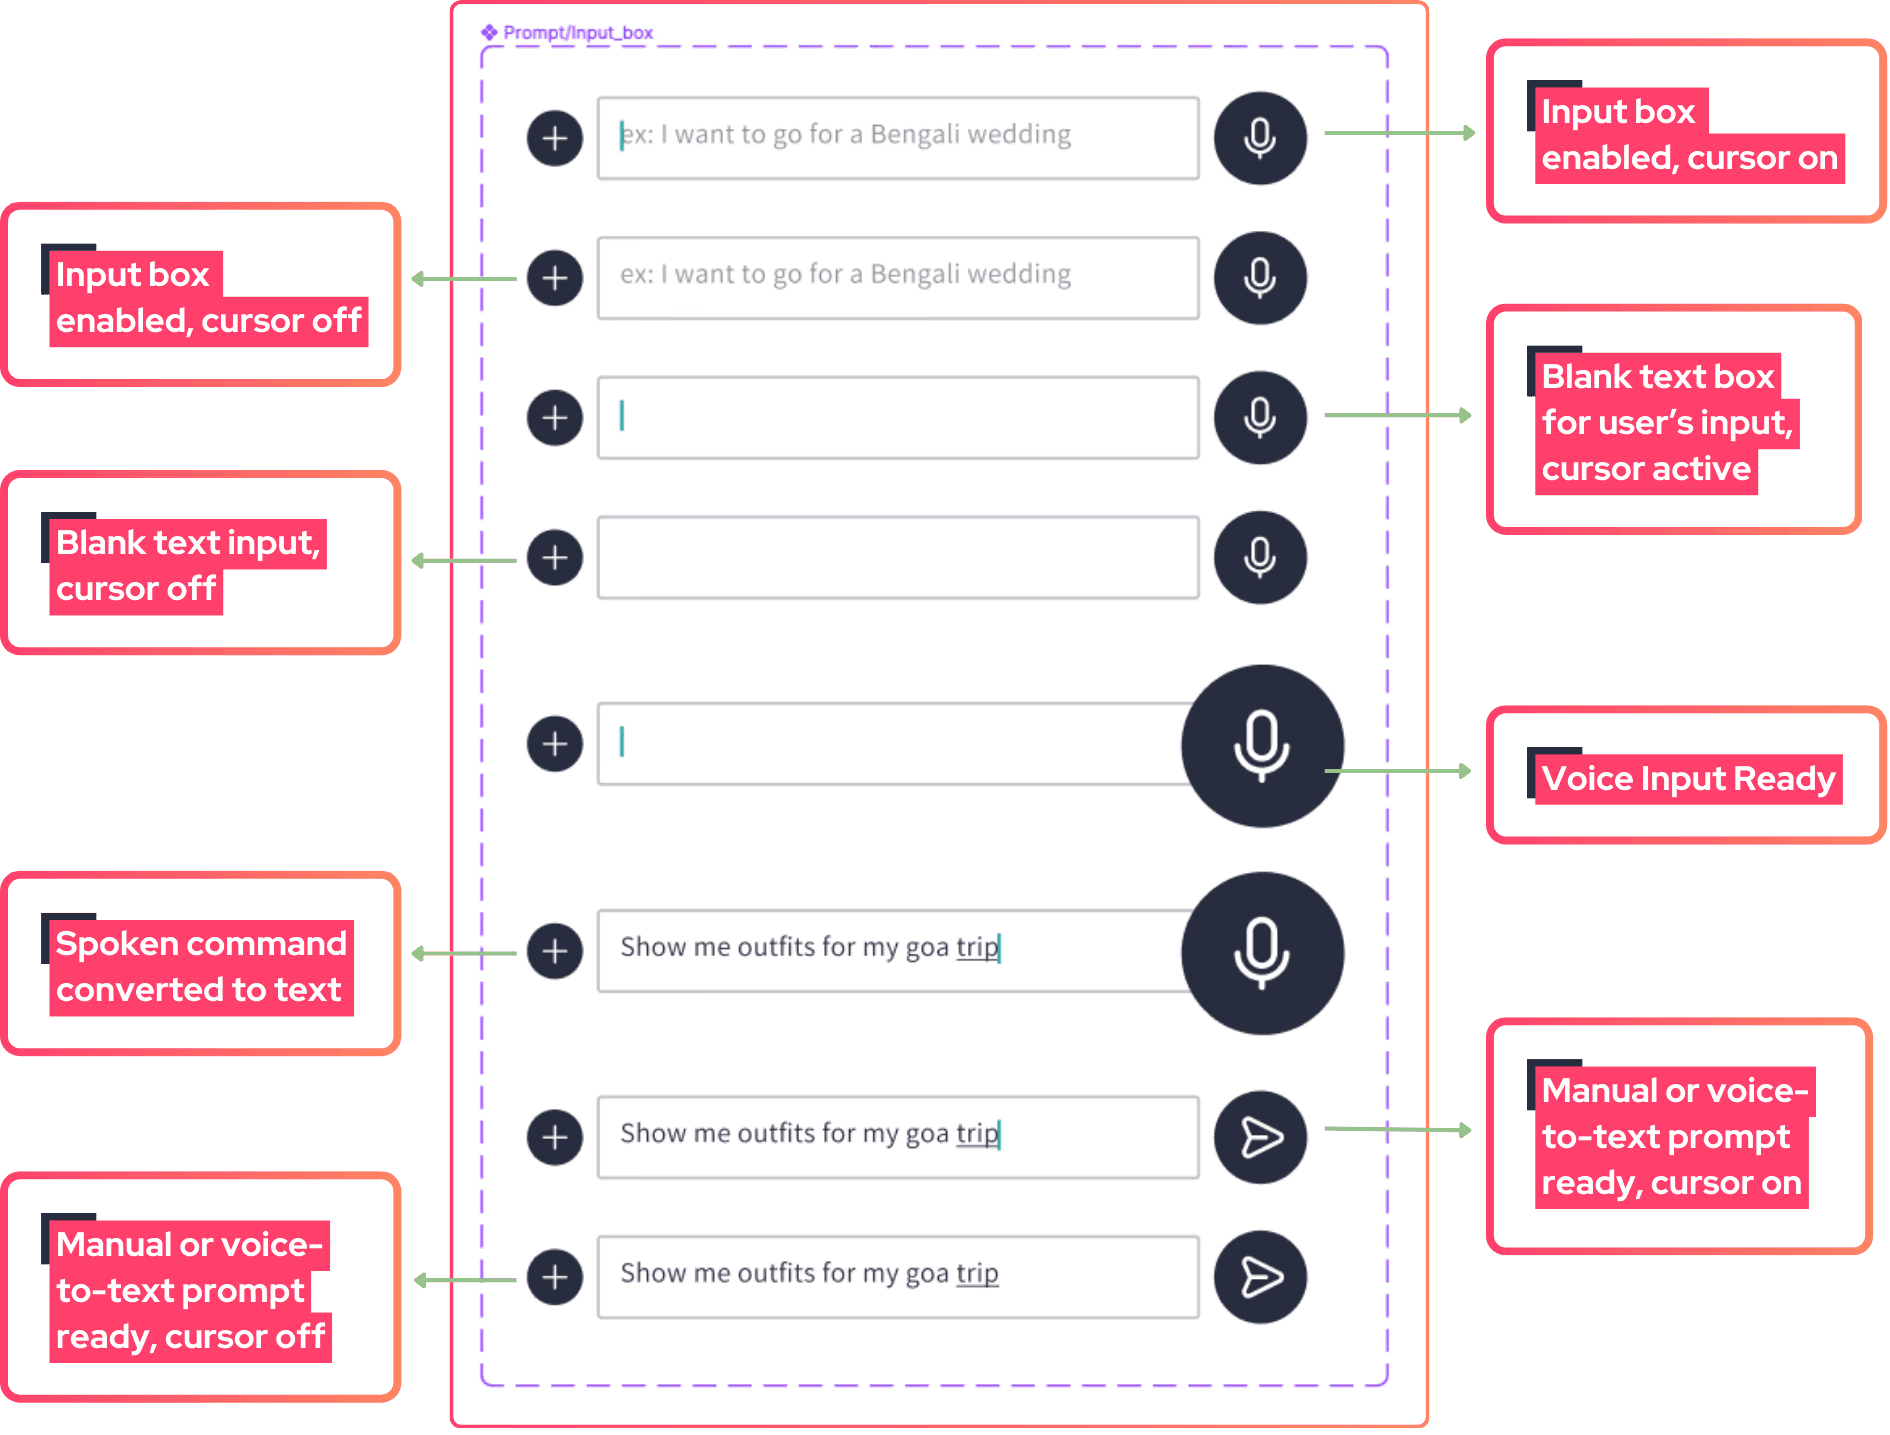
Components with variants for prompt input animation
Components with variants for prompt input animation
Components with variants for prompt input animation
Solving the challenge of creating outfits from scratch
Solving the challenge of creating outfits from scratch
Solving the challenge of creating outfits from scratch
Outfit builder screen
Outfit builder screen
So, I revisited my primary research insights and my prioritization list, trying to find the next piece of the puzzle to enhance the user experience.
So, I revisited my primary research insights and my prioritization list, trying to find the next piece of the puzzle to enhance the user experience.
So, I revisited my primary research insights and my prioritization list, trying to find the next piece of the puzzle to enhance the user experience.
What I discovered was a common challenge among users: Creating complete outfits from scratch. Many folks felt a bit lost in this process, so I wanted to offer them a helping hand.
What I discovered was a common challenge among users: Creating complete outfits from scratch. Many folks felt a bit lost in this process, so I wanted to offer them a helping hand.
What I discovered was a common challenge among users: Creating complete outfits from scratch. Many folks felt a bit lost in this process, so I wanted to offer them a helping hand.
That's when the idea of "mix-and-match suggestions" came into play 😇. These suggestions aim to take the guesswork out of outfit creation. It show users how different pieces can come together to create stylish outfits, making the whole process a breeze.
That's when the idea of "mix-and-match suggestions" came into play 😇. These suggestions aim to take the guesswork out of outfit creation. It show users how different pieces can come together to create stylish outfits, making the whole process a breeze.
That's when the idea of "mix-and-match suggestions" came into play 😇. These suggestions aim to take the guesswork out of outfit creation. It show users how different pieces can come together to create stylish outfits, making the whole process a breeze.
But I didn't stop there 😅. I also thought about users who might not be comfortable scanning their entire bodies in the virtual fitting room, whether due to privacy concerns or limited time. This led to the creation of three distinct outfit display options:
But I didn't stop there 😅. I also thought about users who might not be comfortable scanning their entire bodies in the virtual fitting room, whether due to privacy concerns or limited time. This led to the creation of three distinct outfit display options:
But I didn't stop there 😅. I also thought about users who might not be comfortable scanning their entire bodies in the virtual fitting room, whether due to privacy concerns or limited time. This led to the creation of three distinct outfit display options:
First, there's "Wear" This option lets users fully immerse themselves in the outfit by scanning their bodies. It's like trying it on in real life, virtually.
First, there's "Wear" This option lets users fully immerse themselves in the outfit by scanning their bodies. It's like trying it on in real life, virtually.
First, there's "Wear" This option lets users fully immerse themselves in the outfit by scanning their bodies. It's like trying it on in real life, virtually.
Then comes "Mannequin" This is for users who prefer a quicker solution. They provide some basic body information, like height weight and body type, and VirtuFit creates a mannequin that reflects their body type. It offers a handy way to visualize the outfit without the fuss.
Then comes "Mannequin" This is for users who prefer a quicker solution. They provide some basic body information, like height weight and body type, and VirtuFit creates a mannequin that reflects their body type. It offers a handy way to visualize the outfit without the fuss.
Then comes "Mannequin" This is for users who prefer a quicker solution. They provide some basic body information, like height weight and body type, and VirtuFit creates a mannequin that reflects their body type. It offers a handy way to visualize the outfit without the fuss.
And For those who prefer not to scan or provide detailed body information, the "Photo" mode offers a detailed view of the outfit without any scanning requirements.
And For those who prefer not to scan or provide detailed body information, the "Photo" mode offers a detailed view of the outfit without any scanning requirements.
And For those who prefer not to scan or provide detailed body information, the "Photo" mode offers a detailed view of the outfit without any scanning requirements.
These changes have made VirtuFit more versatile and user-friendly. Outfit building has become faster and simpler, no matter your preferences or constraints.
These changes have made VirtuFit more versatile and user-friendly. Outfit building has become faster and simpler, no matter your preferences or constraints.
These changes have made VirtuFit more versatile and user-friendly. Outfit building has become faster and simpler, no matter your preferences or constraints.
First version
First version
First version
For users who haven't created their mannequin or tried the 'Wear' option, a note will guide them to create their mannequin or initiate a scanning process to enable these features.
For users who haven't created their mannequin or tried the 'Wear' option, a note will guide them to create their mannequin or initiate a scanning process to enable these features.
For users who haven't created their mannequin or tried the 'Wear' option, a note will guide them to create their mannequin or initiate a scanning process to enable these features.
After few iterations
After few iterations
After few iterations
After shifting the 'prompt input' to the Style Choice Selection Screen, However, this transition wasn't without its challenges due to the limitations I mentioned earlier. In my quest for a more user-friendly, practical, and efficient customisation solution, I explored various ideas and ultimately settled on one solution.
After shifting the 'prompt input' to the Style Choice Selection Screen, However, this transition wasn't without its challenges due to the limitations I mentioned earlier. In my quest for a more user-friendly, practical, and efficient customisation solution, I explored various ideas and ultimately settled on one solution.
After shifting the 'prompt input' to the Style Choice Selection Screen, However, this transition wasn't without its challenges due to the limitations I mentioned earlier. In my quest for a more user-friendly, practical, and efficient customisation solution, I explored various ideas and ultimately settled on one solution.

In the final version, the linear steps for practical customization remained, but a powerful addition was filters.
Users could now have more control in finding specific items and adjusting their outfit. Filters provided a convenient way to fine-tune their choices, making the outfit-building experience even more user-friendly.
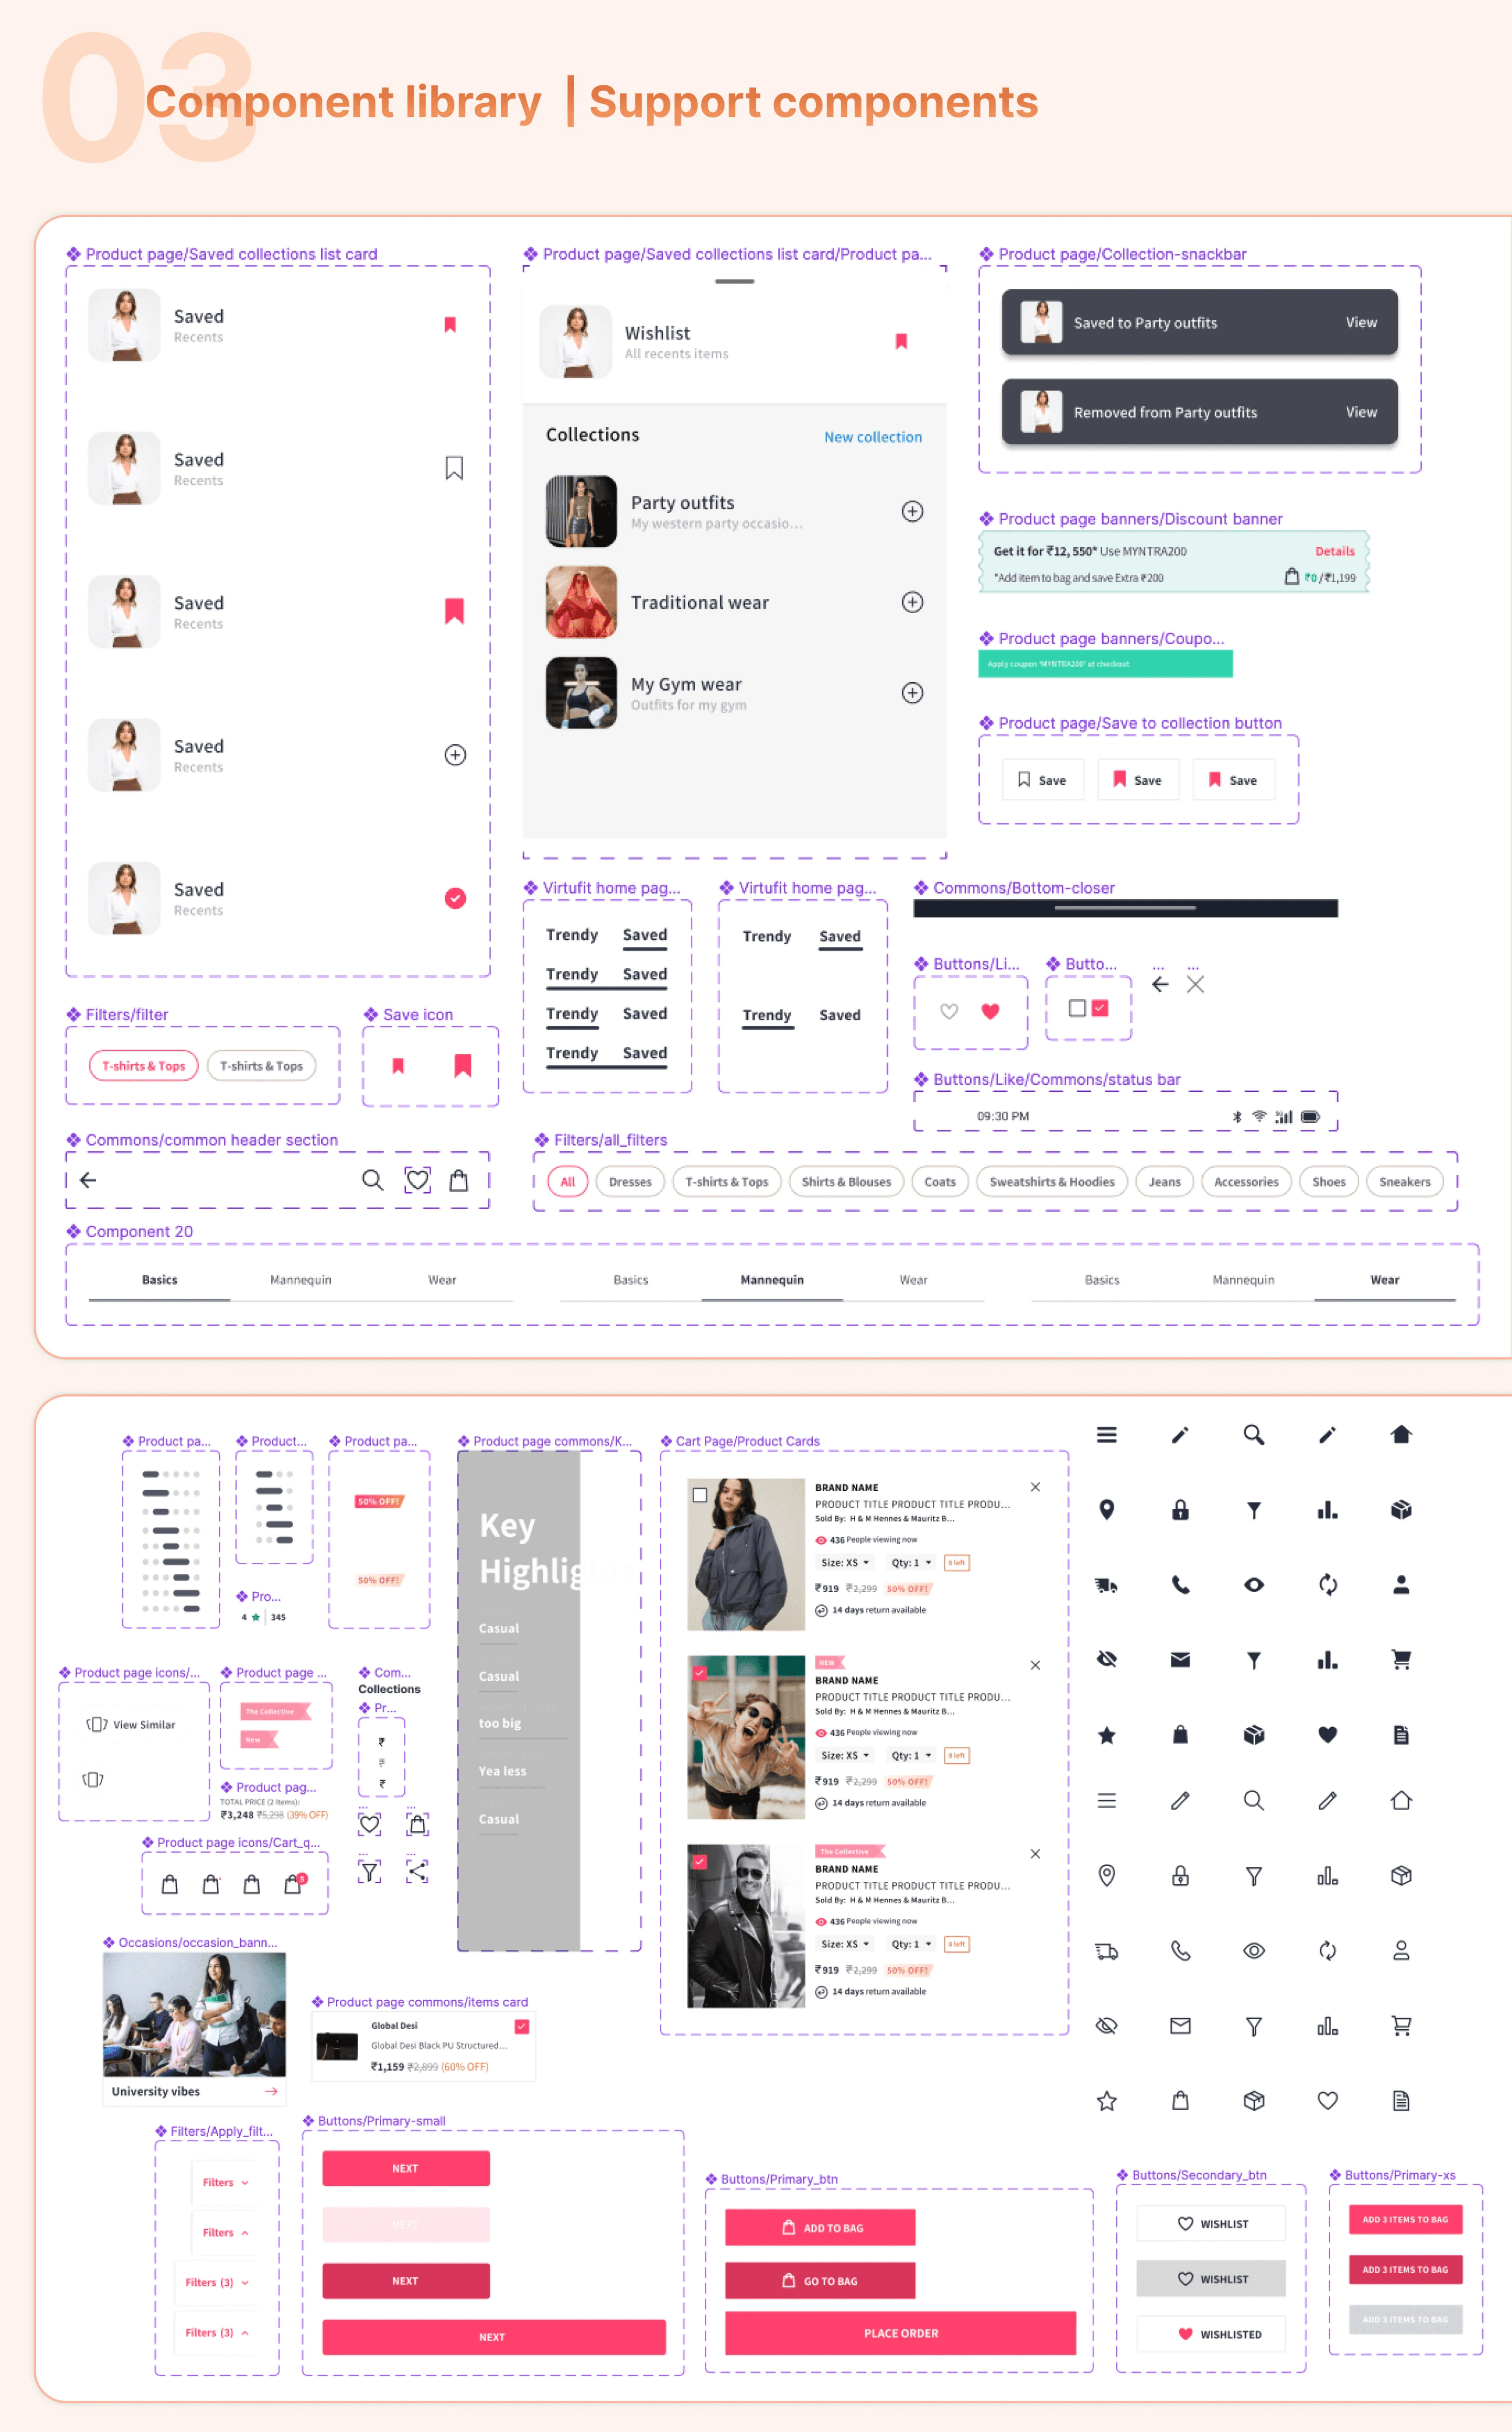
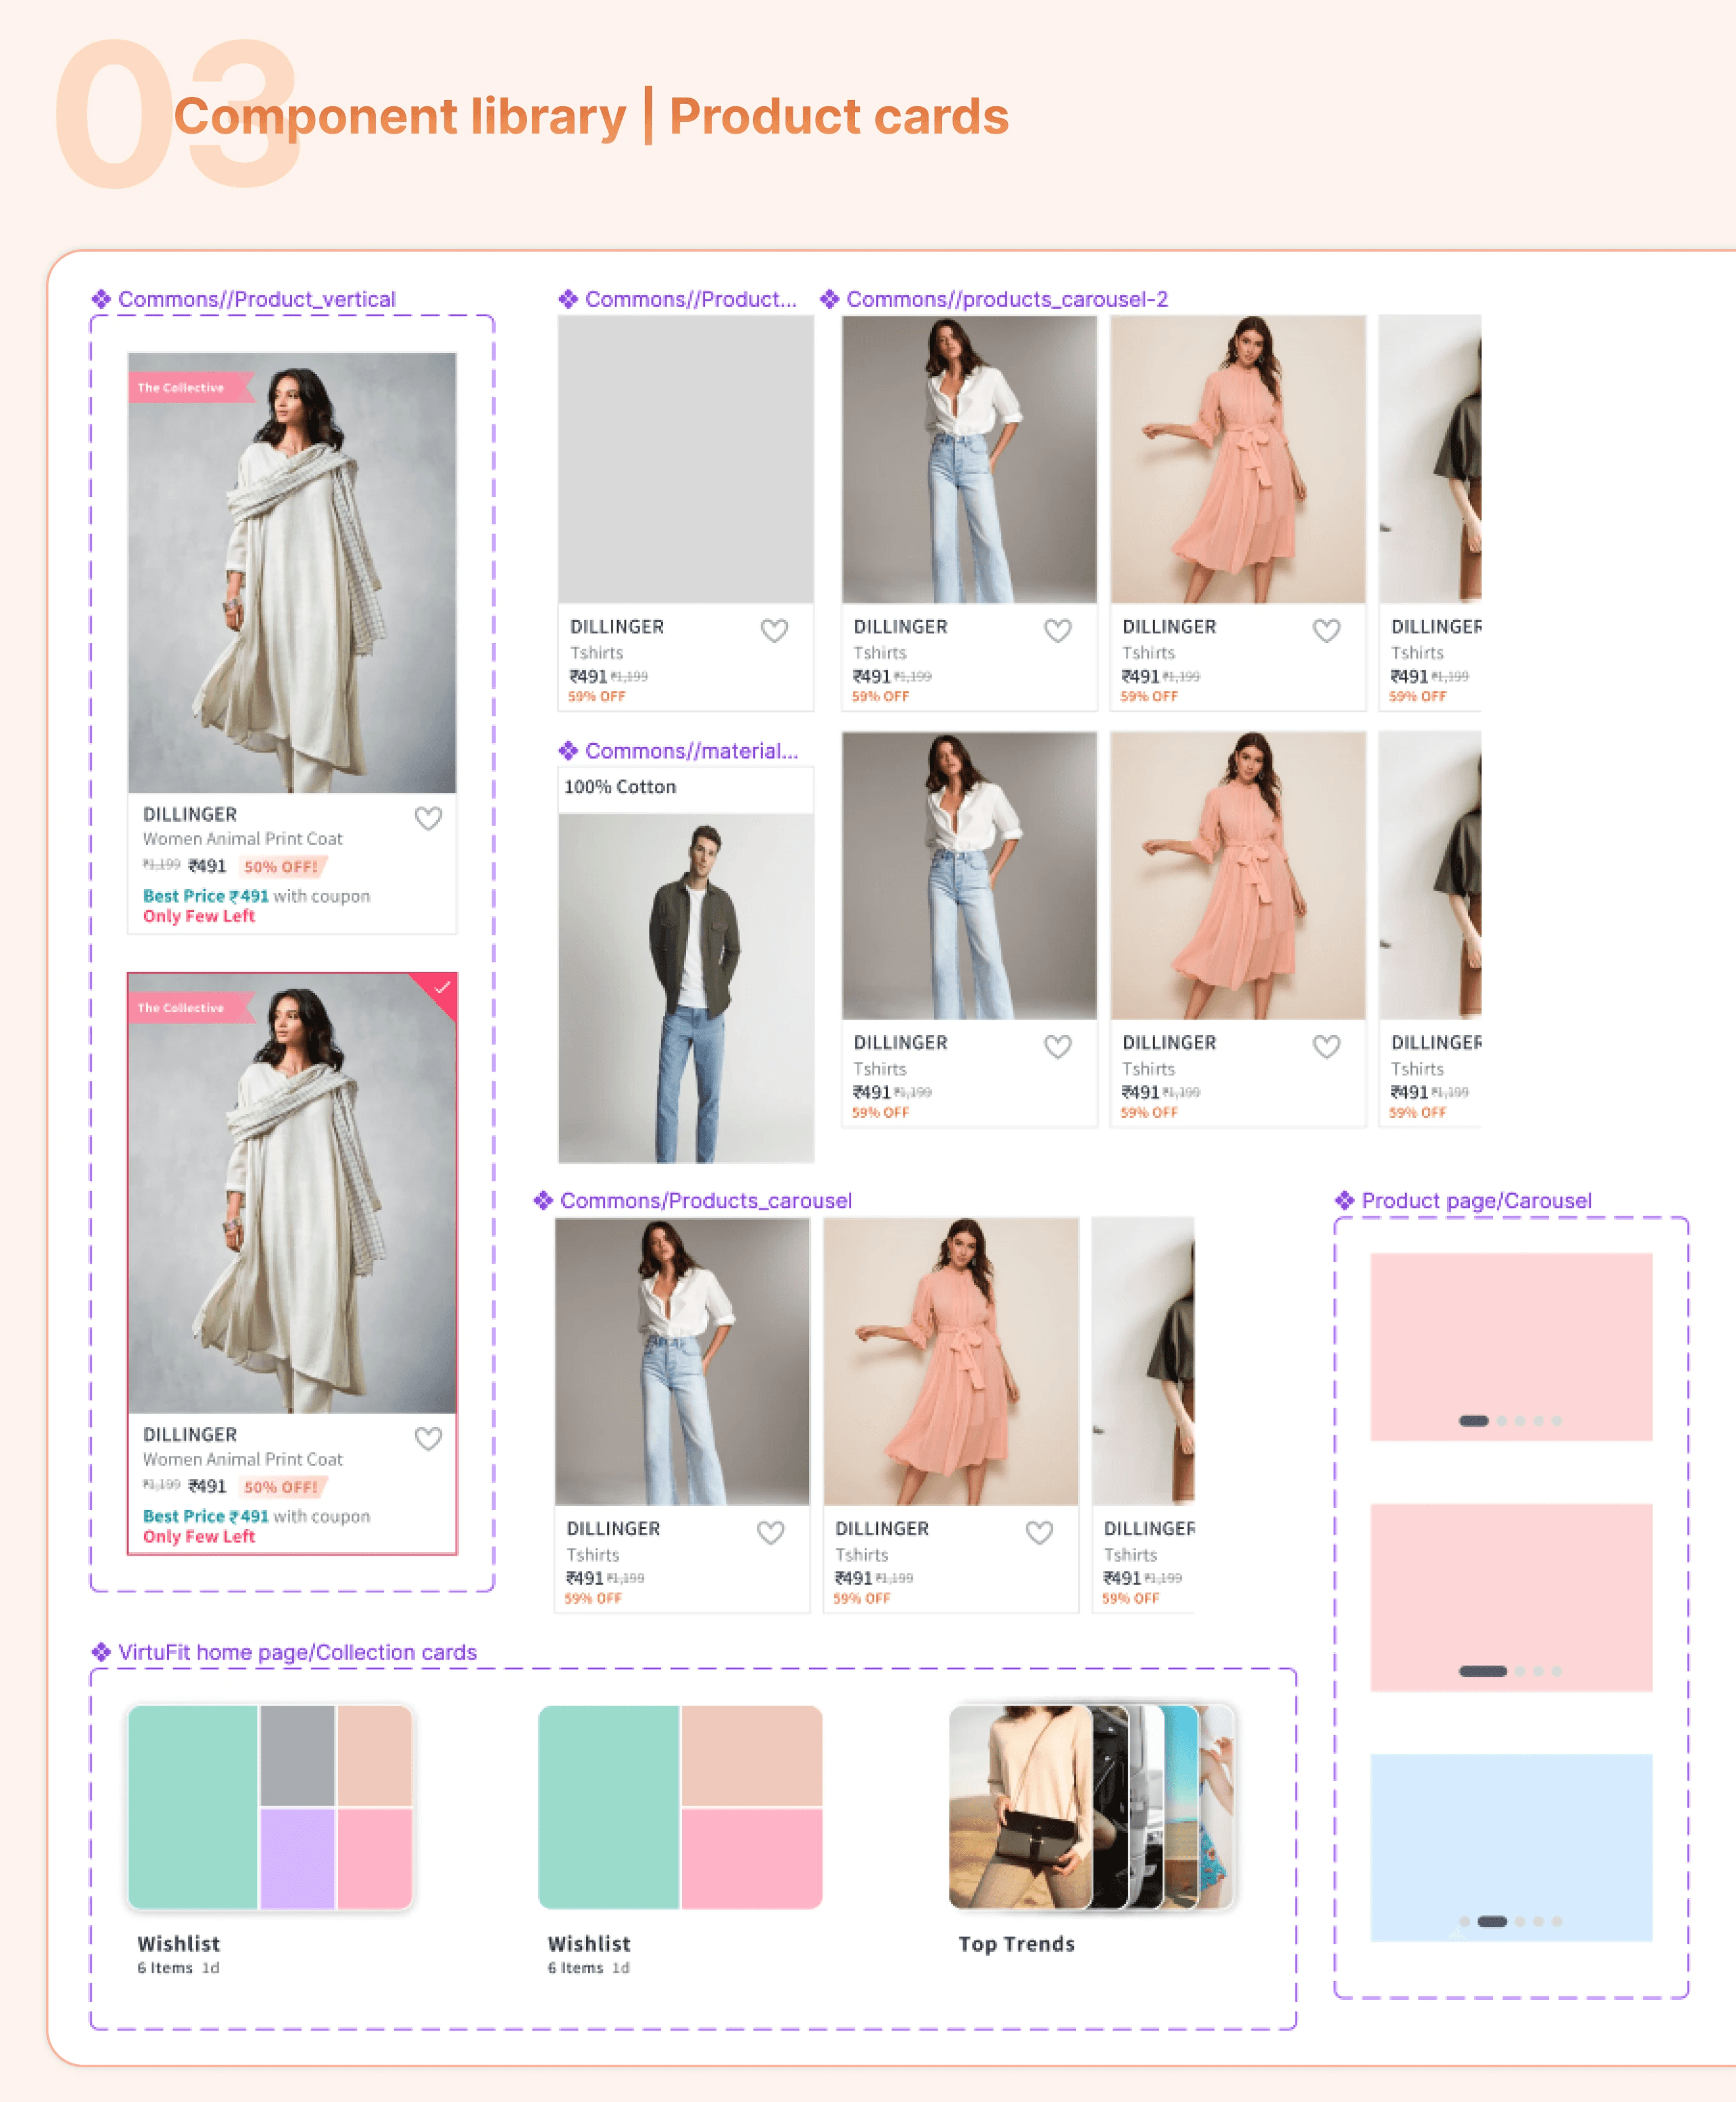
How my approach influenced consistent design assets?
How my approach influenced consistent design assets?
How my approach influenced consistent design assets?
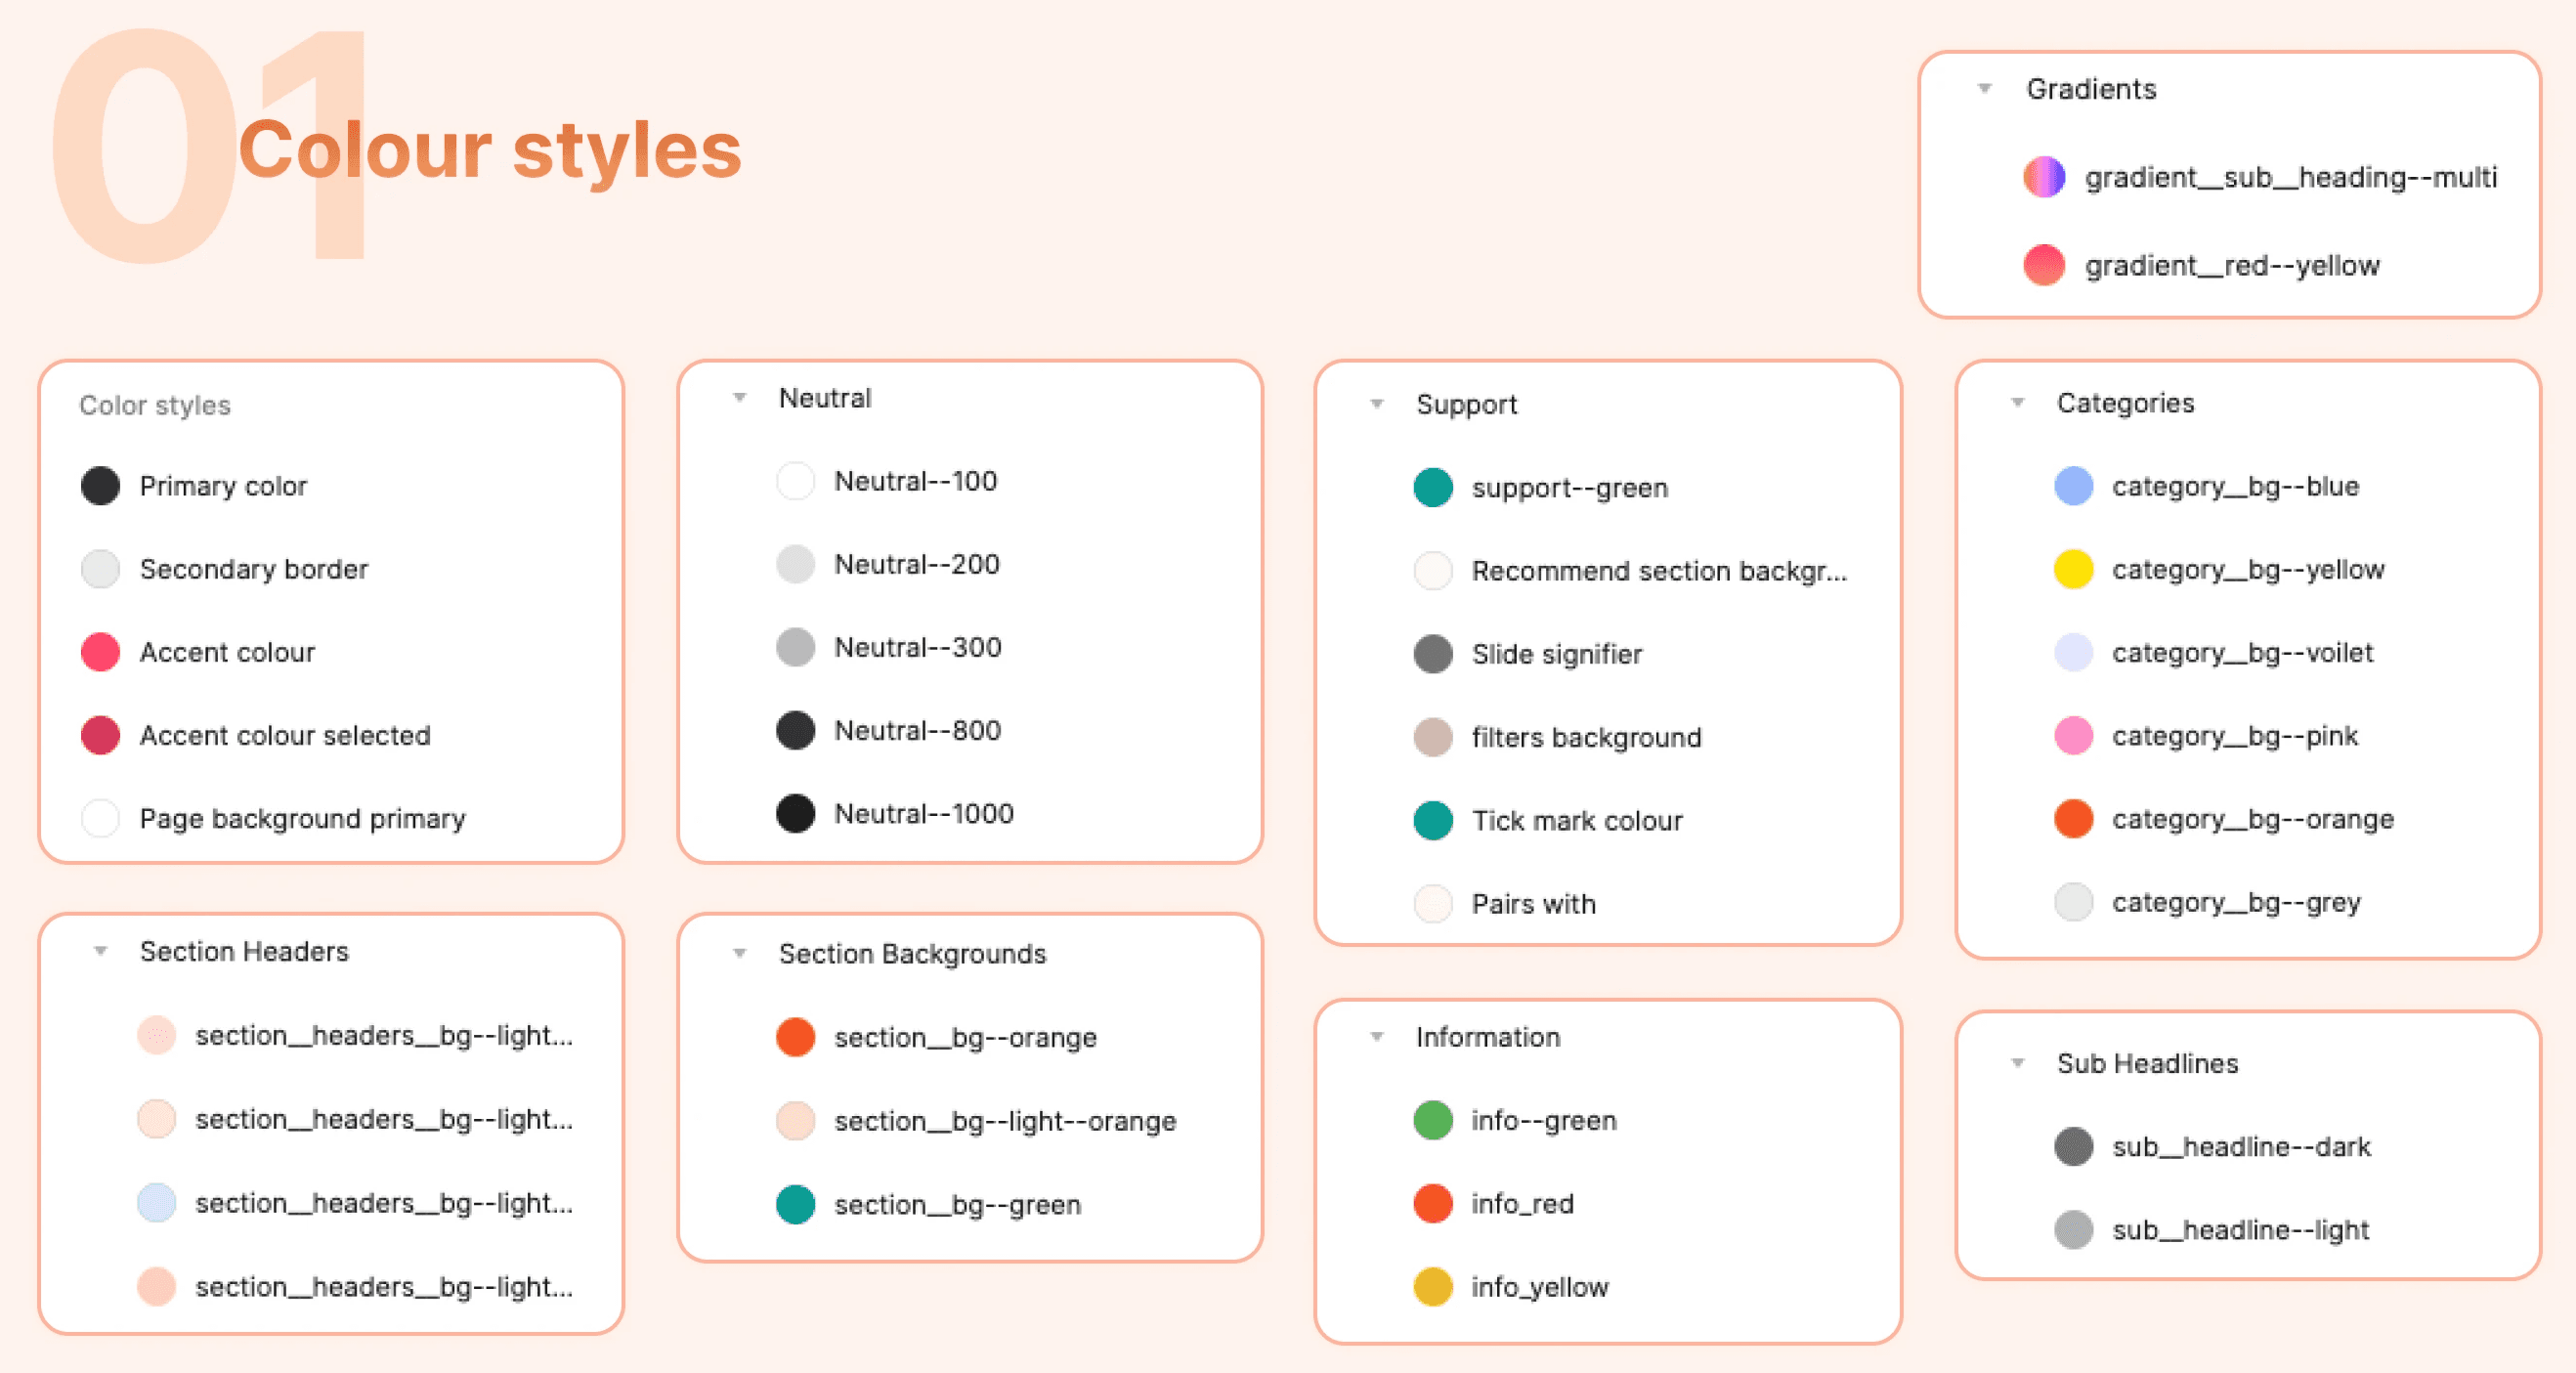
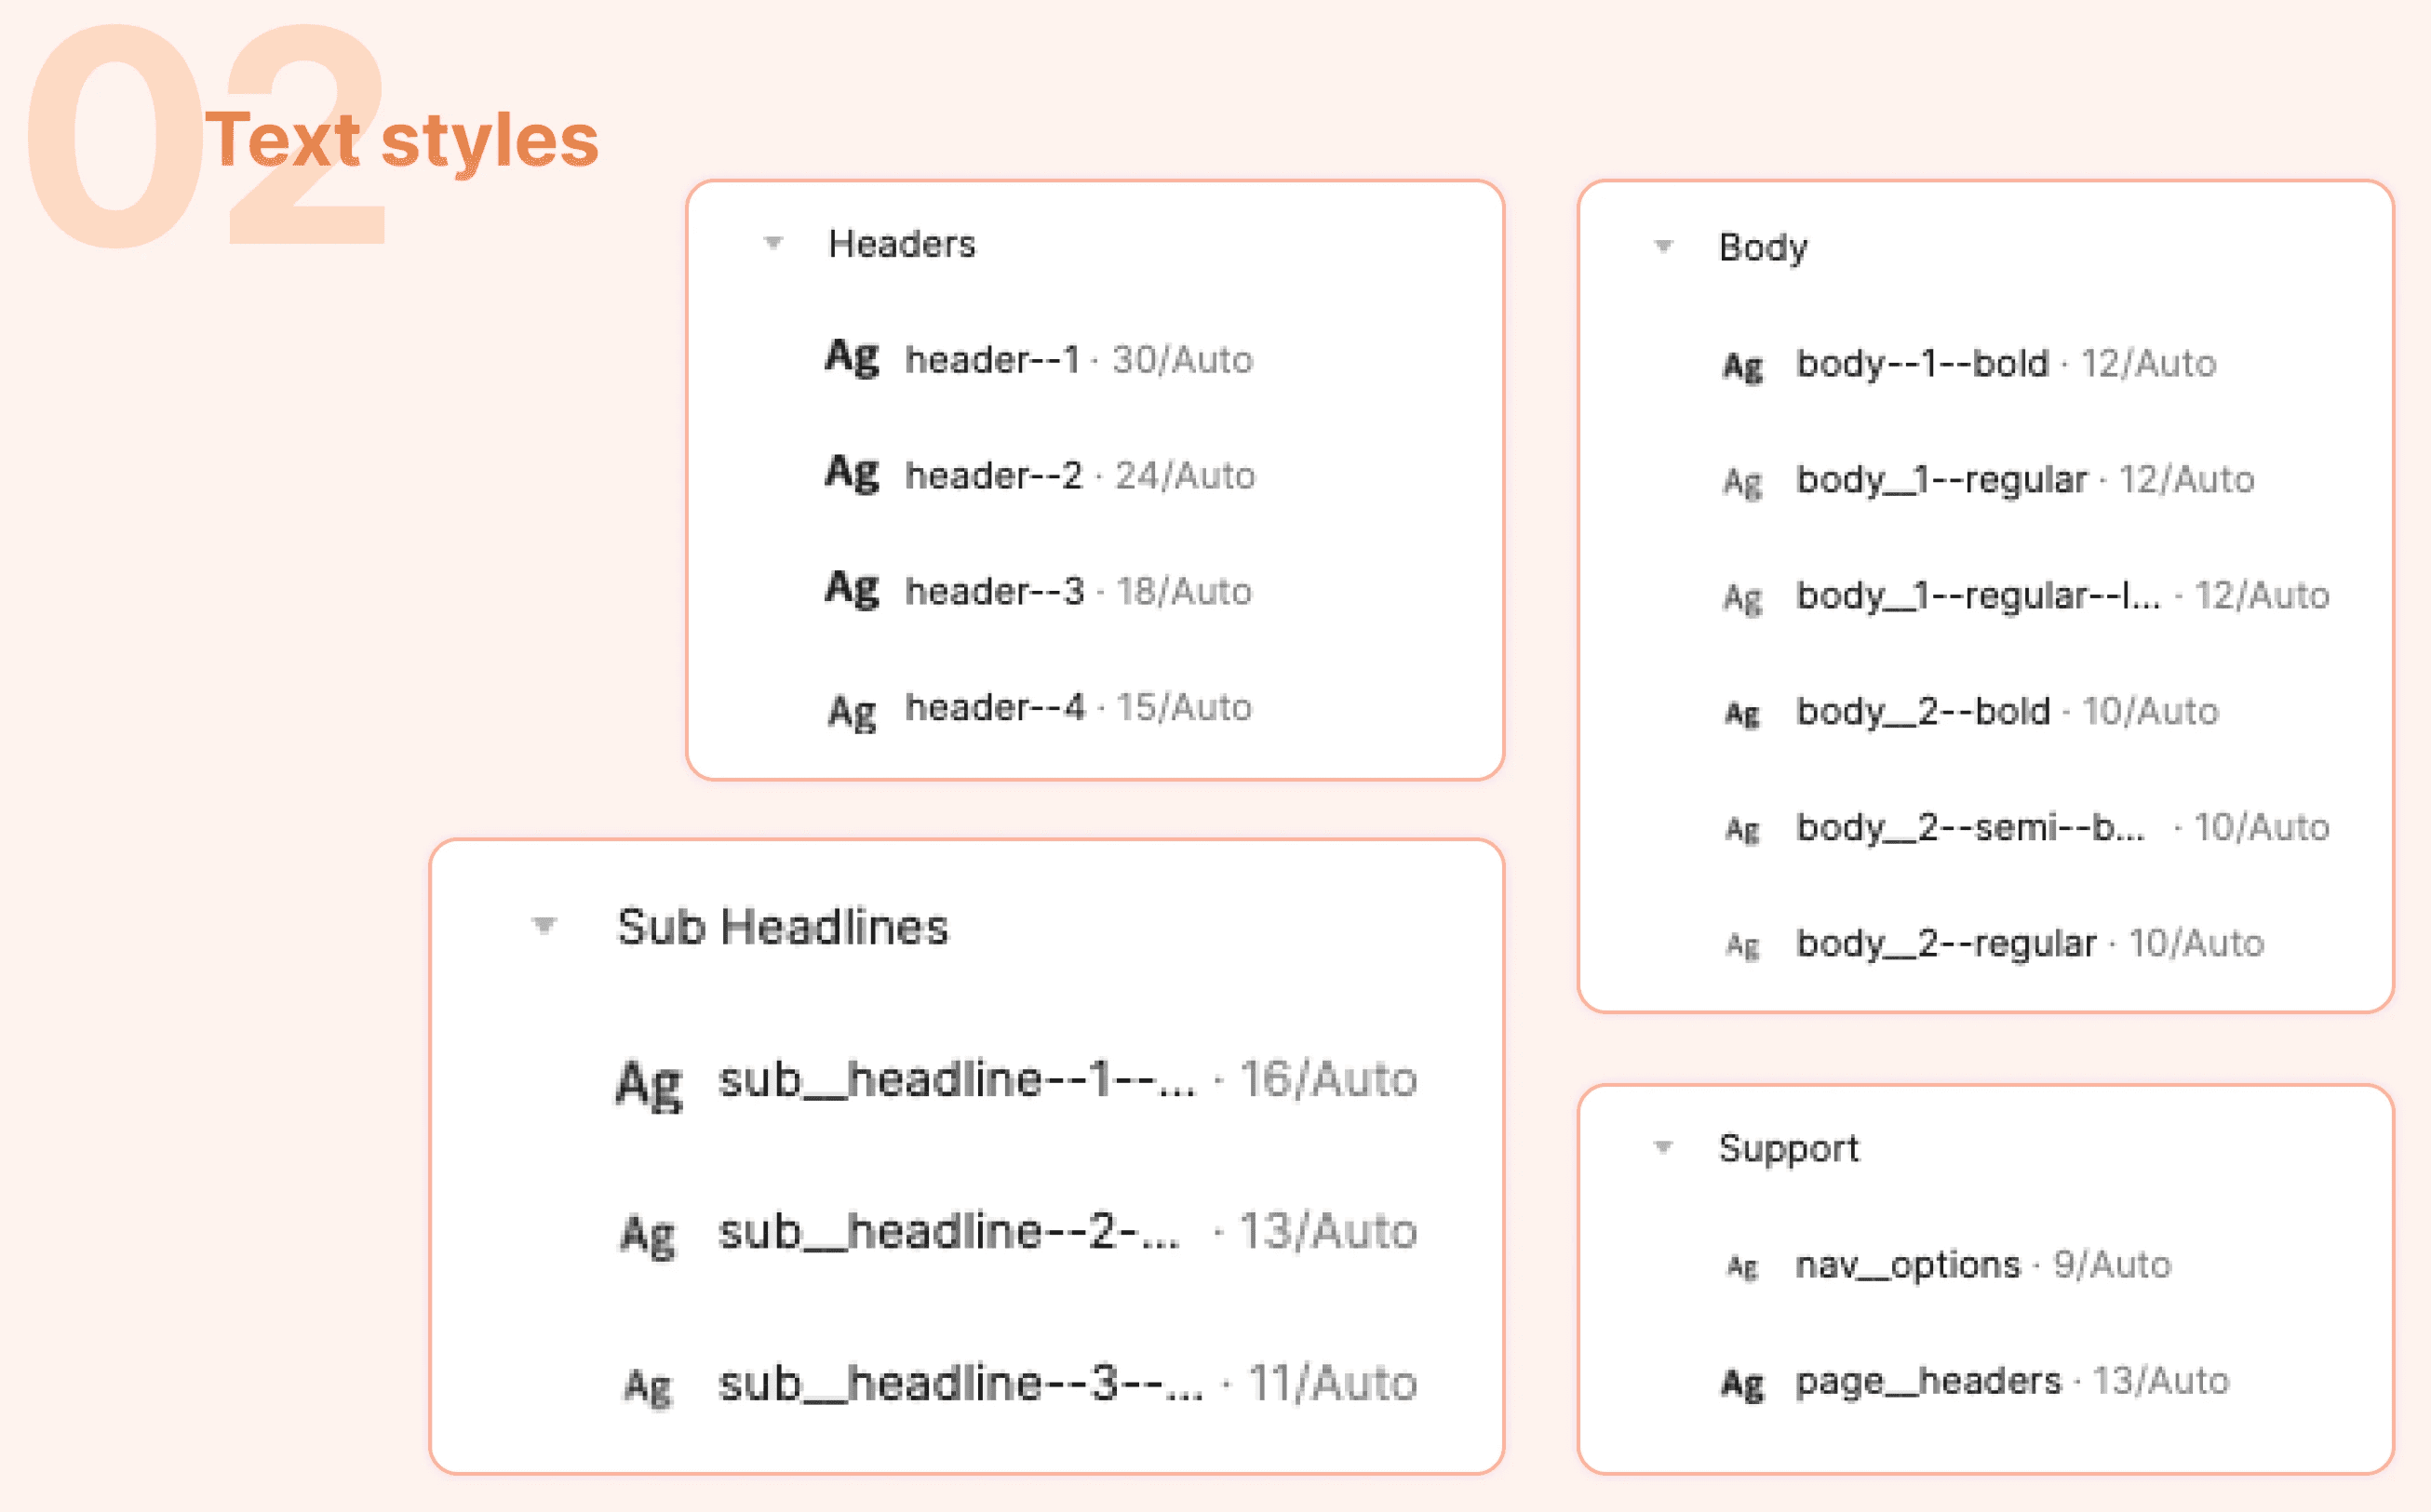
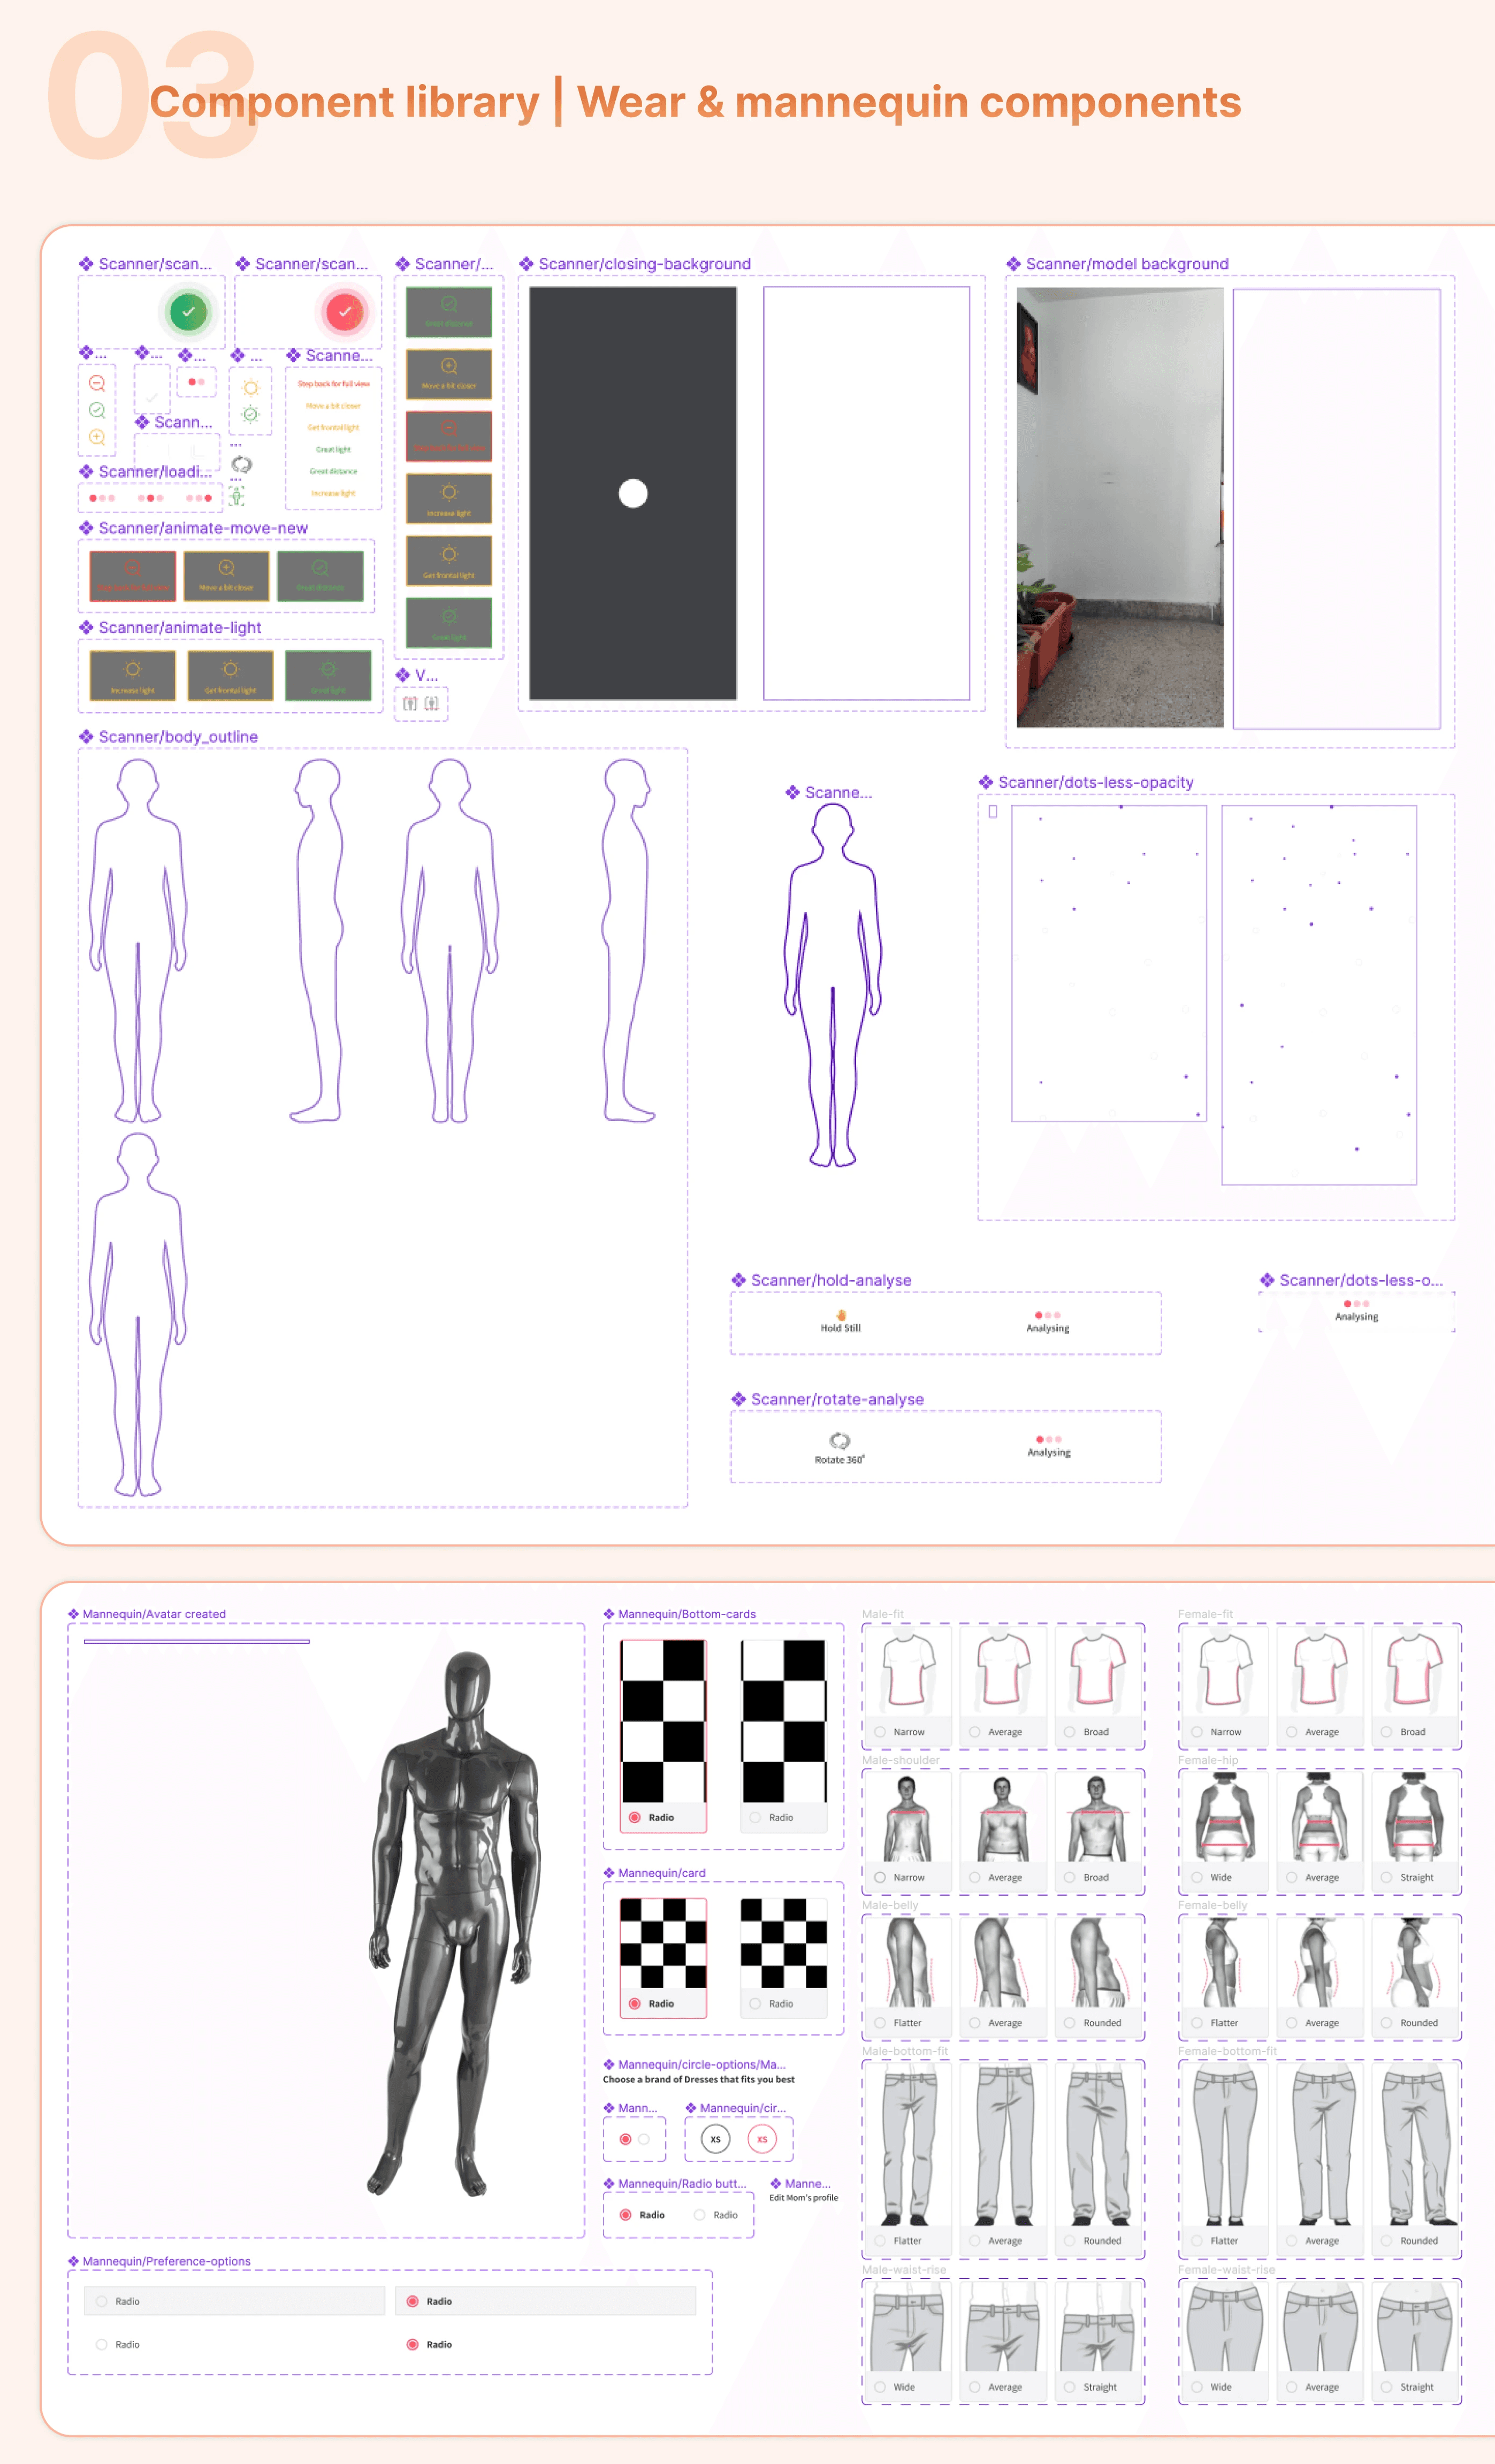
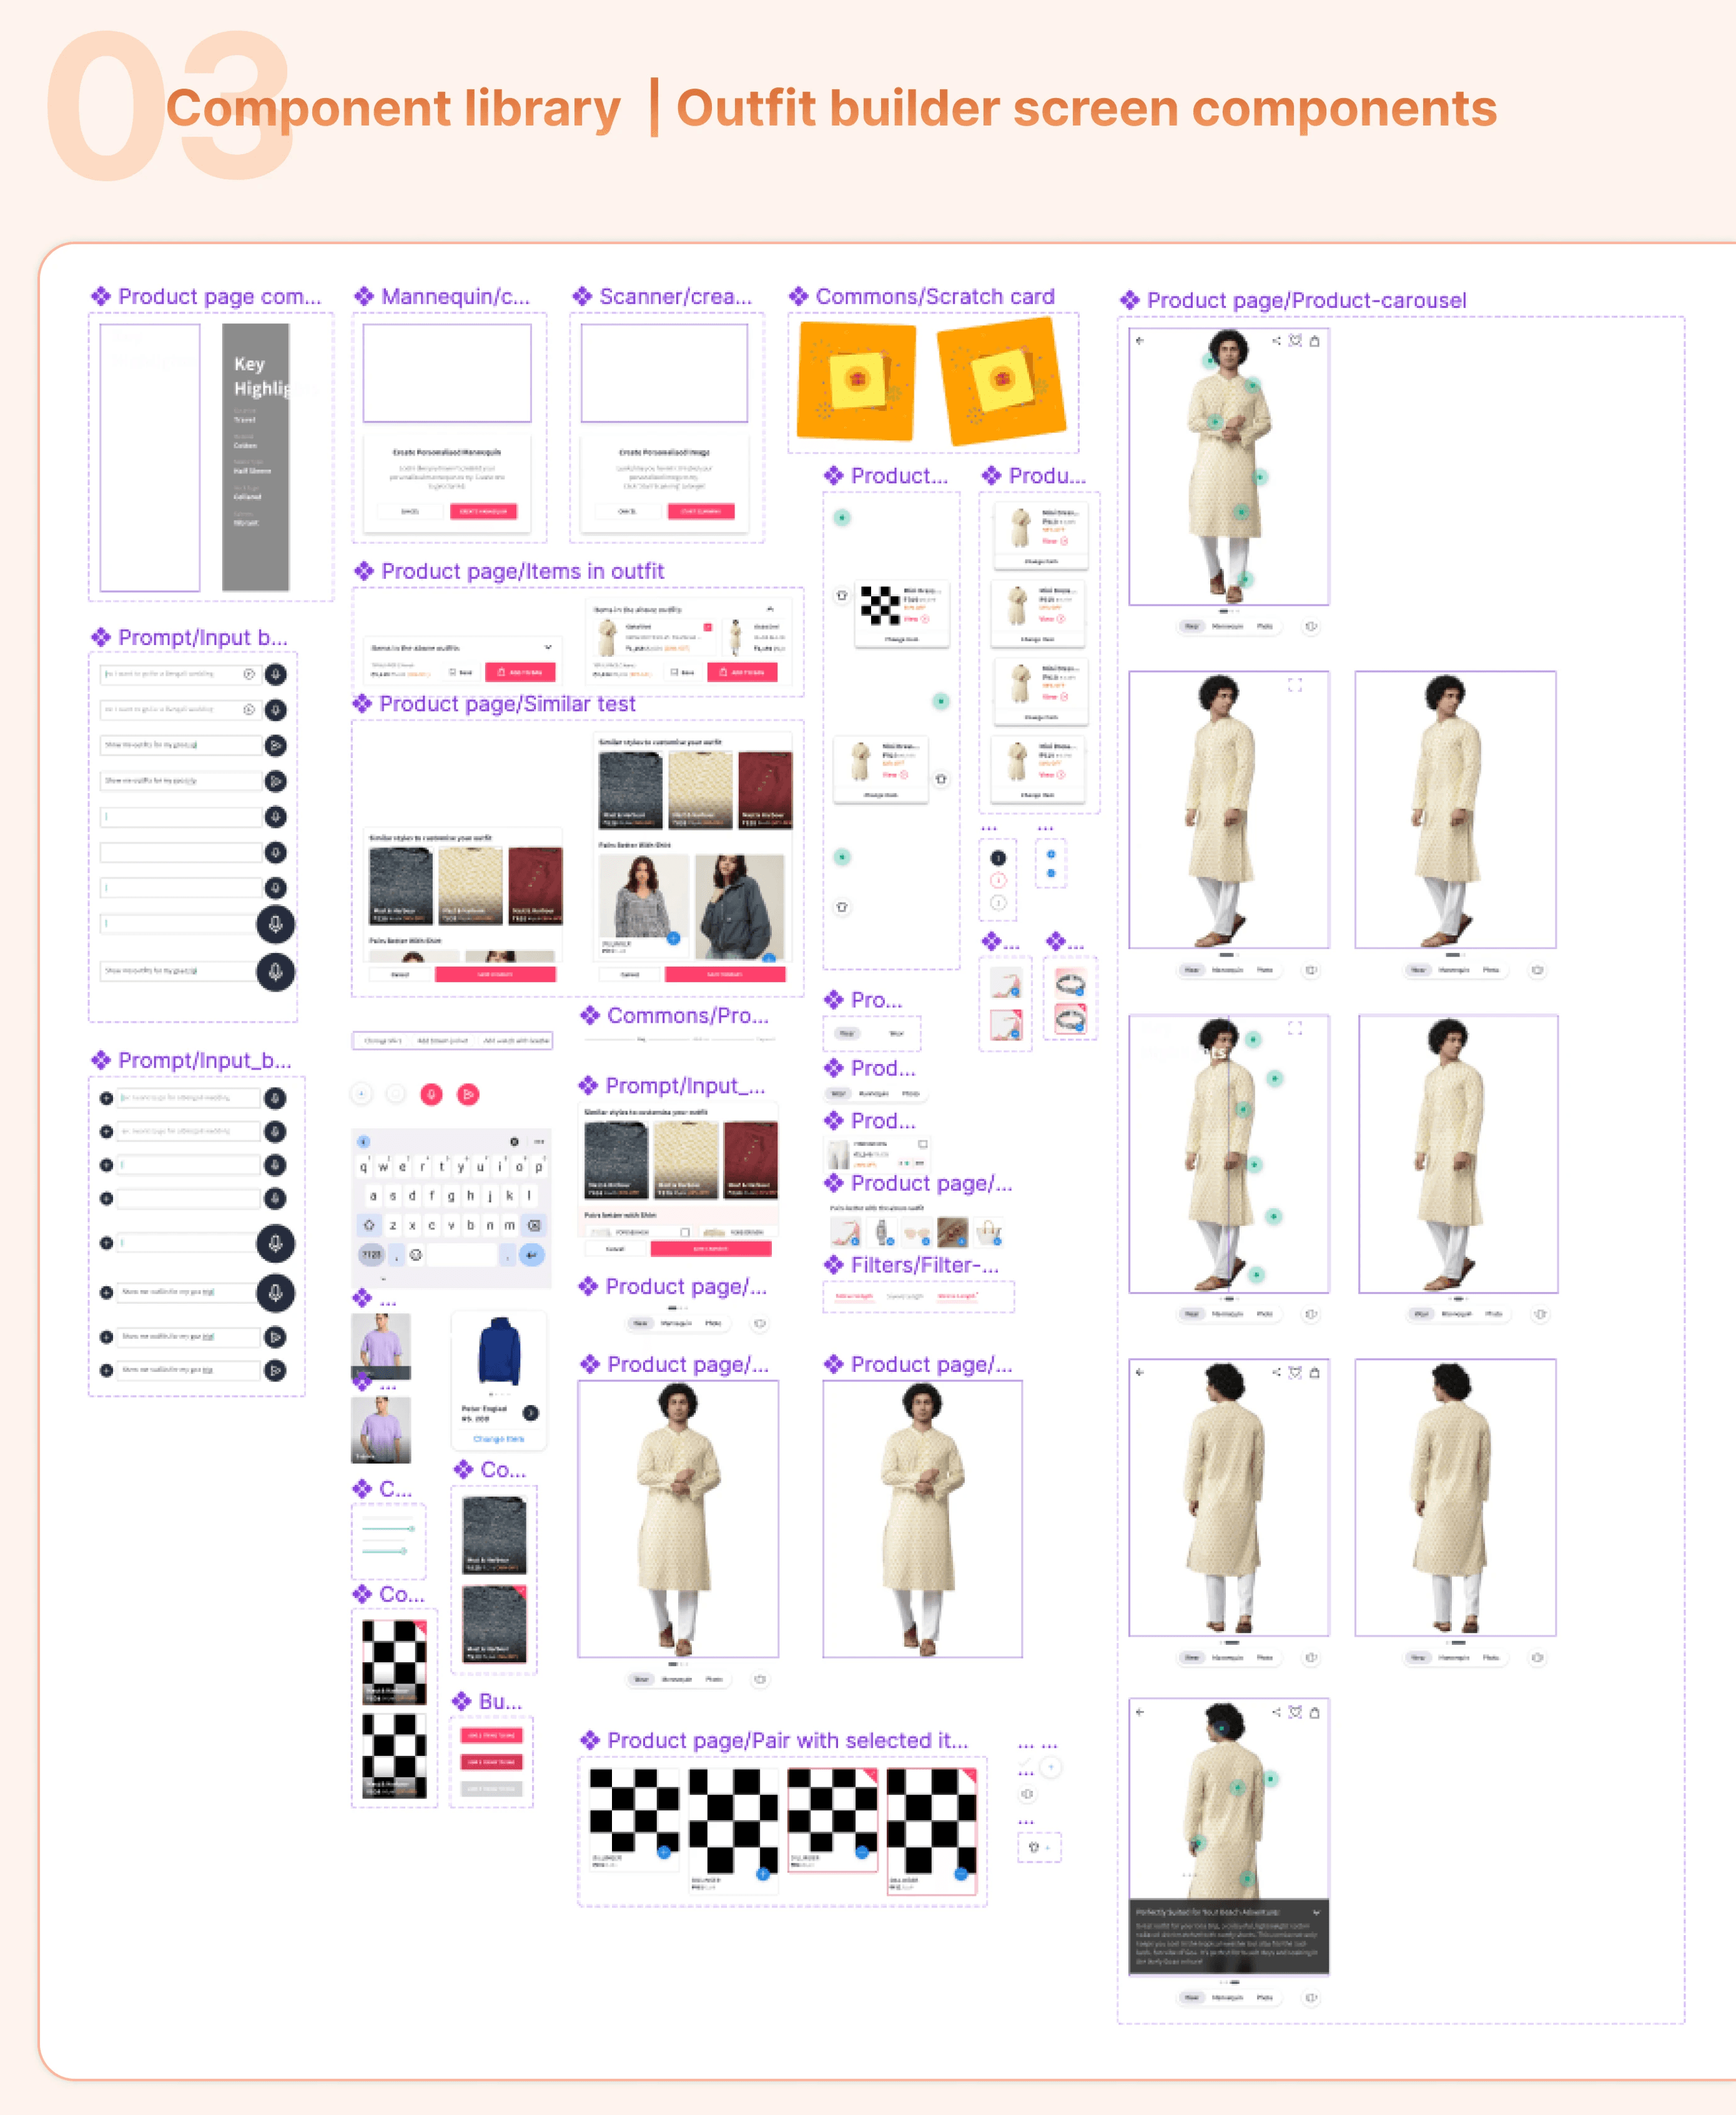
When adding VirtuFit to the Myntra app, I aimed for a seamless fit with their existing design. So, I recreated some of Myntra's components to maintain a consistent look and feel. Yet, because My feature needed some fresh elements, I designed new components inspired by Myntra's style. What's more, I crafted additional components after learning from user interactions and trying different ideas. Now, let's dive into this design journey together.
When adding VirtuFit to the Myntra app, I aimed for a seamless fit with their existing design. So, I recreated some of Myntra's components to maintain a consistent look and feel. Yet, because My feature needed some fresh elements, I designed new components inspired by Myntra's style. What's more, I crafted additional components after learning from user interactions and trying different ideas. Now, let's dive into this design journey together.
When adding VirtuFit to the Myntra app, I aimed for a seamless fit with their existing design. So, I recreated some of Myntra's components to maintain a consistent look and feel. Yet, because My feature needed some fresh elements, I designed new components inspired by Myntra's style. What's more, I crafted additional components after learning from user interactions and trying different ideas. Now, let's dive into this design journey together.
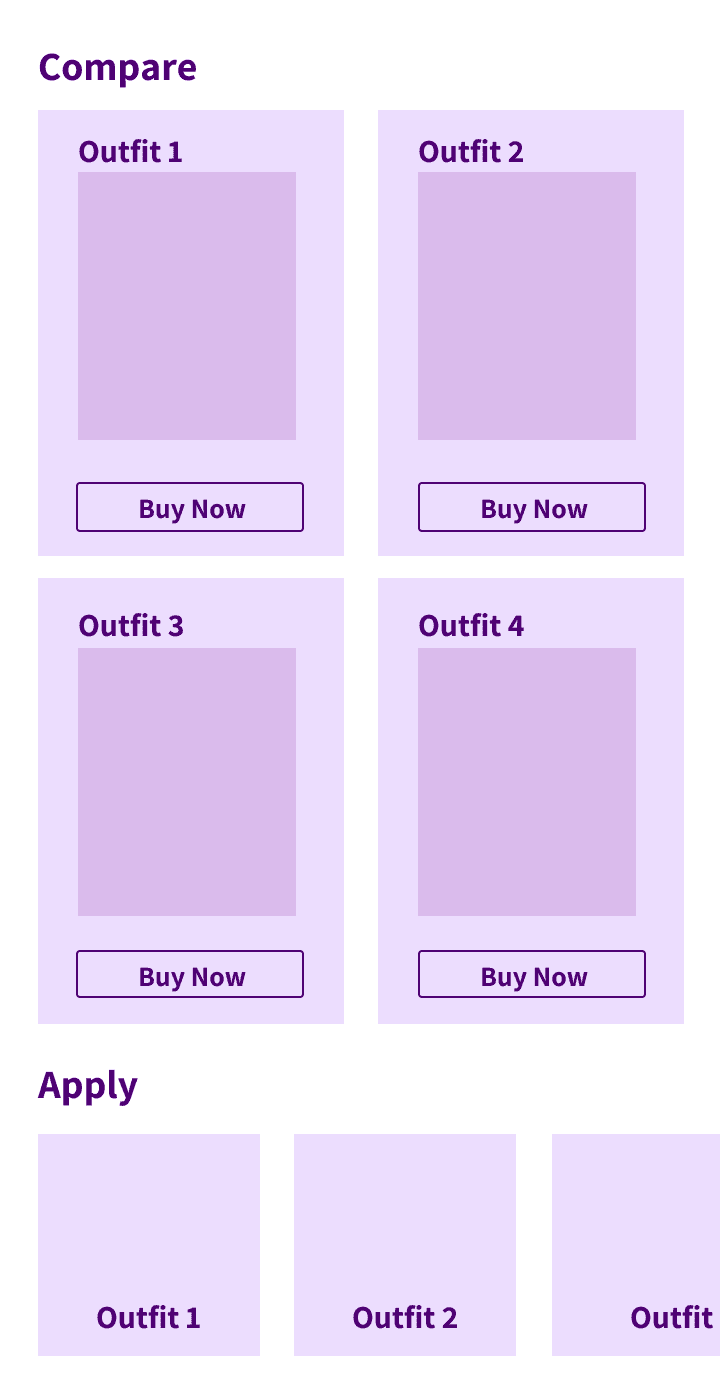
What's next for virtufit?
What's next for virtufit?
What's next for virtufit?
While doing the project, I've come across many ideas to make VirtuFit even better, but due to time constraints, I prioritised the most important ones for now. So, these are some exciting features I plan to add in the future. Let's continue this journey together! Here's a glimpse at what's to come:
While doing the project, I've come across many ideas to make VirtuFit even better, but due to time constraints, I prioritised the most important ones for now. So, these are some exciting features I plan to add in the future. Let's continue this journey together! Here's a glimpse at what's to come:
While doing the project, I've come across many ideas to make VirtuFit even better, but due to time constraints, I prioritised the most important ones for now. So, these are some exciting features I plan to add in the future. Let's continue this journey together! Here's a glimpse at what's to come:
Side-by-Side Comparisons: Users can try multiple outfits and see them side by side at time and they can compare which looks good for them.
Side-by-Side Comparisons: Users can try multiple outfits and see them side by side at time and they can compare which looks good for them.
Side-by-Side Comparisons: Users can try multiple outfits and see them side by side at time and they can compare which looks good for them.
Concept sketch
Concept sketch
Concept sketch
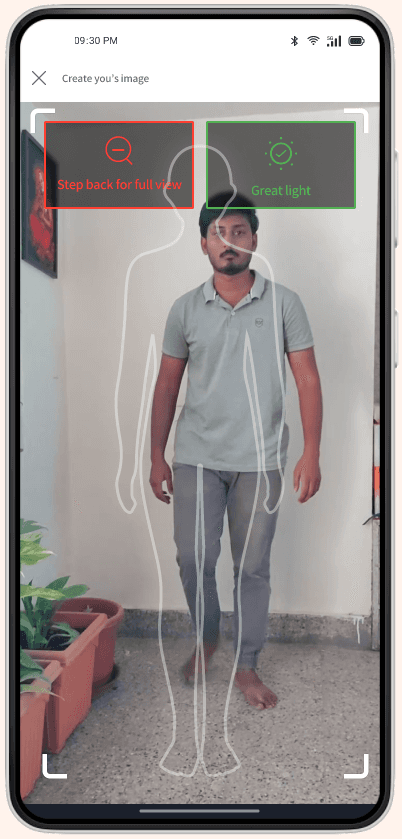
Screen - User scanning
Screen - User scanning
Screen - User scanning
Photo to analyse: Instead of scanning themselves, users could simply upload existing photos they already have. This would be easier and wouldn't require worrying about lighting or surroundings.
Photo to analyse: Instead of scanning themselves, users could simply upload existing photos they already have. This would be easier and wouldn't require worrying about lighting or surroundings.
Photo to analyse: Instead of scanning themselves, users could simply upload existing photos they already have. This would be easier and wouldn't require worrying about lighting or surroundings.
Advanced Settings: Sometimes due to inappropriate light or surroundings, user might not get better results in scanning so Users could be able to adjust the lighting and other settings to match their surroundings better.
Advanced Settings: Sometimes due to inappropriate light or surroundings, user might not get better results in scanning so Users could be able to adjust the lighting and other settings to match their surroundings better.
Advanced Settings: Sometimes due to inappropriate light or surroundings, user might not get better results in scanning so Users could be able to adjust the lighting and other settings to match their surroundings better.
Screen - User scanning
Screen - User scanning
Screen - User scanning
Try-On for All Products: Instead of having VirtuFit as a separate feature, users could virtually try on any product on Myntra directly.
Try-On for All Products: Instead of having VirtuFit as a separate feature, users could virtually try on any product on Myntra directly.
Try-On for All Products: Instead of having VirtuFit as a separate feature, users could virtually try on any product on Myntra directly.
What I've learned from this project?
What I've learned from this project?
What I've learned from this project?
Designing with the User in Mind: Initially, I designed a complex AI-driven prompt input system. However, user testing revealed that people preferred a simple manual input. This taught me the importance of always considering user needs and preferences when designing.
Designing with the User in Mind: Initially, I designed a complex AI-driven prompt input system. However, user testing revealed that people preferred a simple manual input. This taught me the importance of always considering user needs and preferences when designing.
Designing with the User in Mind: Initially, I designed a complex AI-driven prompt input system. However, user testing revealed that people preferred a simple manual input. This taught me the importance of always considering user needs and preferences when designing.
Balancing User Satisfaction and Time Constraints: This project highlighted the importance of enhancing the user experience even under time constraints. Balancing user satisfaction and time constraints is essential for successful design.
Balancing User Satisfaction and Time Constraints: This project highlighted the importance of enhancing the user experience even under time constraints. Balancing user satisfaction and time constraints is essential for successful design.
Balancing User Satisfaction and Time Constraints: This project highlighted the importance of enhancing the user experience even under time constraints. Balancing user satisfaction and time constraints is essential for successful design.
Inspirations helped me to take quick design decisions: looking at other designs for inspiration really helped me make better decisions. It's like learning from the experts and using their ideas to create something great.
Inspirations helped me to take quick design decisions: looking at other designs for inspiration really helped me make better decisions. It's like learning from the experts and using their ideas to create something great.
Inspirations helped me to take quick design decisions: looking at other designs for inspiration really helped me make better decisions. It's like learning from the experts and using their ideas to create something great.
Visual Consistency: by Maintaining a consistent design users can easily understand without confusion and easily navigate through different screens.
Visual Consistency: by Maintaining a consistent design users can easily understand without confusion and easily navigate through different screens.
Visual Consistency: by Maintaining a consistent design users can easily understand without confusion and easily navigate through different screens.
UX Anudeep
UX Anudeep
I'd like to express my sincere thanks to my mentor, UX Anudeep . Their guidance and support meant the world to me throughout this project. They were always there to help me when I faced challenges. I truly appreciate their contributions to my journey.
I'd like to express my sincere thanks to my mentor, . Their guidance and support meant the world to me throughout this project. They were always there to help me when I faced challenges. I truly appreciate their contributions to my journey.
I'd like to express my sincere thanks to my mentor, UX Anudeep. Their guidance and support meant the world to me throughout this project. They were always there to help me when I faced challenges. I truly appreciate their contributions to my journey.